|
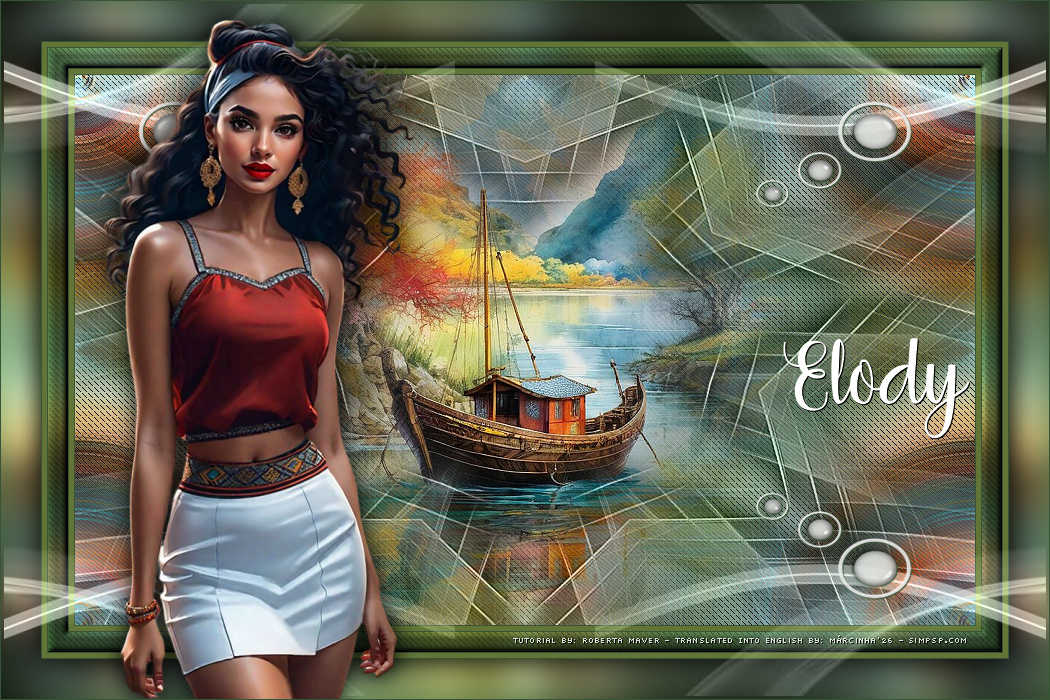
Translated into English by Márcinha
Original Tutorial:
|
IMPORTANT:
Sim PSP and its tutorial authors kindly ask you to:
- Please keep the tutorial
in its original form, refraining from adding or
including effects that were not requested;
- The use of other images is allowed and encouraged,
however, please do not modify the content of the original tutorial;
- Please acknowledge and give proper
credit to those who write tutorials, translate them,
and create the materials.
Note:
This tutorial was written by
Roberta Maver, and is
her sole responsibility.
Any resemblance to other tutorials is purely
coincidental.
Sim PSP only hosts and shares this tutorial so that everyone can
access and enjoy the content.
Sincerely,
SIM PSP and Roberta Maver
|
|
Tutorial made in PSP 2022
Tutorial tested, reviewed and translated into English
by Márcinha in PSP 2020
SUPPLIES:
1 Main Tube of your choice
1 Misted Landscape of your choice
PLUGINS:
Filter Factory gallery A > Mirror , Mirror:
L en K's >Frederiek:
Graphics Plus > Cross Shadow
*****************
I would like to thank the
tube and mask artists, without whom this project would not have been
possible.
When sharing or using their work, please keep the Tubes intact and
give proper credit to the creators.
Feel free to adjust the
Blend Modes to match the colors you are using.
Colorize the decorative elements whenever necessary, according to
the colors you have chosen.
*****************
TUTORIAL
1 - Open the material in PSP, duplicate it, and close the
original.
*Delete the Watermark from all
materials.
Choose two colors to work with.
Foreground #627436
Background #375436

2 - Open a transparent image 900 x 550 px.
Selections > Select All.
Edit > Copy from the imagem_byRobertaMaver file.
Edit > Paste Into Selection.
Selections > Select None.
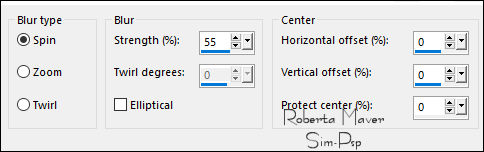
3 - Adjust > Blur > Radial Blur:
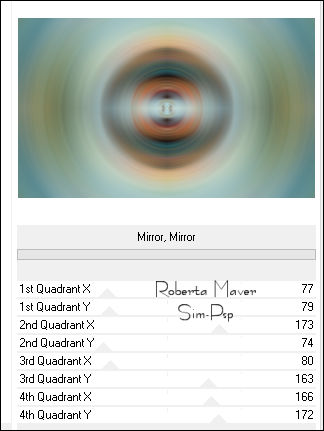
4 - Filters Unlimited 2.0 > Filter Factory Gallery A > Mirror, Mirror:
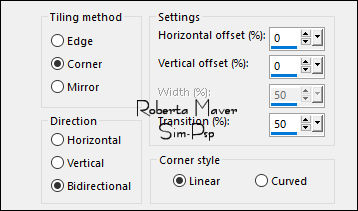
5 - Effects > Edge Effects > Enhance More.
Effects > Image Effects > Seamless Tiling: Default.
6 - Layers > Duplicate.
Effects > Plugins > L en K's > Frederiek:
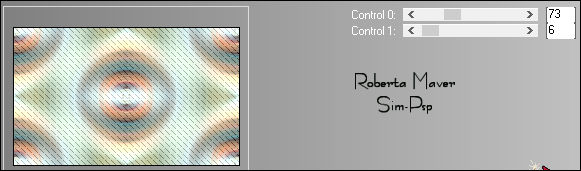
Layers > Properties > General > Blend Mode: Multiply
Effects > Edge effects > Enhance.
7 - Edit > Copy from the Decor01_byRobertaMaver
Edit > Paste As New Layer.
Layers > Properties > General > Blend Mode: Luminance (L)
Effects > 3D Effects > Drop Shadow: 0, 0, 100, 20, Color: #000000
8 - Edit > Copy from the Tube Paisagem_by RobertaMaver.
Edit > Paste As New Layer.
Image > Resize, if necessary. On the material's tube it was applied at 70%.
Adjust > Sharpness > Sharpen.
Layers > Arrange > Move Down.
9 - Image > Add Borders > Symmetric:
1px - color: Background #375436
5 px - color: Foreground #627436
1px - color: Background #375436
10 - Edit > Copy.
Selections > Select All.
Image > Add Borders > Symmetric: 20 px - any color.
Selections > Invert.
Edit > Paste Into Selection.
Adjust > Blur > Gaussian Blur: 15
11 - Selections > Promote Selection to layer.
Effects > Plugins > L en K's > Frederiek:
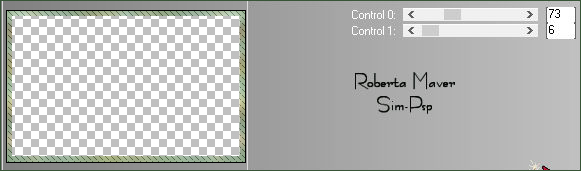
Layers > Properties > General > Blend Mode: Multiply.
Layers > Merge > Merge Down.
12 - Effects > 3D Effects > Inner Bevel.
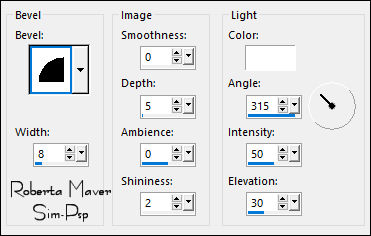
Selections > Select None.
13 - Image > Add Borders > Symmetric:
1 px - color: Background #375436
5 px - color: Foreground #627436
1px - color: Background #375436
14 - Selections > Select All.
Image > Add Borders > Symmetric: 40px - any color.
Selections > Invert.
Edit > Paste Into Selection.
Adjust > Blur > Gaussian Blur: 15
15 - Effects > Plugins > Graphics Plus > Cross Shadow > Default.
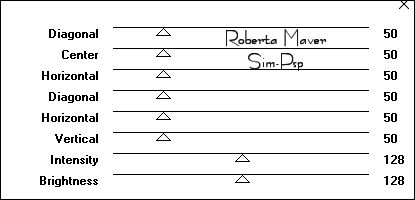
Selections > Invert.
Effects > 3D Effects > Drop Shadow: 0, 0, 100, 50, Color: #000000
Selections > Select None.
16 - Edit > Copy from the Decor02_byRobertaMaver
Edit > Paste As New Layer.
Layers > Properties > General > Blend Mode:
Luminance (L)
17 - Edit > Copy from
the Decor03_byRobertaMaver
Edit > Paste As New Layer.
Effects > 3D Effects > Drop Shadow: 1, 1, 100, 0, Color: Background #375436
18 - Edit > Copy from the Main Tube.
Edit > Paste As New Layer.
Image > Resize if necessary: on the material's tube it was
applied at 72%.
Position it on the left, or as preferred.
Apply Drop Shadow as preferred.
19 - Edit > Copy from the Titulo_byRobertaMaver
Edit > Paste As New Layer.
Position it on the right, or as preferred.
Effects > 3D Effects > Drop Shadow: 1, 1, 100, 0, Color:
#000000
20 - Image > Add Borders: 1 px - color: Background #375436
21 - Edit > Copy from the
Credito-TradByMarcinha file:

Edit >
Paste As New Layer and position it wherever you prefer.
Apply your watermark or signature.
File > Export > JPEG Optimizer...
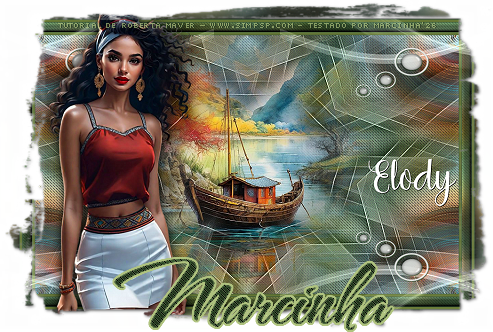
Credits:
Formatting, Final Artwork, and English Translation by
Márcinha
Tutorial by
Roberta Maver
-
Prints by
Roberta Maver
Main Tube and
Misted Landscape: Tubes by Roberta Maver
VERSION:
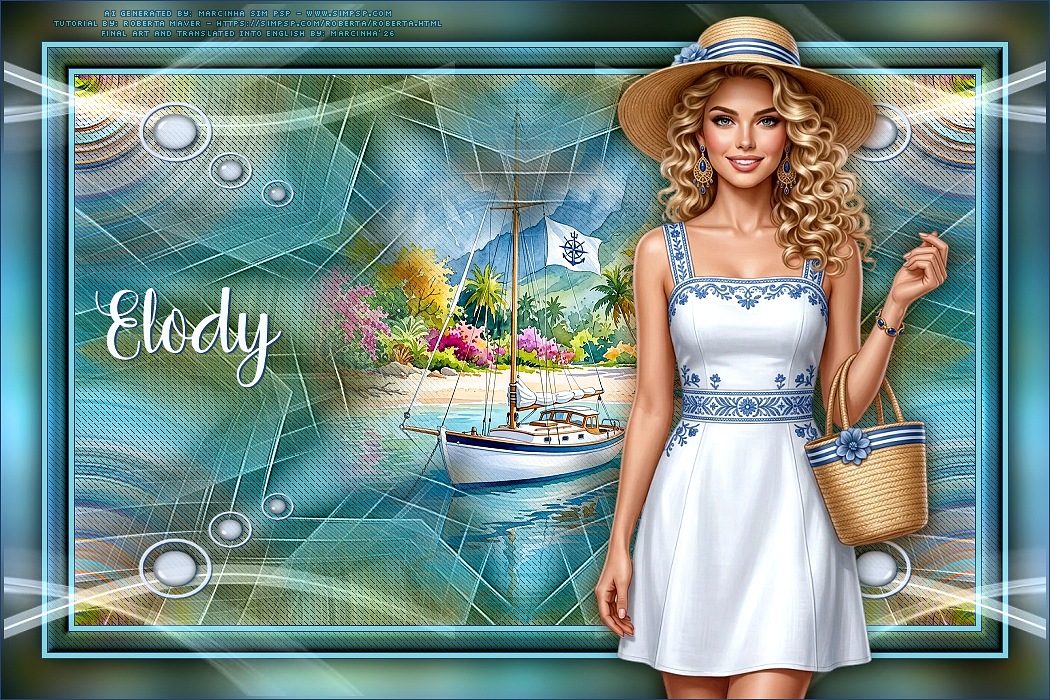
Version credits:
Formatting, Final Artwork, and English Translation by
Márcinha
Tutorial by:
Roberta Maver -
Main Tube and Misted: AI-generated by
Marcinha (SIM PSP)
Prints by
Roberta Maver
Feel free to send us your versions.
We would be delighted to publish them on our site.
Send your version to this e-mail:
robertamaver@gmail.com

SimPSP Social Media


|
This tutorial was created by
Roberta Maver
in August 2026, exclusively for the website:
https://simpsp.com
Tutorial tested, reviewed and translated
into English by Márcinha
in September 2026.
The content of this tutorial is the sole
responsibility of the author.
Sim PSP only hosts and shares it for promotional
purposes.
Partial or full reproduction is prohibited without proper
authorization from the author.
Respect the credits and encourage the creation of new
content! |
|