Translated into
English by Márcinha
Original Tutorial:
|
IMPORTANT:
Sim PSP and its tutorial authors kindly ask
that you:
- Please keep the tutorial's
originality, refraining from adding or
including effects that were not
requested;
- The use of other images is
allowed and encouraged, however, we ask
that you do not modify the content of the
original tutorial;
- Please acknowledge and give
proper credit to those who write
tutorials, make translations and create
the materials.
Note:
This tutorial was written by Leni
Diniz, and is her sole
responsibility.
Any resemblance to other tutorials is
purely coincidental.
Sim PSP only hosts and shares content so
that everyone can access and enjoy
it.
Sincerely,
SIM PSP and Leni Diniz |
SUPPLIES:
1 Main tube of your choice.
Other materials by Leni Diniz
PLUGINS:
Cybia > Screenworks
Simple > Top Left Mirror
Mehdi > Wavy Lab 1.1
dsb Flux > Linear Transmission
Mura's Meister > Perspective Tiling
Tutorial created in PSP 2020
Tutorial tested, reviewed and translated into English
by Márcinha in PSP 2020
*********
I thank the Tube artists for the Tubes and Masks, as without them this work would not have been possible.
When sharing or using them, please keep the Tubes intact and preserve the proper credits.
Feel free to adjust the blends according to the colors you are using.
Colorize the decorative elements whenever necessary to match your chosen colors.
********
TUTORIAL
01- Open the materials in PSP, duplicate them, and
close the originals.
*Delete the Watermark from all
materials.
02- Choose four colors to work with:

Color 1: Foreground: #396d94 (dark color) - Color 2:
Background: #bbddd7 (light color)
Extra Colors
Color 3: #2d5a78 (for some effects)

NOTE: The Blinds
effect will look better with a lighter or darker shade of the
palette,
depending on the shade where it will be applied, to give
contrast.
03- Activate the alpha_channel_silent_elegance file.
Effects > Plugins > Mehdi > Wavy Lab 1.1
Color sequence: 2 / 1 / colors indicated by the plugin
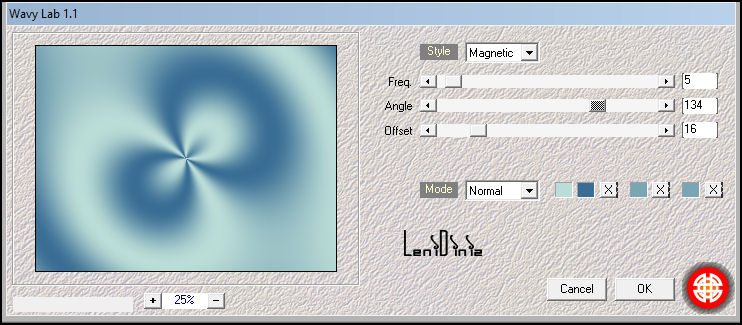
Copy the code and save
it from the color indicated by the plugin, we'll use it in the border effect:
Color 4: #7aa5b5

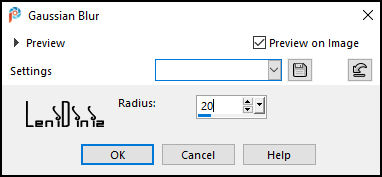
04- Adjust > Blur > Gaussian Blur: 20
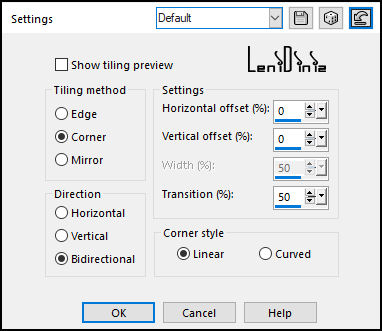
05- Effects > Image Effects > Seamless Tiling: Default
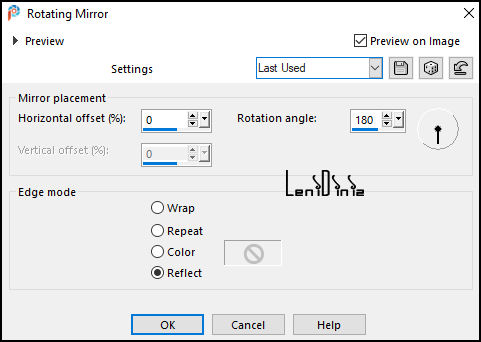
06- Effects > Reflection Effects > Rotating Mirror:
07- Effects > Plugins > dsb Flux > Linear Transmission:
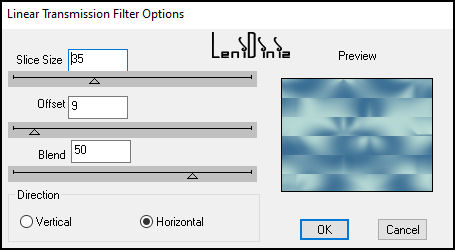
08- Effects > Plugins > Simple > Top Left Mirror:
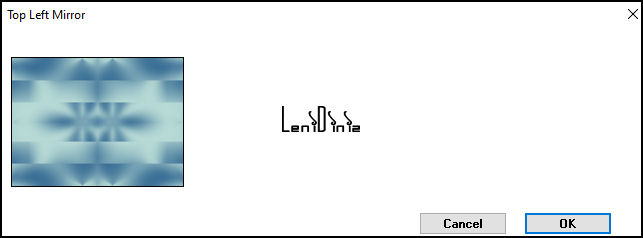
09-
Selections > Load/Save Selections > Load Selection from Alpha
Channel: leni #1
Selections > Promote Selection to Layer:
10- Effects > Texture Effects > Blinds:
Color 3: #2d5a78
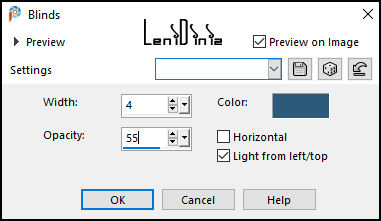
Selections > Select None.
11- Activate the Raster 1 layer.
Selections > Load/Save Selections > Load Selection from Alpha
Channel: leni #2
Selections > Promote Selection to Layer:
Layers > Arrange > Bring to Top.
12- Effects > Plugins > Cybia > Screenworks > Point Array:
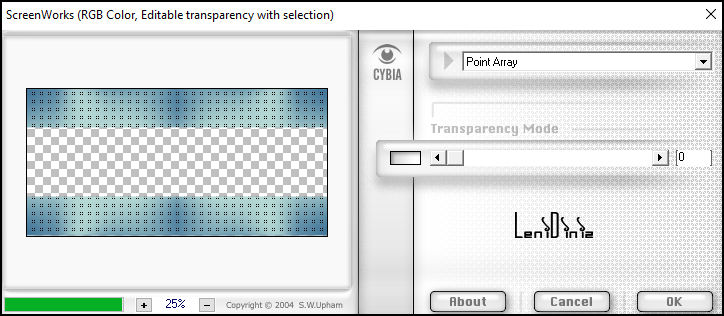
13- Effects > 3D Effects > Drop Shadow: 0, 0, 100, 30. Color:
with Color 3: #2d5a78
Edith > Repeat Drop Shadow.
Selections > Select None.
14- Edit > Copy Special > Copy Merged.
15- Edit > Paste As New Layer.
Effects > Plugins > Mura's Meister > Perspective Tiling: Height 10
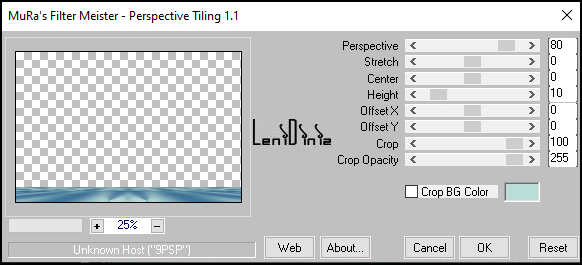
16- Objects > Align > Center in Canvas.
17- Effects > Geometric Effects > Circle:
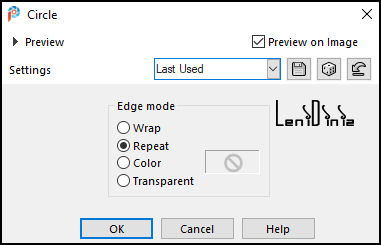
We'll get this result:
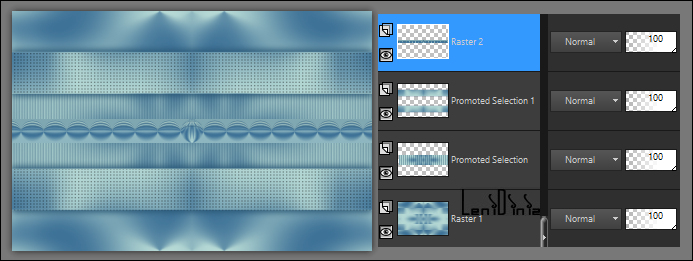
18- Layers > Duplicate.
Objects > Align > Top or
Pick tool: Position X: 0,00 - Position Y: 0,00
Press the "M" key to deactivate the "Pick
Tool".
19- Layers > Duplicate.
Objects > Align > Bottom or
Pick tool: Position X: 0,00 - Position Y: 540,00
Press the "M" key to deactivate the "Pick
Tool".
Layer position:
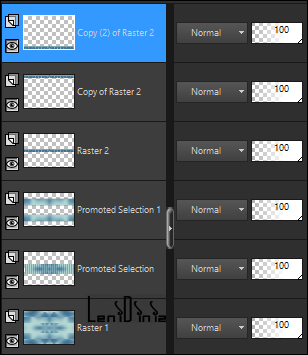
20- Activate the Raster 2 layer.
Effects > Geometric
Effects > Circle
21- Activate the Copy (2) of Raster 2 layer (top).
Layers > Merge > Merge Visible.
Layers > Duplicate.
22- Layers > Properties > General > Blend Mode: Multiply > Opacity:
100.
Layers > Merge > Merge Down.
23- Layers > New Raster Layer.
Selections > Select All.
Selections > Modify > Contract: 100
Effects > 3D Effects > Drop Shadow: 0, 0, 100, 50, Color:
with Color 3: #2d5a78.
Selections > Select None.
24- Effects > Geometric Effects > Skew.
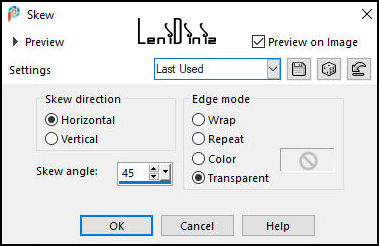
25- Layers > Duplicate.
Image > Mirror > Mirror Horizontal.
Layers > Merge > Merge Down.
26- Layers > New Raster Layer.
Selections > Load/Save Selections > Load Selection from Alpha
Channel: leni #3
Effects > 3D Effects > Drop Shadow: 0, 0, 100, 50, Color: with
Color 3: #2d5a78.
Selections > Select None.
27- Effects > Geometric Effects > Skew.
Layers > Duplicate.
Image > Mirror > Mirror Horizontal.
Layers > Merge > Merge
Down.
Again > Layers > Merge > Merge Down.
Layers > Properties >
General > Blend Mode: Multiply > Opacity: 100.
Result so far:
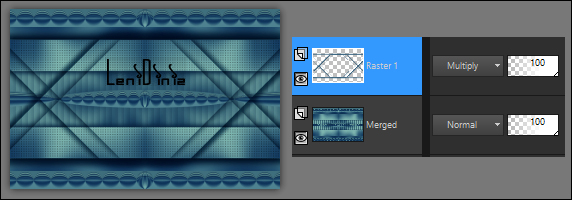
28- Edit > Copy Special > Copy Merged.
29- Image > Add Borders:
2px - symmetric - color > #396d94 Foreground (dark color)
2px - symmetric - color > #bbddd7 Background (light color)
2px - symmetric - color > #396d94 Foreground (dark color)
2px - symmetric - color > #bbddd7 Background (light color)
2px - symmetric - color > #396d94 Foreground (dark color)
30- Selections > Select All.
Image > Add Borders > 50px - symmetric - any color
Selections > Invert.
Edit > paste into selection.
31- Adjust > Blur > Gaussian Blur > 20
32- Effects > Texture Effects > Blinds:
Color: with Color 4:
#7aa5b5
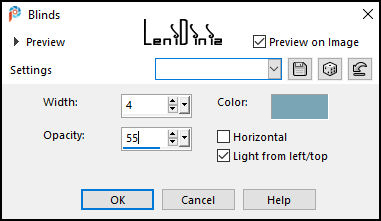
33- Selections > Invert.
Effects > 3D Effects > Drop Shadow: 0, 0, 100, 50, color #000000
Selections > Select None.
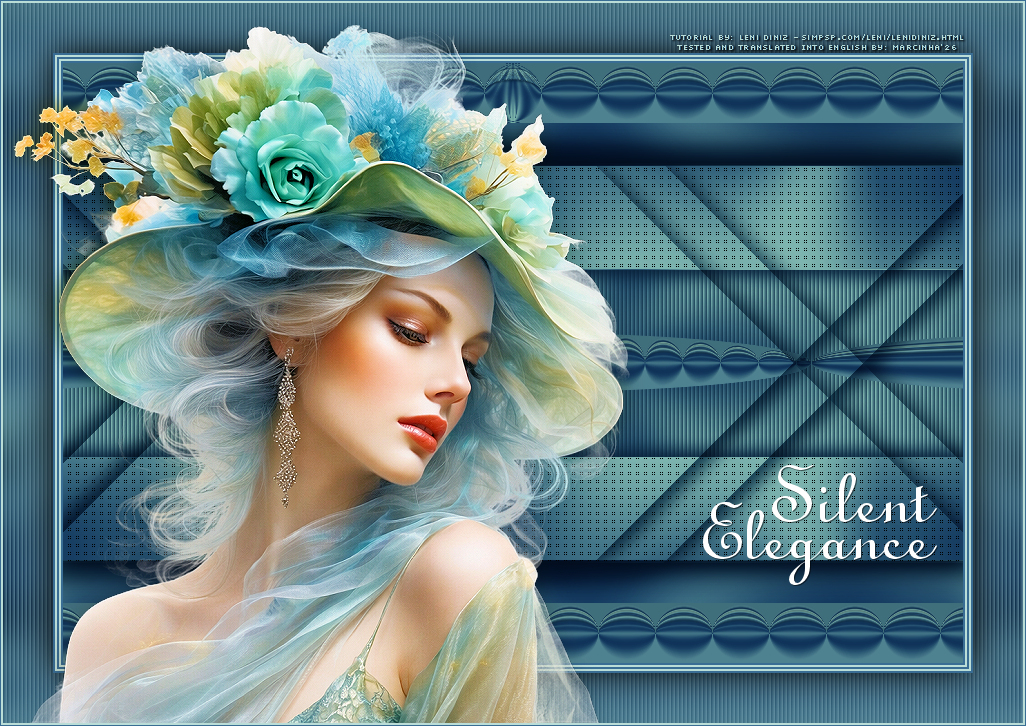
34- Edit > Copy from the Silent Elegance Title
going back to the work,
Edit > Paste As New Layer.
Pick Tool: Position X: 700 Position Y: 461
Press the "M" key to deactivate the "Pick
Tool".
Effects > 3D Effects > Drop Shadow: 1, 1, 50, 0, color #000000
35-
Edit > Copy from the Main tube file.
Going back to the work...
Edit > Paste As New Layer.
Image > Resize, if necessary. On the tube used in
the material, 69% was applied.
Adjust > Sharpness > Sharpen.
Position on the left.
Effects > 3D Effects > Drop Shadow: of your choice.
36- Image > Add Borders:
2px - symmetric - color > #bbddd7 Background (light
color)
1px - symmetric - color > #396d94 Foreground (dark
color
37- Edit >
Copy from the Credit-Tutorial_byLeniDiniz.

Position as you prefer.
Apply your watermark or signature.
File > Export > JPEG Optimizer...
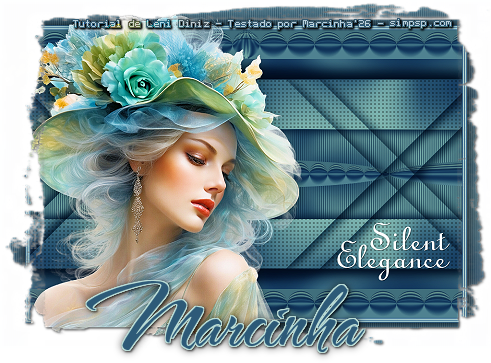
VERSION:
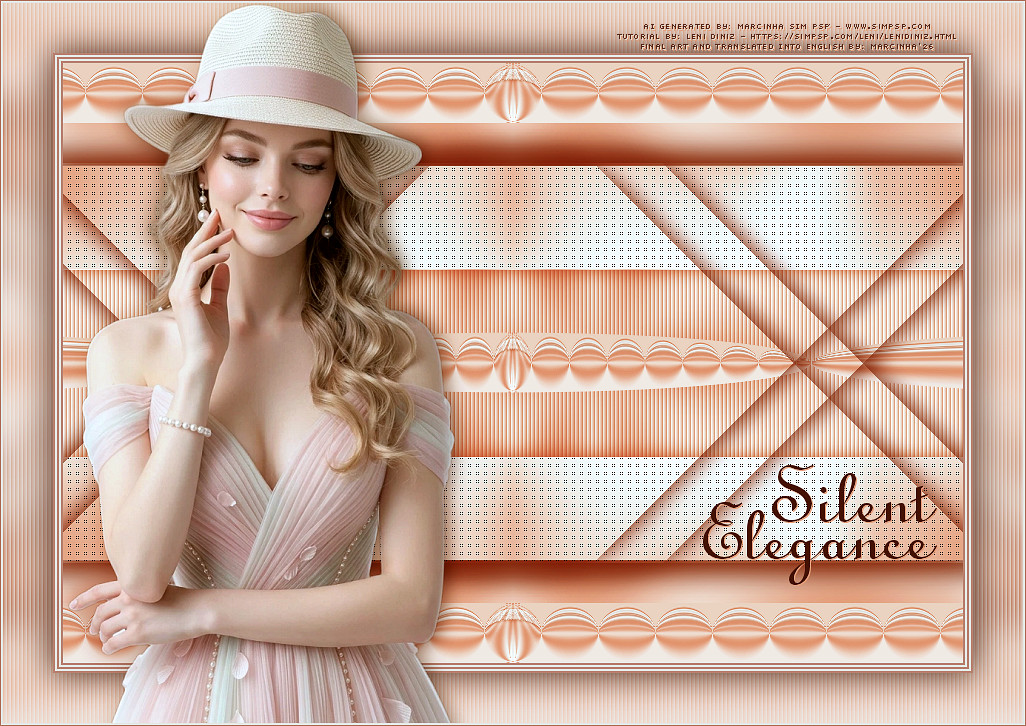
Version credits:
Formatting, Final Artwork, and English Translation by
Márcinha
Tutorial: by
Leni Diniz -
Main Tube: AI-generated by
Marcinha (SIM PSP)
Prints by
Leni Diniz
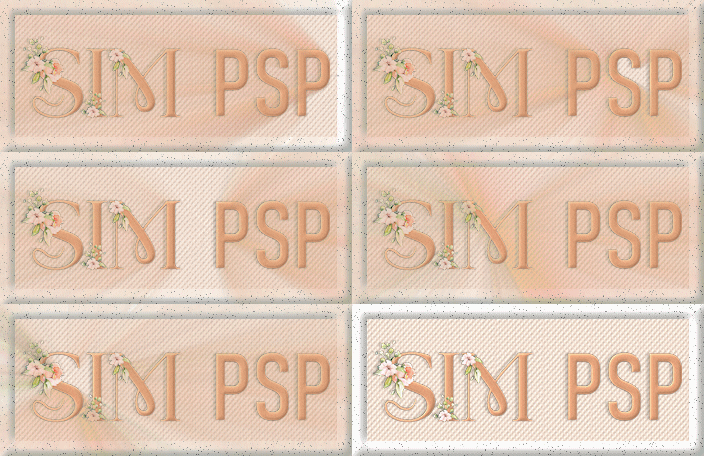
Feel free to send in your versions.
I will be delighted to publish them on our
site.
Send your version to the email:
familia.olgador@gmail.com
SimPSP Social Media


|
This tutorial was created by Leni
Diniz in
March 2026, exclusively for the SIM PSP site: https://simpsp.com
Tutorial tested, reviewed and translated
into English by Marcinha
in August 2026.
The content of this tutorial is the sole
responsibility of the author.
Sim PSP only hosts and shares it for
promotional purposes.
Partial or full reproduction is prohibited without
the author's proper authorization.
Respect the credits and encourage the creation of new
content! |
|