|
Style is a way to say
TRADUÇÕES:
Obrigada aos nossos tradutores!
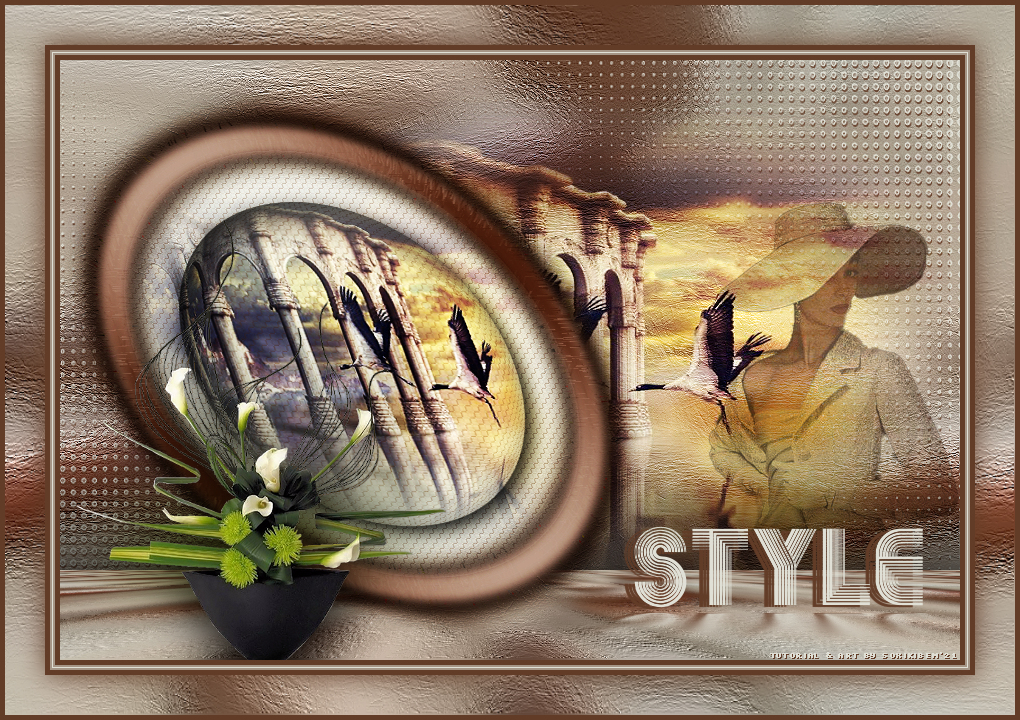
MATERIAL 1 Tube Principal à sua escolha 1 Misted Paisagem à sua escolha 1 Tube decorativo StyleTituloSoxikibem NarahsMasks_1604 glass_soxiki20 * clique duas vezes no arquivo glass_soxiki20 para importar o efeito para dentro do plugin Alien Skin Eye Candy 5 Impact
Plugins Alien Skin Eye Candy 5 Impact Mura's Meister
Execução
1 - Abrir o material no PSP, duplique e feche os originais. Escolher 4 cores para trabalhar, aqui usei as cores:
Cor 1: Foreground #623c27 Cor 2: Background #dbc3a7 Cor 3: #a59586 Cor 4: #e0e0d6
2 - Abra uma transparência de 900x600px. Pintar com a cor do foreground. Selections > Select All. Edit > Copy no tube principal. Edit > Paste Into Selection. Selections > Select None.
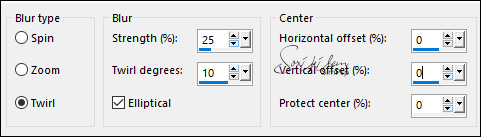
3 - Effects > Image Effects > Seamless Tiling: Default. Adjust > Blur > Radial Blur.
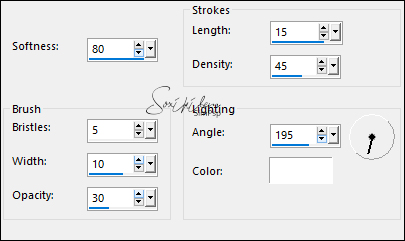
4 - Effects > Art Media Effect > Brush Strokes.
5 - Layers > New Raster Layer. Pintar com a cor do Foreground. Effects > Geometric Effects > Circle: Transparent. Image > Resize 80%, all layers desmarcado.
6 - Selections > Select All. Selections > Float. Selections > Defloat. Selections > Modify > Contract: 30. Aperte a tecla Delete do teclado.
7 - Layers > New Raster Layer. Selections > Modify > Expand: 5. Pintar com a cor 4.
8 - Edit > Copy no Misted Paisagem. Edit > Paste Into Selection. Adjust > Sharpness > Sharpen.
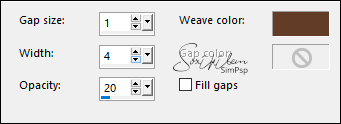
9 - Effects > Texture Effects > Weave.
Adjust > Sharpness > Sharpen.
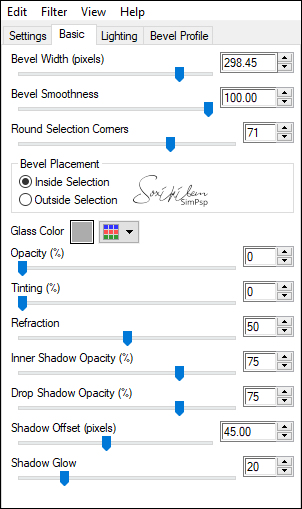
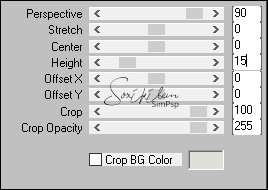
10 - Plugin Alien Skin Eye Candy 5 Impact > Glass: glass_soxiki20 ou configure como abaixo * clique duas vezes no arquivo glass_soxiki20 para importar o efeito para dentro do plugin Alien Skin Eye Candy 5 Impact
Selections > Select None. Layers > Arrange > Move Down.
11 - Ative a Layer Raster 2. Layers > Duplicate. Ative novamente a layer Raster 2. Effects > Art Media Effect > Brush Strokes.
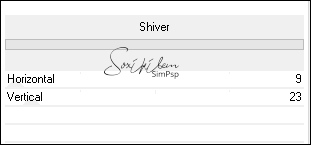
12 - Ativar a layer Copy of Raster 2. Filters Unlimited 2.0 > Special Effects 1 > Shiver: 9, 23.
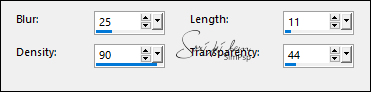
13 - Effects > Texture Effects > Fur.
14 - Effects > 3D Effects > Drop Shadow: 0, 0, 100, 40, cor preta.
15 - Fechar a visibilidade da layer Raster 1. Layers > Merge > Merge Visibile. Abra a visibilidade da Layer Raster 1.
16 - Layer Merged ativa. Effects > Geometric Effects > Skew.
Posicione com a Ferramenta Pick Tool: Position X 0, Position Y 30.
17 - Ative a layer Raster 1. Layers > Duplicate. Plugin Mura's Meister > Perspective Tiling.
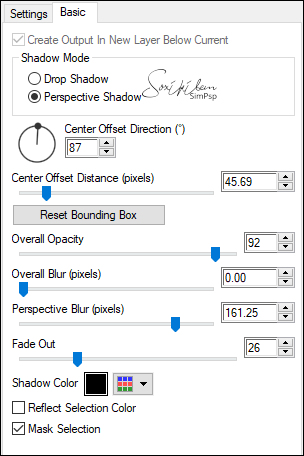
18 - Plugin Alien Skin Eye Candy 5 Impact > Perspective Shadow: Settings Cast on Wall.
19 - Layers > New Raster Layer. Selections > Select All. Edit > Copy no Misted Paisagem. Edit > Paste Into Selection. Selections > Select None. Layers > Properties > General > Blend Mode: Hard Light ou como preferir. Layers > Arrange > Move Down.
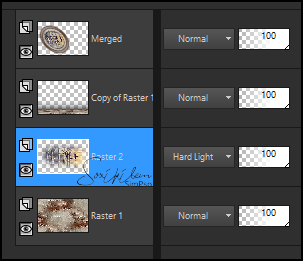
20 - Verifique as Layers.
21 - Com a layer Raster 2 ativada... Edit > Copy no tube principal. Edit > Paste a new Layer. Posicione à direita. Layers > Properties >General > Blend Mode: Multiply, Opacity 70%, ou como preferir.
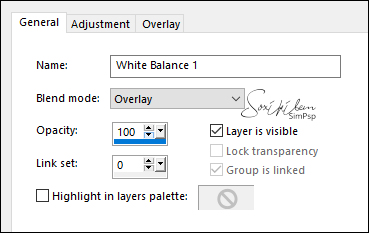
22 - Ative a layer Merged. Selections > Select All. Selections > Float. Selections > Defloat. Layers > Adjustment Layer > White Balance. Aba General:
Selections > Select None. Item 22 é opcional
23 - Ative a Layer Raster 1. Layers > New Raster Layer. Pintar com a cor 4. Layers > New Mask Layer > From Image: NarahsMasks_1604. Effects > Edge Effects > Enhance. Layers . Merge > Merge Group.
24 - Effects > 3D Effects > Drop Shadow: 2, -10, 100, 1, com a cor do foreground.
25 - Ative a layer do topo. Edit > Copy no tube decorativo. Edit > Paste a New Layer. Posicione à esquerda. Effects > 3D Effects > Drop Shadow como preferir.
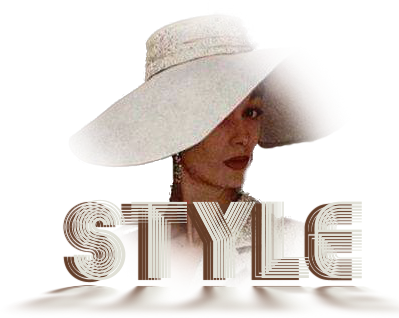
26 - Edit > Copy no StyleTituloSoxikibem. Edit > Paste a New Layer. Pick Tool: Position X 501, Position Y 466.
27 - Ative a layer Raster 1. Edit > Copy.
28 - Image > Add Borders: 5px cor 1 2px cor 3 1px cor 4 2px cor 3 5px cor 1 Selections > Select All. Image > Add Borders: 40px com qualquer cor. Selections > Invert. Edit > Paste Into Selection. Selections > Invert.
29 - Effects > 3D Effects > Drop Shadow: 0, 0, 100, 40, com a cor 1. Selections > Select None.
30 - Image > Add Borders: 5px com a cor 1.
31 - Aplicar sua marca d'água ou assinatura. File > Export > JPEG Optimizer.
CREDITOS Tube by Naise M - Misted by Colybrix - Mask by Narah Tube Vaso by Nena Silva - Fonte akka.TTF
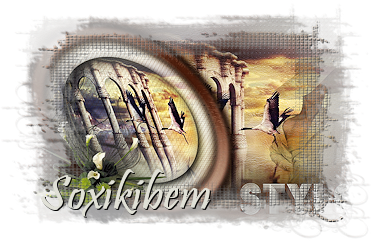
Tutorial by Soxikibem'21
Sinta-se à vontade para enviar suas versões. Terei todo o prazer em publicá-las em nosso site.
|