|
TRADUÇÕES:
Obrigada aos nossos tradutores!
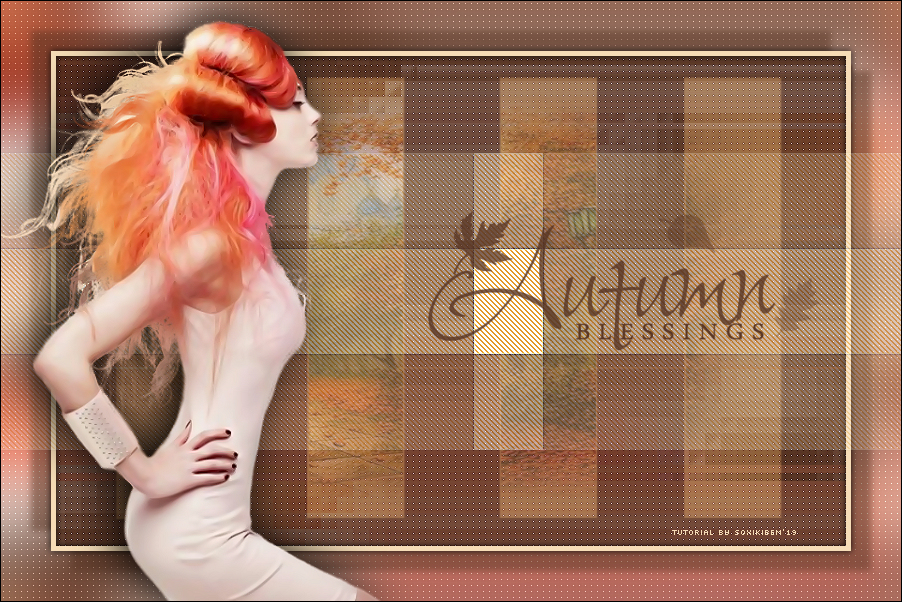
MATERIAL 1 Tube principal à sua escolha 1 Tube Misted Paisagem à sua escolha autumn_blessings_soxikibem,pspimage, WordArt, Narah_Mask_1263
Plugins Carolaine and Sensibility Filters Unlimited 2.0 Italian Editors Effect Xero
Execução
1 - Abra o material no PSP. Escolha duas cores: Foreground > cor #573423 Background > #f6ddb7
2 - Abrir o arquivo autumn_blessings_soxikibem.pspimage.
3 - Pinte com a cor do Foreground > cor #573423 Selections > Select All. Edit > Copy no tube. Edit > paste into selection. Selections > Select None.
4 - Effects > Image Effects > Seamless Tiling: Default.
5 - Adjust > Blur > Motion Blur: Angle 50, Strngth 100. Edit > Repeat Motion Blur.
6 - Effects > Edge Effects > Enhance. Edit > Repeat Enhance Edges.
7 - Plugin Carolaine and Sensibility > cs-HLines: 100, 140, 0.
8 - Filters unlimited 2.0 > BKg Designer sf10 II > Hinzeberg's Mirror 01: 14.
9 - Layers > New Raster Layer Selections > Load/Save Selections > Load Slection From Alpha Channel: rec1_xiki. Pintar a seleção com a cor do Foreground > cor #573423
10 - Plugin Carolaine and Sensibility > cs-LDots: 50, 3, 2.
11 - Effects > Edge Effects: Enhance. Layers > Properties > General > Opacity: 80%
12 - Layers > New Raster Layer Pintar a seleção com a cor do Background > #f6ddb7
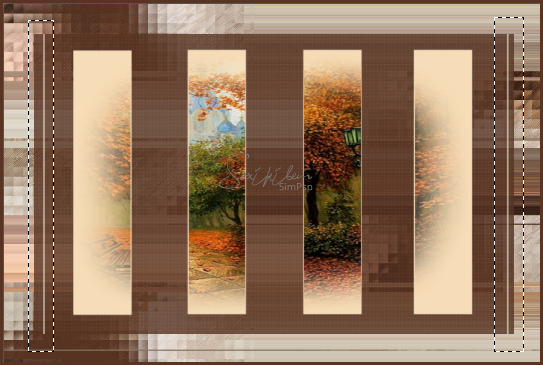
13 - Layers > New Mask Layer > Form Image > Narah_Mask_1263 Layers > Merge > Merge Group. Selections > Select None. Com a ferramenta Selection, selecione as linhas como indica a imagem abaixo:
Edit > Cut (Ou aperte a tecla Delete do teclado) Selections > Select None. Layers > Properties > General > Blend Mode: Soft Light.
14 - Layers > New Raster Layer. Selections > Load/Save Selections > Load Slection From Alpha Channel: rec2_xiki.
15 - Edit > Copy no misted Paisagem. Edit > Paste Into Selection. Selections > Select None. Plugin Xero > Porcelain nas configurações originais. Layers > Properties > General > Opacity: 60%
16- Clique na última layer. Selections > Select All. Selections > Modify > contrat: 50px.
17 - Selections > Invert. Adjust > Blur > Gaussian Blur: 30.
18 - Plugin Carolaine and Sensibility > cs-LDots: 50, 3, 2.
19 - Adjust > Sharpness > Sharpen More.
20 - Selections > Invert. Effects > 3D Effects > Drop Shadow: 20, 20, 50, 10, com a cor do foreground: #573423.
21 - Repetir o Drop shadow mudando o valor em vertical e horizontal para -20.
22 - Ainda selecionado, ativar a layer que está no do topo de todas. Layers > New Raster Layer Pintar a seleção com a cor do Background > #f6ddb7
23 - Selections > Modify > Contrat: 5. Aperte a tecla Delete do teclado ou Edit > Cut. Selections > Select None.
24 - Effects > 3D Effects > Drop Shadow: 0, 0, 100, 10, cor #00000.
25 - Edit> Copy no tube principal. Edit > paste as new layer. Posicionar à esquerda. Effects > 3D Effects > Drop Shadow: a sua escolha.
26 - Layers > New Raster Layer. Selections > Load/Save Selections > Load Slection From Alpha Channel: rec3_xiki. Pintar a seleção com a cor do Background > #f6ddb7 Selections > Select None. Layers > Arrange > Move Down.
27 - Plugin Italian Editors Effect > Effetto Fantasma: 147, 41.
28 - Plugin Carolaine and Sensibility > cs-DLines: 155, 5.
29 - Effects > Edge Effects: Enhance.
30 - Abra a wordart e export como custom Brush.
31 - Layers > New Raster Layer. Com a Ferramenta Brush aplicar com uma das cores escolhidas.
32 - Image > Add Borders > 1px - symmetric - color: #000000 Se você desejar redimensione seu trabalho. Aplicar sua marca d'água ou assinatura. File > Export > JPEG Optimizer...
CREDITOS: Tube by GraphicsBeatrice - Misted paisagem by Alenza - Mask by Narah - WordArt by KathyFrances Versao2: Tube by Lily - Misted Paisagem Aqui
Tutorial by Soxikibem'19
Sinta-se à vontade para enviar suas versões. Terei todo o prazer em publicá-las em nosso site.
|