|
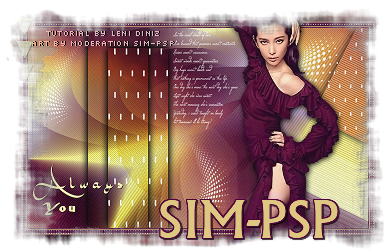
Tutorial By LeniDiniz English Translation by SIM-PSP moderation Original Tutorial
Material 1 Main Tube of your choice alpha_chanel_alwaysyou_leni decor_alwaysyou1_leni decor_alwaysyou2_leni decor_alwaysyou3_leni
titulo_alwaysyou_leni
TUTORIAL
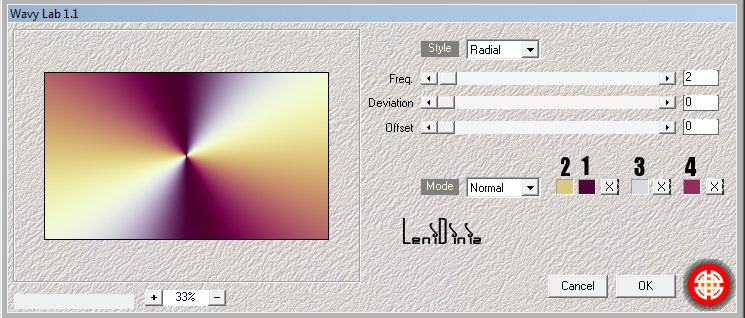
01 - Open the material on the PSP, duplicate and close the original. Choose 4 colors to work with. Color 1: #4f023a - Foreground Color 2: #dec781 - Background Color 3: #dad9df Color 4: #923a6c
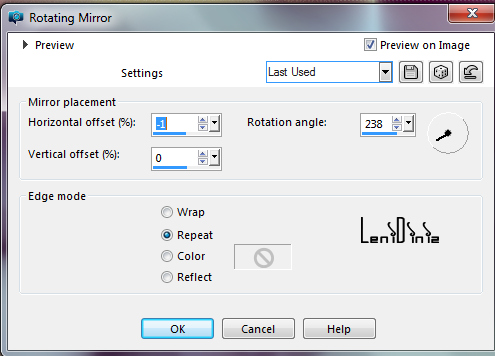
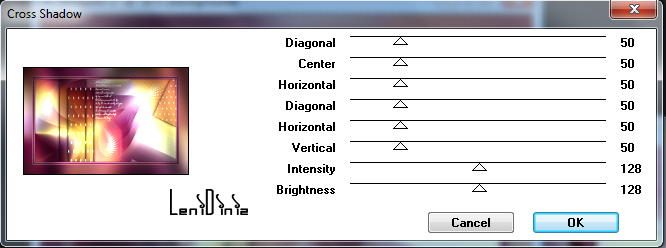
Effects > Plugin Mehdi > Wavy Lab 1.1: Configure the colors in the sequence indicated...
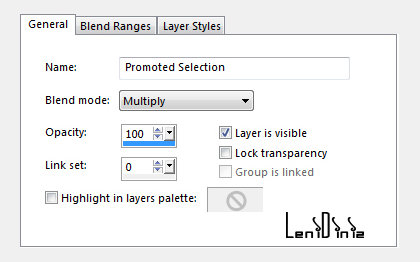
Layers > Properties > General > Blend Mode: Multiply... *Feel free to change the blend mode according to the colors you are using.
Selections > Load/Save Selections > Load Selection from Alpha Channel: alwaysyou #1 Selections > Promote Selection to Layer. Selections > Select None Effects > 3D Effects > Drop Shadow: 0, 0, 100, 30, color: #000000 Layers > Properties > General > Blend Mode: Multiply.
Selections > Load/Save Selections > Load Selection from Alpha Channel: alwaysyou #2 Selections > Promote Selection to layer. Effects > 3D Effects > Drop Shadow: 0, 0, 100, 30, color: #000000 Layers > Properties > General > Blend Mode: Multiply. Still with the selection, activate the top layer ...
Edit > Copy no decor_alwaysyou_1_leni Edit > Paste Into Selection. Layers > Duplicate. Layer > Merge > Merge Down. Selections > Select None.
Selections > Load/Save Selections > Load Selection from Alpha Channel: alwaysyou #3 Effects > Edge effects > Enhance. Effects > 3D Effects > Drop Shadow: 0, 0, 100, 30, color: #000000
Layers > New Raster Layer Edit > Paste Into Selection. Layers > Duplicate. Layer > Merge > Merge Down. Selections > Select None.
Edit > Paste as new layer. With the Pick Tool, position: Position X 360 Position Y 5
Edit > Paste as new layer.
Objects > Align > Left. Image > Add Borders > Symmetric: 2 px color: background
18 - Selections > Select All. Image > Add Borders > Symmetric: 10 px - color: foreground.
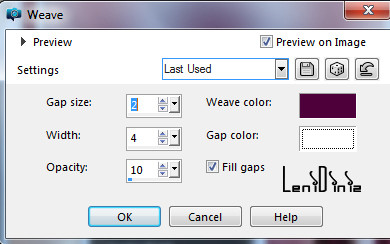
Selections > Invert. Weave color: foreground Gap color: #FFFFFF
Image > Add Borders > Symmetric: 2 px color: foreground
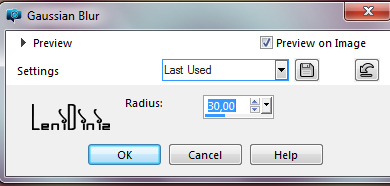
Image > Add Borders > Symmetric: 50 px with any color Selections > Invert. Edit > paste into selection. Adjust > Blur > Gaussian Blur: 30
Color: Foreground
Effects > 3D Effects > Drop Shadow: 0, 0, 100, 40, color: #000000
Selections > None. Edit > Paste As New Layer. Image > Resize if necessary. Adjust > Sharpness > Sharpen. Position to the right.
Effects > 3D Effects
> Drop Shadow:
as you prefer. Edit > Paste As New Layer. With the Pick Tool, position: Position X 40 Position Y 42.
Effects > 3D Effects
> Drop Shadow: 1 / 1 / 100 / 1, color: #000000
Edit > Paste As New Layer. Effects > 3D Effects > Drop Shadow: 1 / 1 / 100 / 1, color: #000000
Position to your choice.
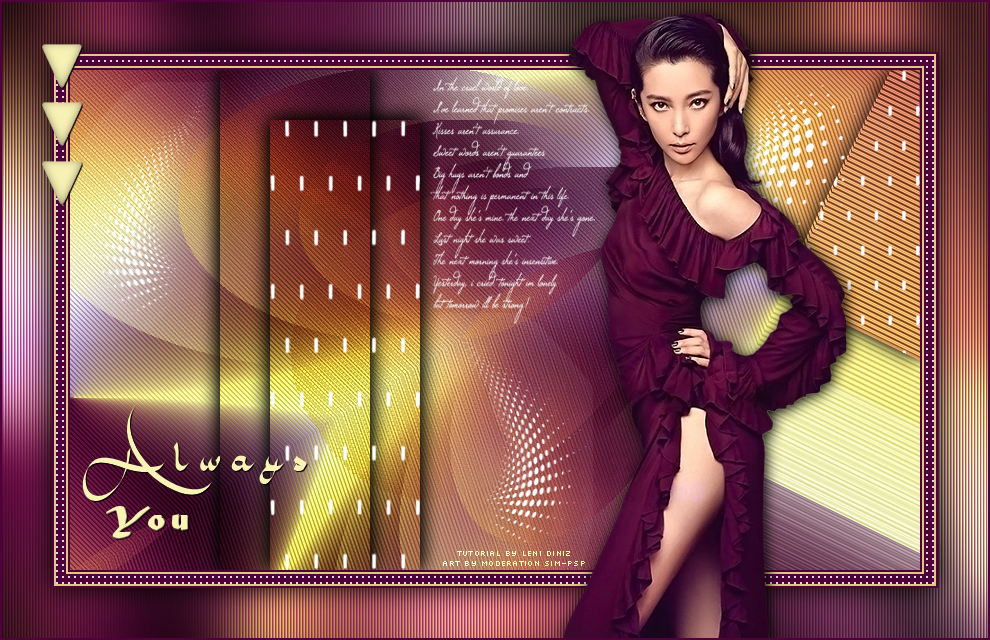
File > Export > JPEG Optimizer .
CREDITS: Tutorial by LeniDiniz
English Translation by
Moderation SIM-PSP
Main Tube: Tubed by Lily Feel free to send your versions. I will be happy to publish them on our website.
|