|
Feliz Ano Novo
TRADUÇÕES:
Obrigada aos nossos tradutores!
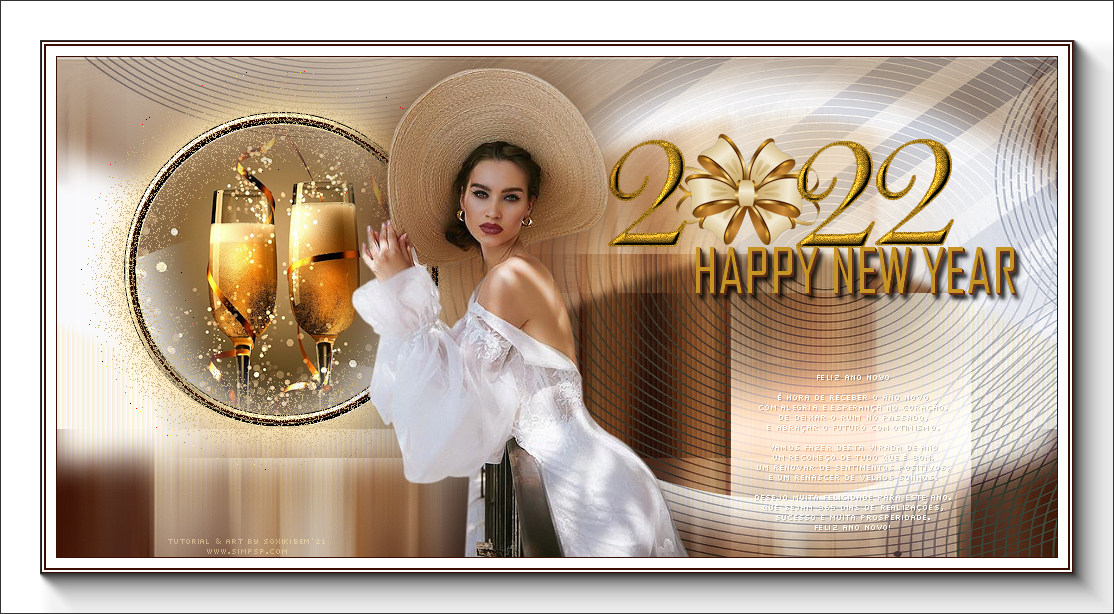
MATERIAL 1 Tube Principal à sua escolha titulo2022ByXiki decorTextXiki brindeNY Pngtree_cartoon_gold_ribbon bow_3365077 NarahsMasks_1624 Seleções (Salvar as seleções na pasta Selection do seu PSP) 2022_1Xiki - 2022_2Xiki 2022_3Xiki
Plugins Italian Editors Effect AAA Frames
NOTA:
- Fique à vontade para alterar os Blends e
Opacidade de acordo com o material
Execução
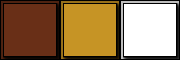
1 – Abrir o material no PSP, duplique e feche o original. Escolher três cores para trabalhar. Foreground: #6a3017 Background: #c59424 Cor 3: #ffffff
2 - Abra uma imagem transparente de 1000x500px. Pintar com a cor do Foreground. Selections > Select All. Edit > Copy no Pngtree_cartoon_gold_ribbon bow_3365077. Edit > Paste Into Selection. Selections > Select None.
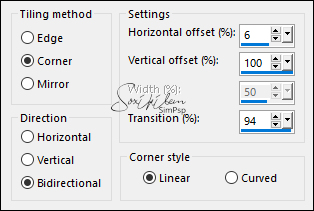
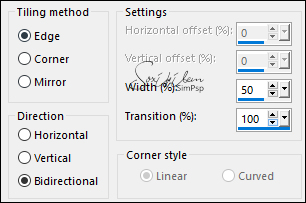
3 - Effects > Image Effects > Seamless Tiling: Side by side.
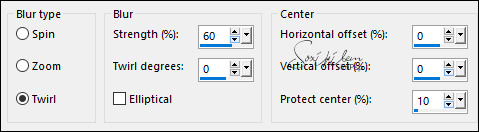
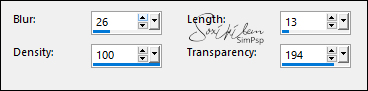
4 - Adjust > Blur > Radial Blur:
5 - Effects > Distortion Effects > Polar Coordinates: Polar to rectangular. Effects > Edge Effects > Enhance.
6 - Selections > Load/Save Selection > Load Selection From Disk: 2022_1Xiki. Selections > Promote Selection to Layer. Selections > Select None.
7 - Effects > Image Effects > Seamless Tiling: Back agressive.
8 - Effects > Plugins > Italian Editors Effect > Vignetta:
Effects > 3D Effects > Drop Shadow: 30, 0, 100, 50, Color: #FFFFFF (branco).
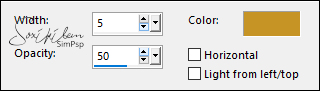
9 - Layers > Duplicate. Com a ferramenta Pick Tool posicionar: Position X: 0, Position Y: 124. Effects > Texture Effects > Blinds: Color: cor do Background.
Layers > Properties > General: Blend Mode: Dissolve.
10 - Layers > New Raster Layer. Selections > Load/Save Selection > Load Selection From Disk: 2022_2Xiki. Pintar esta seleção com a cor do Background. Selections > Modify > Contract: 5. Pintar com a cor do Foreground. Selections > Modify > Contract: 3. Pintar esta seleção com a cor do Background. Selections > Modify > Contract: 5. Pressione a tecla Delete do teclado. Selections > Select None.
11 - Layers > Duplicate. Adjust > Blur > Gaussian Blur: 20. Layers > Properties: General > Blend Mode: Dissolve.
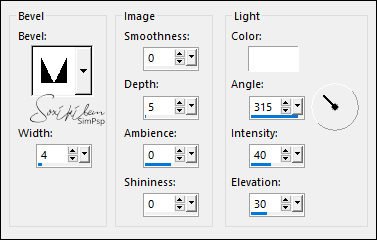
12 - Ativar a layer Raster 2. Effects > 3D Effects > Inner Bevel:
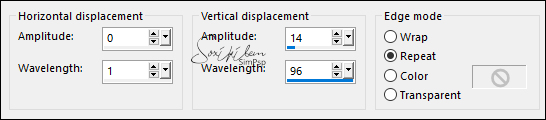
13 - Ativar a layer Promoted Selection. Layers > Duplicate. Effects > Distortion Effects > Wave:
14 - Layers > Duplicate. Image > Mirror > Mirror Vertical. Layers > Arrange > Move Up. Effects > Texture Effects > Fur:
Layers > Properties > General > Blend Mode: Screen.
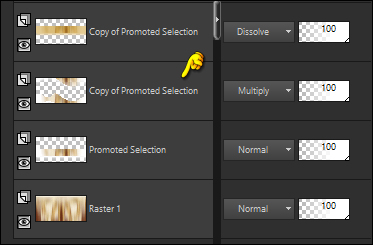
15 - Ativar a primeira layer Copy of Promoted Selection.
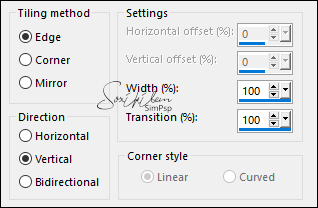
Effects > Image Effects > Seamless Tilling:
Layers > Properties > General > Blend Mode: Multiply.
16 - Selections > Load/Save Selections > Load Selection From Disk: 2022_2Xiki. Pressione a tecla Delete do Teclado. Ativar a layer Copy (2) of Promoted Selection. Pressione a tecla Delete do Teclado.
17 - Ainda selecionado: Layers > New Raster Layer. Effects > 3D Effects > Drop Shadow: 0, 0, 100, 50, Color: cor do Background. Edit > Repeat Drop Shadow.
18 - Layers > New Raster Layer. Com a ferramenta Clone Brush configura como abaixo, clique com o botão direito do mouse na imagem brindeNY ou em na imagem de sua escolha. Volte ao trabalho e clique com o botão esquerdo dentro da seleção. Clique quantas vezes desejar para que fique a seu gosto.
Adjust > Sharpness > Sharpen. Selections > Select None.
19 - Ativar a layer Copy (2) of Promoted Selection. Layers > New Raster Layer. Pintar com a cor do Background. Layers > New Mask Layer > From Image: NarahsMasks_1624. Layers > Merge > Merge Group. Layers > Properties > General > Blend Mode: Multiply, Opacity: 50%.
20 - Ativar a layer do topo. Edit > Copy no titulo2022ByXiki. Edit > Paste as New Layer. Com a ferramenta Pick Tool posicionar: Position X: 551, Position Y: 77.
21 - Edit > Copy no Tube Principal. Edit > Paste as New Layer. Posicionar à sua escolha. Effects > 3D Effects > Drop Shadow: à sua escolha.
22 - Edit > Copy no decorTextXiki. Edit > Paste a New Layer. Com a ferramenta Pick Tool posicionar: Position X: 674, Position Y: 253. Layers Properties > General > Blend Mode: Luminance (L).
23 - Image > Add Borders > Symmetric: 1px - color: do Foreground. 10px - color: #ffffff (branco) 2px - color: do Foreground 2px - color: #ffffff (branco) 2px - color: do Foreground 40px - color: #ffffff (branco)
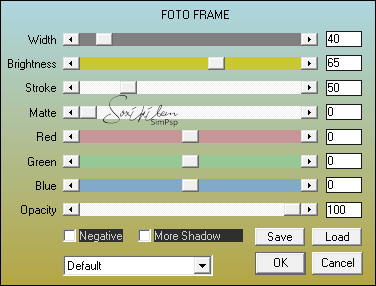
24 - Effects > Plugins > AAA Frames > Foto Frame:
25 - Aplicar sua marca d'água ou assinatura.File > Export > JPEG Optimizer.
CREDITOS: Tutorial & Art by Soxikibem Tube Principal by Cicka Design - Mask by Narah - ribbon Aqui Versão 2: Tube by LB Tubes
Sinta-se à vontade para enviar suas versões. Terei todo o prazer em publicá-las em nosso site.
|