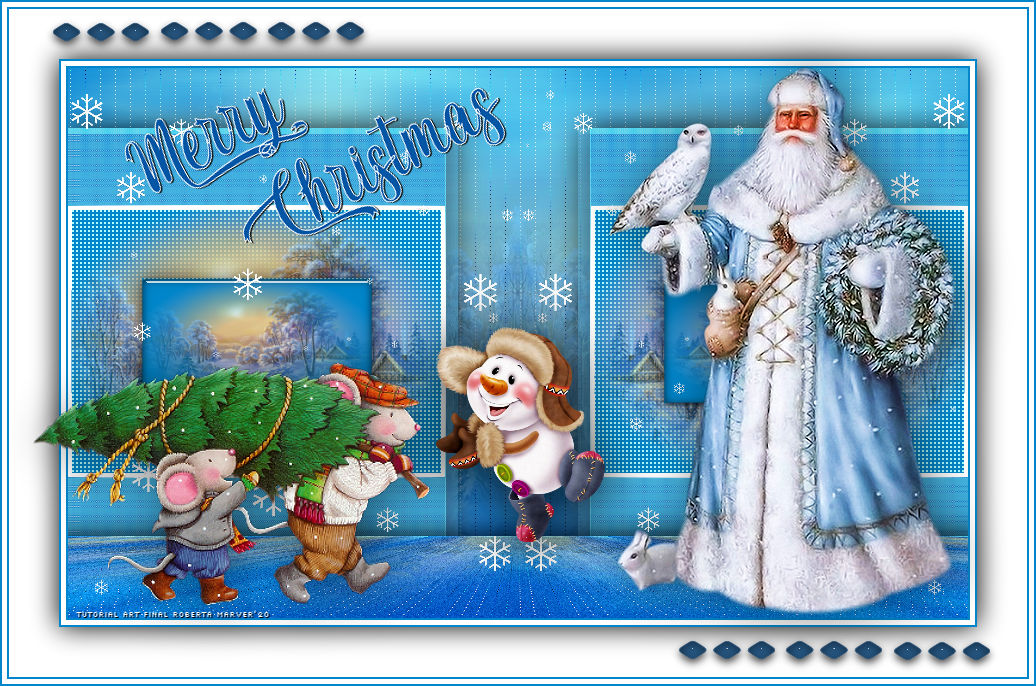
Tutorial criado para o Desafio 03 SimPsp Este desafio foi proposto por Marcinha com o Tema Merry Christmas
TRADUÇÕES:
Obrigada aos nossos tradutores!
MATERIAL 1 Tube Principal 1 Misted Paisagem 1 Tube Decorativo Decor_desafionatal_by Roberta Decor_flocosdeneve Titulo_MerryChristmas_by Roberta Titulo_FelizNatal_by Roberta
PLUGINS Plugin AFS Import Plugin Backgroundmaniac Plugin Eye Candy 5 Plugin Graphics Plus MuRa's Meister Plugin Simple Filter Unlimetd 2.0 Sapphire 03 (importar Filter Unlimetd 2.0) Plugin Ulead Particle
Roteiro: 1 - Abrir o material no PSP, duplique e feche o original. Escolher duas cores para trabalhar. Foreground #600b00 Background #f51f37
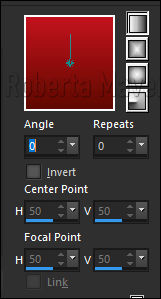
2 - Abra uma imagem transparente de 900 x 550 px. Pinte com o gradiente formado pelas cores escolhidas: Linear - Angle: 0 - Repeats: 0 - Invert: Desmarcado
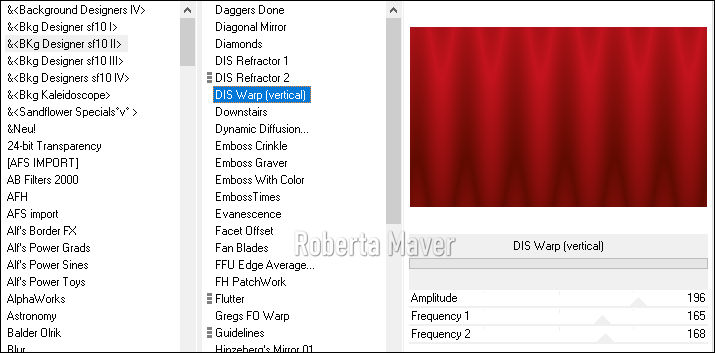
3- Effects > Filter Unlimetd 2.0 > BKG Designer 10sfII > Dis Was Warp (vertical)
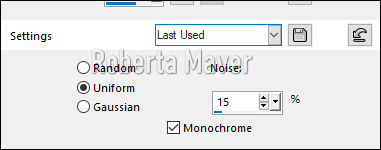
4- Adjust > Add Noise
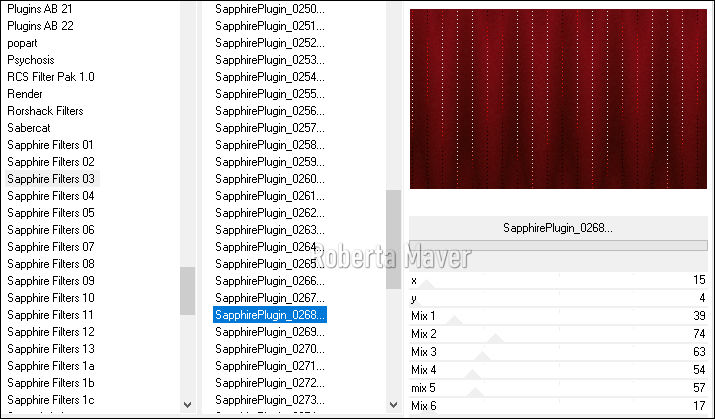
5- Effects > Filter Unlimetd 2.0 > Sapphire 03 > Sapphire Plugin 0268
6- Layers > New Raster Layer Pinte a layer com a cor escura #600b00
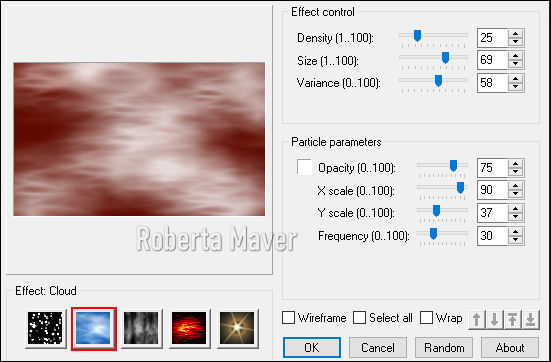
7- Effects > Plugin Ulead Effects > Particle
Layers > Properties > General > Blend Mode: Overlay Layer > Merge > Merge Visible
8 - Selections > Select All. Selections > Modify > Contract 60px Selections > Promote Selection to Layer. Ainda selecionada
9- Effects > Plugin > Plugin Backgroundmaniac > Oriental Lines'n Dots
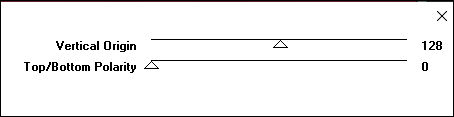
10 - Effects > Plugin Graphics Plus > Vertical Mirror
Selections > Select None.
11 - Effects > Edge Effects > Enhance.
12- Effects > Plugin Simple> Left Right Wrap.
13- Selections > Select All.Selections > Float Selections > Defloat.
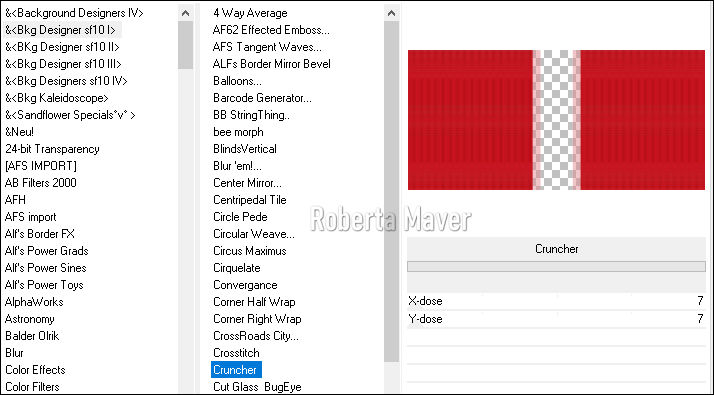
14- Effects > Filter Unlimetd 2.0 > BKG Designer 10sfI > Cruncher
Selections > Select None.
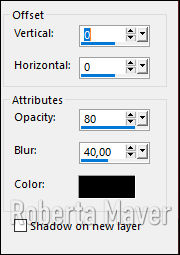
15- Effects > 3D Effects > Drop Shadow
16- Ativar a Layer Merged
17 - Edit > Copy no misted
paisagem.
Edit > Paste
As New Layer
Posicione Dê rezise se
for necessário.
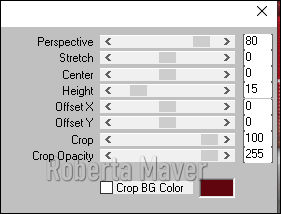
(Dei 80%)
Adjust > Sharpness >
Sharpen
18-
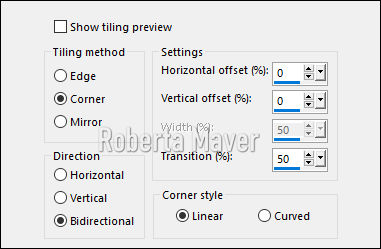
Effects > Image Effects > Seamless Tiling
19 - Layers > Properties > Opacity
40%

20 - Ative a layer promoted Selection.
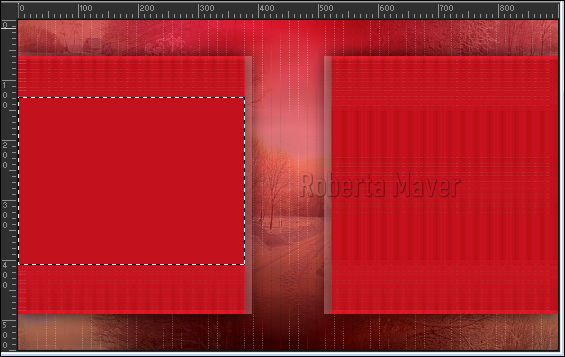
21- Layers > New Raster Layer Com a ferramenta seleção selecione como mostro no print Pinte com a cor #c3131e
22- Effects > Plugin AFS Import > Sqborder2
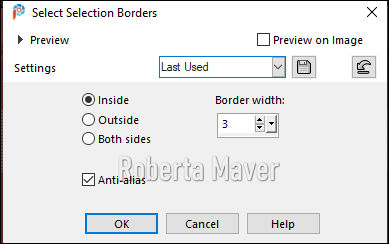
23- Layers > New Raster Layer Edit > Copy no misted paisagem. Edit > Paste Into Selection. Ainda selecionada: Selections > modify > select selection bords
Pinte com a cor #ffffff (branco) Selections > Select None. Feche a visilidade dessa layer (Raster 3)
24- Ative a layers raster 2 Com a ferramenta seleção selecione o retangulo menor Selections > Promote Selection to Layer. Layers > Arrange > Bring to TopEdit > Copy no misted paisagem. Edit > Paste Into
Selection.
25
- Effects > Eye Candy 5 > Impact >
Glass
Settings: Clear 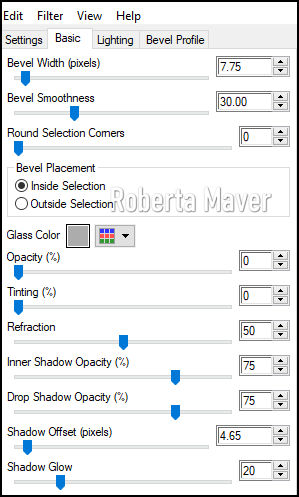 Selections > Select None 26- Effects > 3D Effects > Drop Shadow 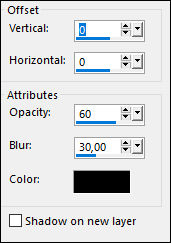
Abra a visibilidade da layer Raster 3. Ativar a layer Promoted Selection 1 Layer > Merge > Merge Down. (2 vezes) 27 -Layers > Duplicate. Image > Mirror > Mirror Horizontal. Layer > Merge > Merge Down.
28- Ative a raster 1 Layer > Merge > Merge Down. Layers > Duplicate 29- Effects > Plugins Mura's Meister > Perspective Tiling > Default
Layers> Arrange> Bring to Top Adjust > Sharpness > Sharpen.
30- Adjust > Add Noise
31- Effects > 3D Effects > Drop Shadow: 0 /0/100/40 Color: #000000
32- Image > Add Borders: 2 px na cor do foreground #600b00 5 px na cor #fffff (branco) 2 px na cor do foreground #600b00
33- Selections > Select All.Image > Add Borders: 50 px cor #ffffff (branco)
34- Effects > 3D Effects > Drop Shadow: 0 /0/100/40 Color: #000000 (Preto) Selections > Select None. 2 px na cor do foreground #600b00
35- Edit > Copy no decor_flocos de neve. Edit > Paste a New Layer.
36 - Edit > Copy no deco_natal_byRoberta.Edit > Paste a New Layer.
37- Edit > Copy no Tube decoração.Edit > Paste a New Layer. Posicione à gosto no trabalho. Adjust > Sharpness > Sharpen. Effects > 3D Effect > Drop Shadow à sua escolha.
38- Edit > Copy no titulo_Merry Christmas_byRoberta. Edit > Paste a New Layer. Posicione à esquerda como preferir.
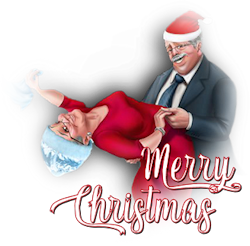
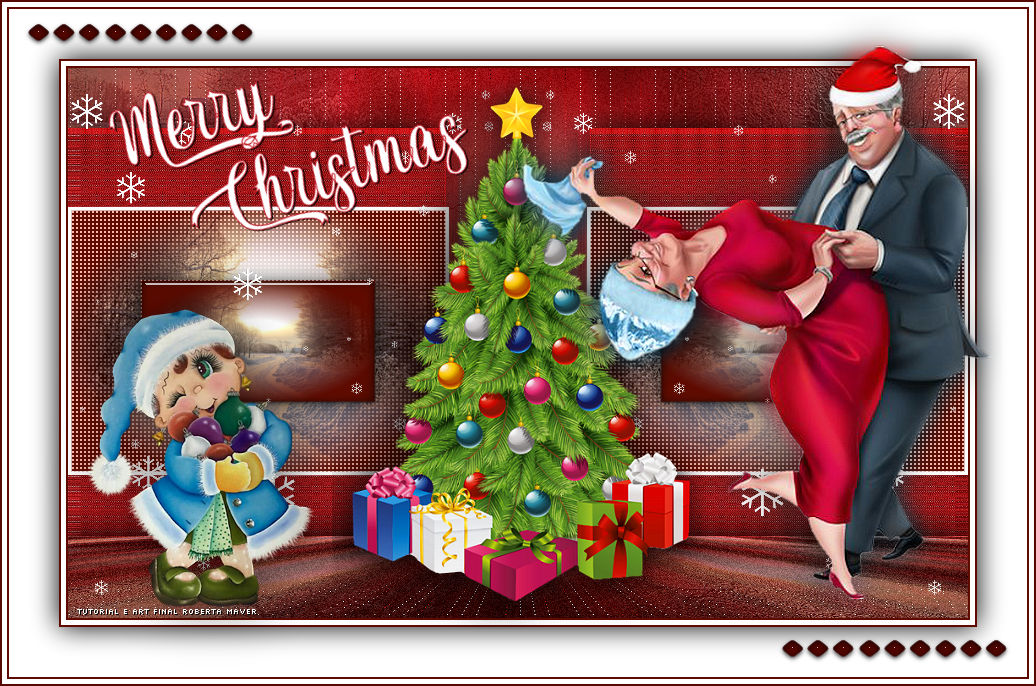
39- Edit > Copy no Tube Principal. Edit > Paste a New Layer. Redimensionar o tube à gosto. Adjust > Sharpness > Sharpen. Posicionar à sua escolha. Effects > 3D Effect > Drop Shadow à sua escolha. 40- Se desejar, redimensione seu trabalho. Aplicar sua marca d'água ou assinatura. File > Export > JPEG Optimizer.
Créditos
Desafio Merry
Christmas criado por Roberta Maver
Tube:wieskes tube
689
Tube: Casal recebido grupo de trocas
Paisagem: sem menção do autor
Tube decorativo: Arvore de natal sem menção
do autor
Deco_flocosdeneve( Kit de Scrap
Naral)
Deco_natal_by Roberta
Titulo_Merry Christmas_by Roberta
13/11/2020
Sinta-se à vontade para enviar suas versões. Terei todo o prazer em publicá-las em nosso site.   
|