|
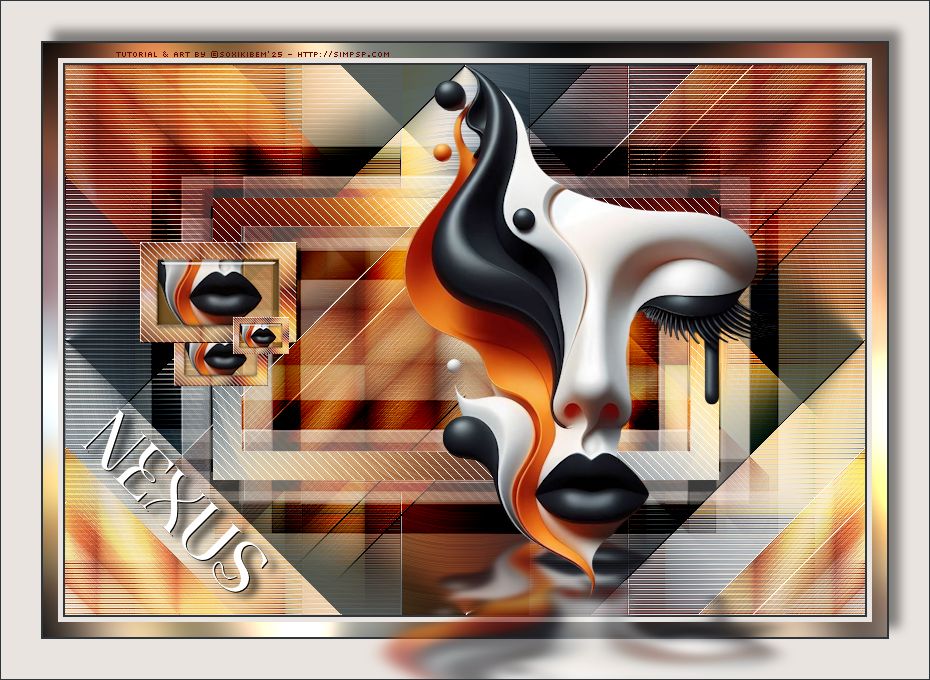
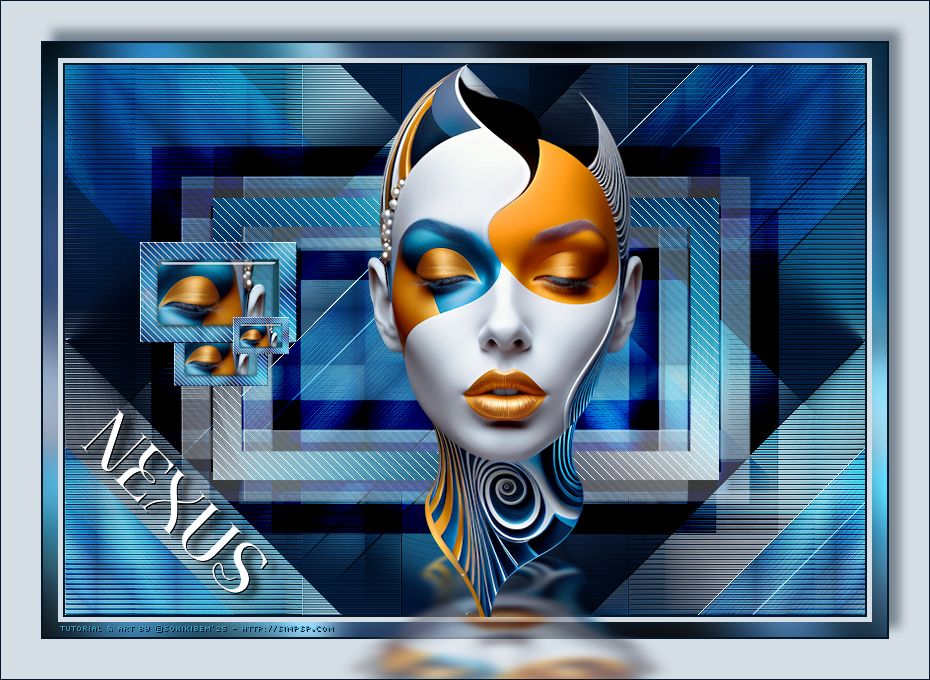
No centro do caos, um elo silencioso. “Nexus” é o ponto onde cor e forma se abraçam, onde o instante e a eternidade dançam juntos. Um sussurro visual que conecta o que vemos ao que sentimos.
TRADUÇÕES:
O Sim
PSP valoriza e reconhece o trabalho das tradutoras que tornam os
tutoriais acessíveis a diferentes idiomas.
MATERIAL: 1 Tube Principal ou Personagem à sua escolha Mask by Narah Outros Materiais by Soxikibem
PLUGINS: Alien Skin Eye Candy 5 > Impact > Glass, Perspective Shadow AP [Lines] > Silver Lining Filters Unlimited 2.0 > Bkg Designer sf10 I > Circus Maximus, Cruncher Graphics Plus > Cross Shadow Mehdi > Wavy Lab 1.1, Sorting Tiles Mura's Seamless > Emboss at Alpha
Tutorial elaborado no PSP 2022 Testado e revisado por Márcinha no PSP 2020.
Agradeço às Tubeiras pelos Tubes e Masks, pois sem eles não seria
possível criar este trabalho.
TUTORIAL 1 - Abrir o material no PSP, duplique e feche os originais.
*Deletar a Marca D'água de todos os
materiais. Cor 3: #2e363b Cor 4: #e9e4e0
2 - Abra o arquivo Alpha313_Xiki.
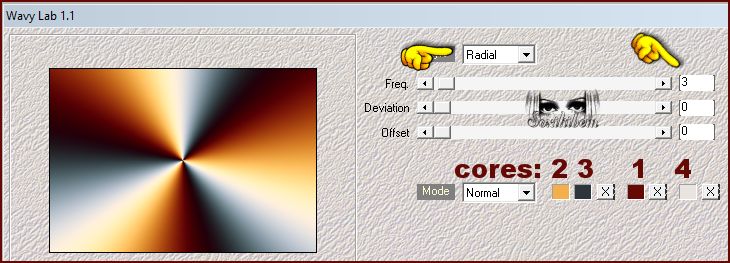
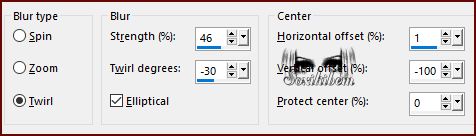
3 - Adjust > Blur > Radial Blur.
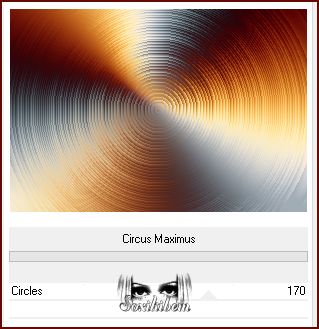
4 - Filters Unlimited 2.0 > Bkg Designer sf10 I > Circus Maximus.
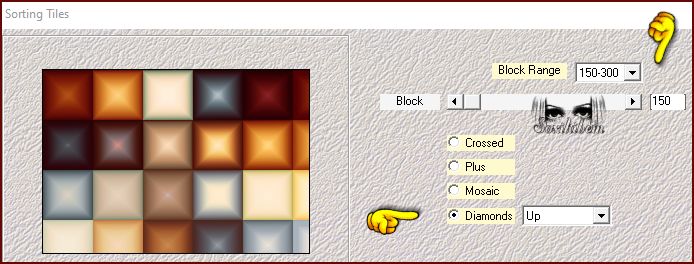
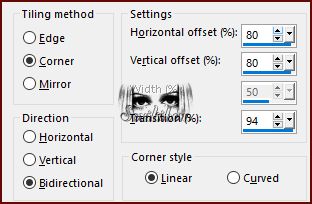
5 - Layers > Duplicate. Plugin Mehdi > Sorting Tiles.
6 - Effects > Image Effects > Seamless Tiling.
7 - Layers > New Mask Layer > From Image: Narah_Mask_1338. Effects > Edge Effects > Enhance. Layers > Merge > Merge Group.
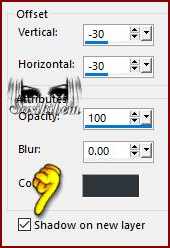
8 - Effects > 3D Effects > Drop Shadow: 1, 1, 100, 0, com a cor 4.
9 - Selections > Load/Save Selections > Load Selection From Alpha Channel: Selection #1. Ativar a Layer Raster 1. Selections > Promote Selection to Layer. Layers > Arrange > Move Up.
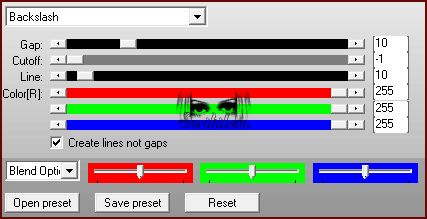
10 - Plugin AP [Lines] > Lines - SilverLining.
Selections > Select None.
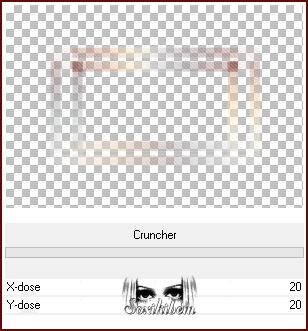
11 - Layers > Duplicate. Ativar a Layer Promote Selection. Filters Unlimited 2.0 > Bkg Designer sf10 I > Cruncher: Default.
12 - Plugin Mura's Seamless > Emboss at Alpha: Default.
13 - Effects > 3D Effects > Drop Shadow. Com a cor 3.
Layers > Properties > General > Blend Mode: Burn, Opacity 100%.
14 - Layers > Duplicate. Image > Mirror > Mirror Horizontal. Image > Mirror > Mirror Vertical.
15 - Selections > Load/Save Selections > Load Selection From Alpha Channel: Selection #2. Ativar a Layer Group - Copy of Raster 1. Selections > Promote Selection to Layer. Selections > Select None.
16 - Effects > Image Effects > Seamless Tiling.
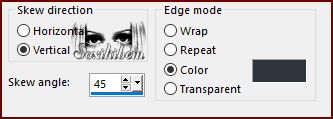
17 - Effects > Geometric Effects > Skew. Com a cor 3.
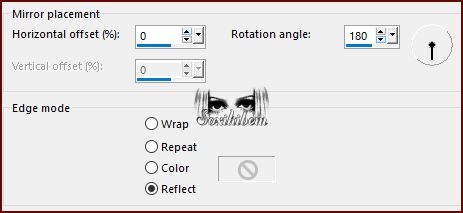
18 - Effects > Reflection Effects > Rotating Mirror.
19 - Effects > Image Effects > Seamless Tiling: Default. Layers > Properties > General > Blend Mode: Hard Light, Opacity 100%.
20 - Plugin Mura's Seamless > Emboss at Alpha: Default.
21 - Selections > Load/Save Selections > Load Selection From Alpha Channel: Selection #2. Ativar a Layer Group - Copy of Raster 1. Selections > Promote Selection to Layer. Selections > Select None. Layers > Arrange > Bring to Top.
22 - Image > Free Rotate.
23 - Selections > Load/Save Selections > Load Selection From Alpha Channel: Selection #3. Edit > Cut ou Delete no teclado. Selections > Select None.
24 - Selections > Load/Save Selections > Load Selection From Alpha Channel: Selection #4. Edit > Cut ou Delete no teclado. Layers > New Raster Layer.
25 - Flood Fill > Opacity 50%. Pintar a seleção com a cor do background. Flood Fill > Voltar em Opacity para 100%
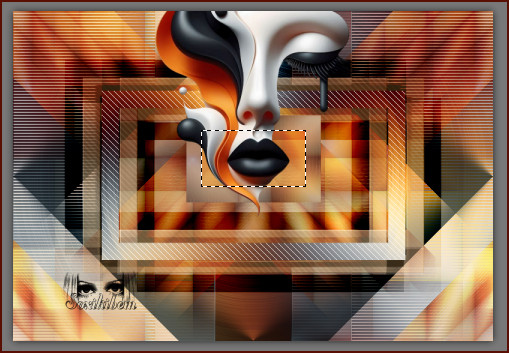
26 - Edit > Copy no Tube escolhido. Edit > Paste As New Layer. Resize se for necessário, se estiver usando o do material de um resize de 50%. Ative a ferramenta Move e mova uma parte da imagem para dentro da seleção.
27 - Selections > Invert. Edit > Cut ou Delete. Selections > Invert.
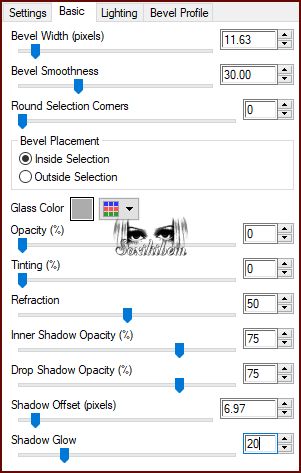
28 - Plugin Alien Skin Eye Candy 5 > Impact > Glass. Settings: Clear Basics: como no print abaixo.
Selections > Select None.
29 - Ativar a Layer Promoted Selection 2. Selections > Load/Save Selections > Load Selection From Alpha Channel: Selection #5. Plugin AP [Lines] > Lines - SilverLining.
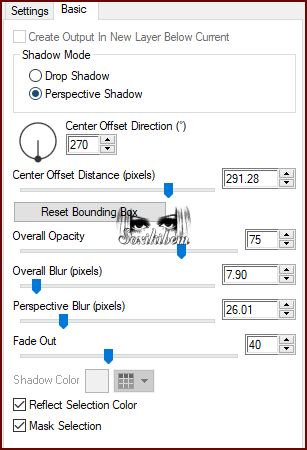
30 - Layers > Duplicate. Layers > Properties > General > Blend Mode: Overlay, Opacity 100%. Selections > Select None. Layers > Merge > Merge Down.
31 - Ativar a Layer Raster 3 (Top Layer). Layers > Merge > Merge Down > por 2 vezes.
32 - Image > Resize: 70%, all layers desmarcado. Plugin Mura's Seamless > Emboss at Alpha: Default.
33 - Pick Tool: Position X: 75, Position Y: 177. Layers > Duplicate.
34 - Image > Resize: 60%, all layers desmarcado. Pick Tool: Position X: 109, Position Y: 260. Layers > Arrange > Move Down.
35 - Layers > Duplicate. Image > Resize: 60%, all layers desmarcado. Layers > Arrange > Bring to Top. Pick Tool: Position X: 168, Position Y: 252. Adjust > Sharpness > Sharpen.
36 - Edit > Copy Special > Copy Merged.
37 - Image > Add Borders > Symmetric: 2px com a cor 3 5px com a cor 4
38 - Selections > Select All. Image > Add Borders > Symmetric: 15px com qualquer cor. Selections > Invert. Edit > Paste Into Selection.
39 - Adjust > Blur > Gaussian Blur: 15.
40 - Plugin Graphics Plus > Cross Shadow.
Selections > Select None.
41 - Image > Add Borders > Symmetric: 2 px com a cor 3. Selections > Select All.
42 - Image > Add Borders > Symmetric: 40px com a cor 4.
43 - Effects > 3D Effects > Drop Shadow na cor preta.
Selections > Select None.
44 - Edit > Copy no Tube escolhido. Edit > Paste As New Layer. Redimensione se for necessário. Se estiver usando o do material resize em 55%. Adjust > Sharpness > Sharpen.
45 - Posicione e aplique Drop Shadow ou efeito como preferir. Eu apliquei: Plugin Alien Skin Eye Candy 5 > Impact: Perspective Shadow. * Em Settings selecione Reflect in Front - Sharp
46 - Edit > Copy no TituloNexus_Soxikibem. Edit > Paste As New Layer. Pick Tool: Position X: 79, Position Y: 406.
47 - Image > Add Borders > Symmetric: 1px cor 3.
48 - Se você desejar redimensione seu trabalho.
49 - Edit > Copy no Creditos-bySoxikibem. Edit > Paste As New Layer. Posicione como preferir.
50 -
Aplicar sua marca d'água ou assinatura.
Porque cada detalhe faz
diferença...
Versão:
Créditos: Formatação, Arte Final e Tutorial by Soxikibem Tube Principal: Tubed by Pqna&Alice Mask: by Narah Outros Materiais: by Soxikibem
Sinta-se à vontade para enviar suas versões. Terei todo o prazer em publicá-las em nosso site.
Envie sua versão para o e-mail:
SimPSP Redes Sociais
|