|
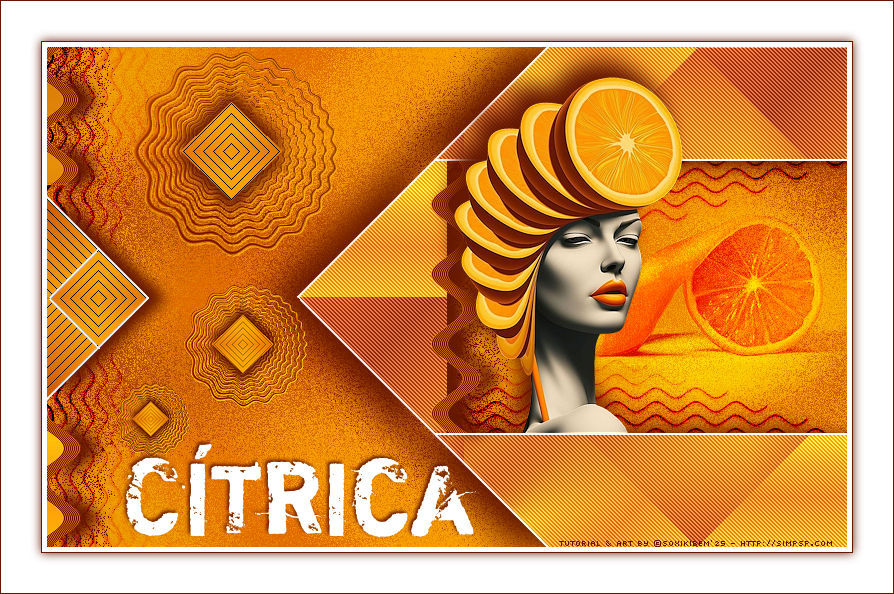
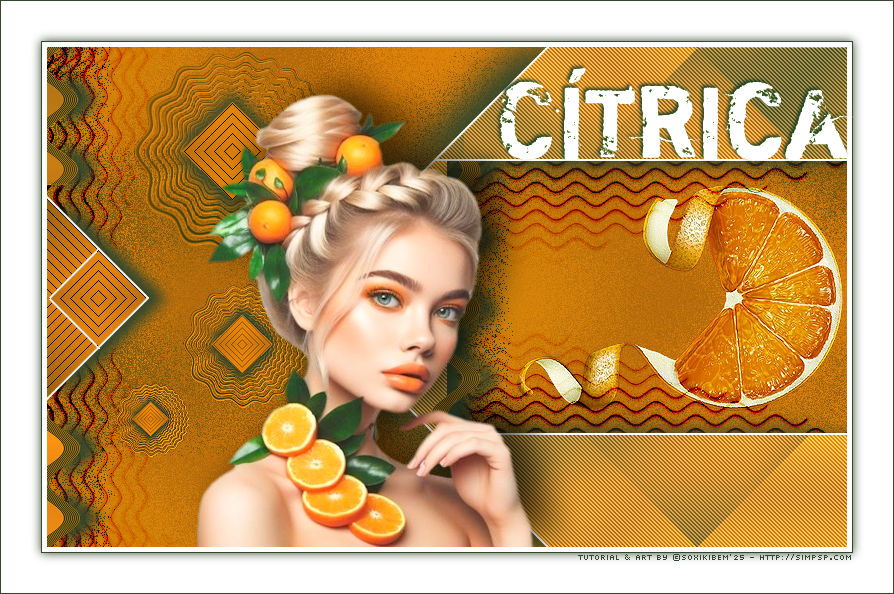
Sabe aqueles dias em que
a criatividade pede algo diferente, cheio de cor e com um toque
divertido? Então, este é o tutorial perfeito! Em "Cítrica", a
estrela é a laranja — mas não qualquer laranja: ela vira
arte, chapéu e atitude! Vamos brincar com formas geométricas,
texturas e um visual super moderno, daqueles que dão vontade de
tomar um suco gelado enquanto a gente cria.
TRADUÇÕES:
O Sim
PSP valoriza e reconhece o trabalho das tradutoras que tornam os
tutoriais acessíveis a diferentes idiomas.
MATERIAL: 1 Tube Principal ou Personagem à sua escolha 1 Misted Frutífero Outros Materiais by Soxikibem
PLUGINS: AP 01 Innovations > Lines - SilverLining Flaming Pear > Flexify 2 Penta.com > Jeans Unlimited 2.0 > Bkg Designers sf10 IV > @BlueBerry Pie Simple > Diamonds 'v' Kiwi's Oelfilter > Zig-Zag
Tutorial elaborado no PSP 2022 Testado e revisado por Márcinha no PSP 2020.
Agradeço às Tubeiras pelos Tubes e Masks, pois sem eles não seria
possível criar este trabalho.
TUTORIAL
*Deletar a Marca D'água de todos os materiais. Cor 3: #ffffff
2 - Abra uma imagem
transparente de 800x500px..
3 - Plugin Simple > Diamonds. Layers > Duplicate. Image > Mirror > Mirror Horizontal. Layers > Properties > General > Blend Mode: Soft Light. Layers > Merge > Merge Down.
4 - Layers > Duplicate. Fechar a visibilidade da layer Copy of Raster 1. Ativar a Layer Raster 1.
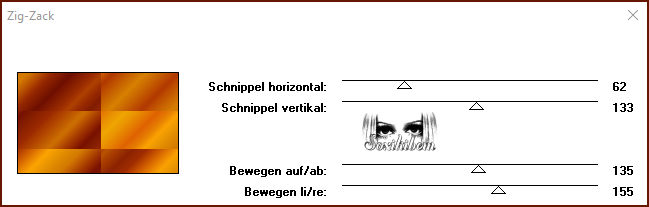
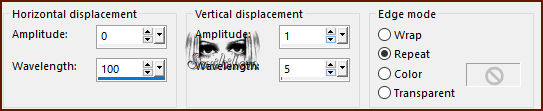
5 - Plugin 'v' Kiwi's Oelfilter > Zig-Zag.
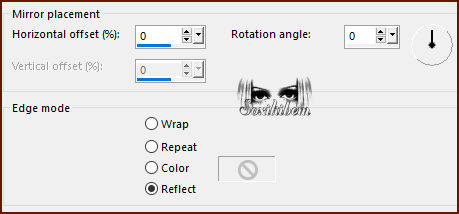
6 - Effects > Reflection Effects > Rotating > Mirror.
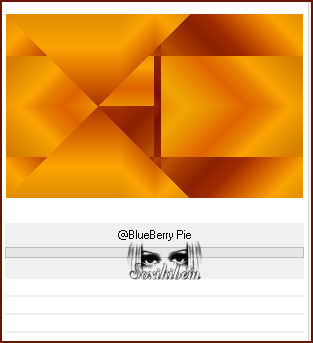
7 - Filters Unlimited 2.0 > Bkg Designers sf10 IV > @BlueBerry Pie.
Effects > Image Effects > Seamless Tiling: Default.
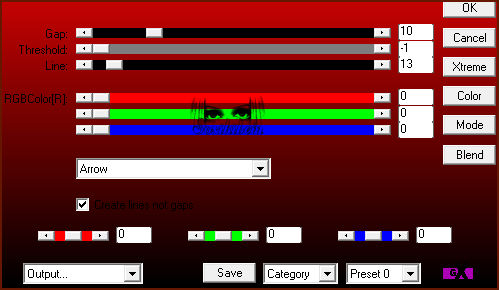
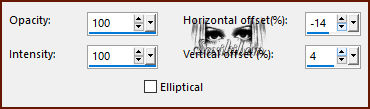
8 - Selections > Load/Save Selections > Load Selection From Disk: 309_Xiki1. Selections > Promote Selection to Layer. Plugin AP 01 Innovations > Lines - SilverLining.
9 - Layers > Duplicate. Effects > Reflection Effects > Rotating Mirror.
Selections > Select None.
10 - Layers > Duplicate. Fechar a visibilidade da Layer Copy (2) of Promoted Selection. Ativar a Layer Copy of Promoted Selection. Layers > Merge > Merge Down. Effects > 3D Effects > Drop Shadow: 0, 17, 100, 20, cor Foreground.
11 - Ativar a Layer Raster 1. Selections > Load/Save Selections > Load Selection From Disk: 309_Xiki2. Selections > Promote Selection to Layer. Effects > Texture Effects > Blinds, com a cor do Background.
Adjust > Sharpness > Sharpen. Selections > Select None.
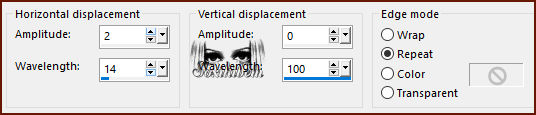
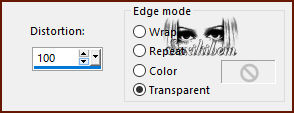
12 - Effects > Distortion Effects > Wave.
Effects > 3D Effects > Drop Shadow: 0, 17, 100, 20, cor Foreground.
13 - Ativar a Layer Raster 1. Selections > Load/Save Selections > Load Selection From Disk: 309_Xiki3. Selections > Promote Selection to Layer. Plugin Penta.com > Jeans.
14 - Effects > 3D Effects > Drop Shadow: 0, 17, 100, 20, cor Foreground. Effects > 3D Effects > Drop Shadow: 0, -31, 100, 50, cor Foreground. Selections > Select None.
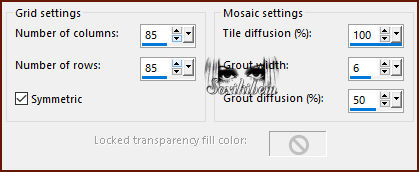
15 - Ativar a Layer Raster 1. Effects > Texture Effects > Mosaic - Antique.
16 - Ativar e abrir a visibilidade da layer Copy of Raster 1. Effects > Geometric Effecs > Perspective - Horizontal.
Repetir o Perspective - Horizontal mudando o valor para -100
17 - Effects > Distortion Effects > Wave.
18 - Plugin Flaming Pear > Flexify 2.
19 - Effects > Reflection Effects > Feedback.
Layers > Duplicate. Layers > Merge > Merge Down. Effects > 3D Effects > Drop Shadow: 1, 1, 100, 0, cor Background.
20 - Ativar e abrir a visibilidade da Layer Copy (2) of Promoted Selection. Layers > Arrange > Move UP. Pick Tool: Position X: 297, Position Y: 215. Effects > 3D Effects > Drop Shadow: 10, 0, 100, 20, cor Foreground. Effects > 3D Effects > Drop Shadow: -10, 0, 100, 20, cor Foreground. Layers > Merge > Merge Down. Pick Tool: Position X: 85, Position Y: 4.
21 - Layers > Duplicate. Image > Resize: 60%, all layers desmarcado. Layers > Duplicate. Layers > Merge > Merge Down. Adjust > Sharpness > Sharpen. Pick Tool: Position X: 136, Position Y: 237.
22 - Layers > Duplicate. Image > Resize: 60%, all layers desmarcado. Layers > Duplicate. Layers > Merge > Merge Down. Adjust > Sharpness > Sharpen. Pick Tool: Position X: 68, Position Y: 336. Layers > Merge > Merge Down 2 vezes.
23 - Ativar a Layers Raster 1. Edit > Copy no Misted Frutifero ou o que preferir. Edit > Paste As New Layer. Resize se for necessário, se estiver usando o do material eu dei resize de 60%. Adjust > Sharpness > Sharpen. Posicione à direita, dentro do efeito retangular, como no exemplo da tag original. *Opcional: Blend Mode Overlay.
24 - Edit > Copy no Decor309_1Xiki. Edit > Paste As New Layer. Layers > Properties > General > Blend Mode: Burn.
25 - Ativar a Layer do topo (Copy of Raster 1). Edit > Copy no Decor309_2Xiki. Edit > Paste As New Layer.
26 - Image > Add Borders: 5px cor 3 (#ffffff) 1px cor Foreground Selections > Select All. 40px cor 3 (#ffffff)
27 - Effects > 3D Effects > Drop Shadow: 0, 0, 100, 15, cor Foreground. Selections > Select None.
28 - Edit > Copy no Tube Personagem. Edit > Paste As New Layer. Redimensione se for necessário, se estiver usando o do material de um resize de 40%. Adjust > Sharpness > Sharpen. Posicione, aplique Efeito ou Drop Shadow como preferir.
29 - Edit > Copy no TituloCitrica_Xiki. Edit > Paste As New Layer. Posicione como preferir.
30 - Edit > Copy no Creditos-bySoxikibem. Edit > Paste As New Layer. Posicione como preferir.
31 - Image > Add Borders > Symmetric: 1px cor Foreground.
32 -
Aplicar sua marca d'água ou assinatura.
Versão:
Créditos: Formatação, Arte Final e Tutorial by Soxikibem Tube Principal: Tubed by Pqna&Alice Outros Materiais: by Soxikibem
Sinta-se à vontade para enviar suas versões. Terei todo o prazer em publicá-las em nosso site.
Envie sua versão para o e-mail:
SimPSP Redes Sociais
|