|
Tutorial by Elaine English Translation by Soxikibem Original Tutorial
Material: 1 Main Tube of your choice
Plugins: Caroline and Sensibility
TUTORIAL:
01-
Open the material on the psp, duplicate and close the originals.
02- Open a 900 x 600px image.
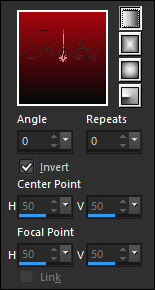
03- Paint this layer with a linear gradient:
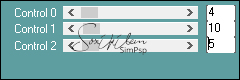
04- Effects > Plugins Caroline and Sensibility - CS-HLines:
05- Layers > Duplicate. Image > Resize: 50% - all layers unchecked.
06- Effects > 3D Effects > Drop Shadow: 0 / 0 / 100 / 50, color #000000
07- Layers> Duplicate twice.
08- Activate the Copy (3) of
Raster 1 layer
09- Activate the Copy (2) of
Raster 1 layer
10- Activate the Copy (3) of
Raster 1 layer
11- Layers > New Raster Layer. Paint with white #ffffff.
12- Layers > New Mask Layer > From image: FAFAMASK002 Layers > Invert Mask/Adjustment Layers > Merge > Merge Group. Layers > Properties > General > Blend Mode: Soft Light
13- Layers > New Raster Layer. Paint with the background color Layers > New Mask Layer > From image: FAFAMASK190 Layers > Merge > Merge Group. Layers > Merge > Merge Visibile. Edit > Copy
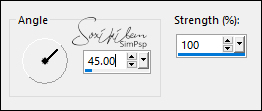
14- Selections > Select All Image > Add Bordes > 40px with any color. Selections > Invert Edit > paste into selection. Adjust > Blur > Motion Blur:
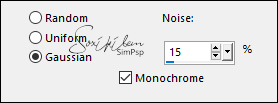
15- Adjust > Add/Remove Noise > Add Noise:
16- Selections > Invert. Effects > 3D Effects > Drop Shadow: 0 / 0 / 100 / 50, color #000000 Selections > Select none.
Edit > Paste as new layer. With the Pick Tool (Deform Tool) configure: Position: X (491) - Position: Y (42)
18- Edit > Copy in the Main tube
Edit > Paste as new layer. Position.
Effects > 3D
Effects > Drop Shadow of your choice.
19- Image > Add Bordes > 1px - simmetric - color: #000000 (black). Apply your watermark or signature. File > Export > JPEG Optimizer...
Credits Tubeby Lily - Masks: FAFAMASK190 & FAFAMASK002
Feel free to send your
versions.   
|