|
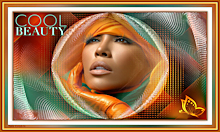
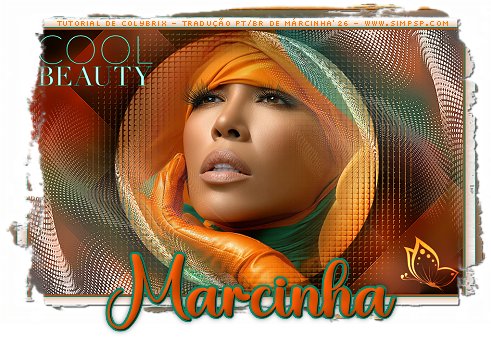
Tutorial "Cool Beauty" by Colybrix Traduzido para o Português por Márcinha do grupo SIM PSP Tutorial Original:
MATERIAL:
PLUGINS: Graphics Plus > Cross
Shadow
CORES: Foreground: #02886f - Background: #c34401 - Color 3: #ffffff
Configure o Foreground e Background com as cores escolhidas:
Tutorial Traduzido no PSP 2020
Volte para a imagem que estamos trabalhando... Edit > Paste Into Selection. Selections > Select None.
2 - Adjust > Blur > Gaussian Blur:
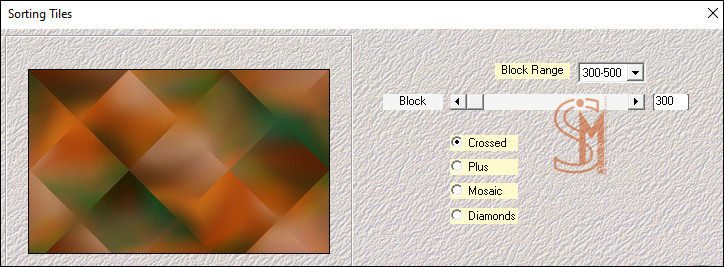
35 Effects > Plugins > Mehdi > Sorting Tiles:
Effects > Edge Effects > Enhance.
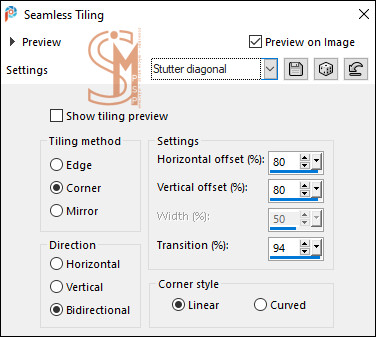
3 - Effects >
Image Effects > Seamless Tiling: Stutter diagonal. 4 - Layers >
Duplicate.
Repetir mais uma vez o efeito Spherize. Layers > Properties > General > Blend Mode: Multiply Nota de Colybrix: Se preferir mais claro mude o Blend para Screen.
5 - Effects > Plugins > Graphics Plus > Cross Shadow: Default
6 - Selections > Load/Save Selections > Load Selection from Alpha Channel: Sélection #1
Selections > Promote Selection to layer.
7 - Layers > New Raster Layer. Effects > 3D Effects > Drop Shadow: 0, 0, 100, 100, color #000000 (Preto)
Layers > Properties > General > Blend Mode: Multiply Selections > Select None.
8 - Ativar a layer Promoted Selection... Effects > Texture Effects > Mosaic Glass:
9 - Ativar a layer Raster 2 (Topo) Layers > New Raster Layer. Pintar essa layer com a cor #ffffff. Layers > New Mask Layer > From image: Narah_Mask_1491
10 - Layers >
Duplicate. Effects > 3D Effects > Drop Shadow: 2, 2, 100, 2, color > Foreground: #02886f
Layers > Properties > General > Blend Mode: Luminance (L)
11 - Layers >
Duplicate.
13 - Ative o arquivo tube mist visage. Edit > Copy. Volte para a imagem que estamos trabalhando... Edit > Paste as New Layer. Layers > Arrange > Move Down.
14 - Ative a layer Copy of Group - Raster 3 (Topo) Ative o arquivo Riet 1212-Tekst cool beauty-030725. Edit > Copy. Volte para a imagem que estamos trabalhando... Edit > Paste as New Layer. Image > Resize > 75%, resize all layers desmarcado.
15 - Image > Negative Image. (Opcional) Colorize se desejar. Nota de Colybrix: Usei a Ferramenta Change to Target Tool para colorir o texto com a minha cor do Foreground: #02886f Effects > 3D Effects > Drop Shadow: 0, 0, 70, 30, color > Background: #c34401
16 - Ativar a layer Raster 1. Edit > Copy.
17 - Image > Add Borders >
Symmetric: 1 px com a cor do Foreground. Image > Add Borders > Symmetric: 2 px com a cor do Foreground.
18 - Selections > Select All. Image > Add Borders >
Symmetric: 20 px com a cor 3: #ffffff (Branco)
Selections > Select None.
19 - Image > Add Borders > Symmetric: 1 px com a cor do Foreground.
20 - Selections > Select All. Image > Add Borders >
Symmetric: 35 px com qualquer cor.
21 - Edit > Paste Into Selection. Adjust > Blur > Gaussian Blur:
35
22 - Effects > Plugins > AAA Frames > Frame Works:
Selections > Invert. Effects > 3D Effects > Drop Shadow: 0, 0, 70, 30, color: #000000 (preto)
Selections > Select None.
23 - Ative o arquivo deco papillon. Edit > Copy. Volte para a imagem que estamos trabalhando... Edit > Paste as New Layer. Layers > Properties > General > Blend Mode: Dodge - Opacity: 80%
24 - Layers >
Merge > Merge All. Adjust > Sharpness > Sharpen. Aplicar a marca dos créditos: e sua marca d'água ou assinatura. File > Export > JPEG Optimizer...
CRÉDITOS: Tutorial "Christine" by Colybrix Tradução, Formatação e Arte Final por Márcinha SIM PSP Tubes Misted by Colybrix
Versão by Marcinha
Créditos: Tube Misted: Tubed by Pqna&Alice
Versão by Soxikibem
Créditos: Tubes: AI Generated by Soxikibem
Sinta-se à vontade para enviar suas versões para a autora para o e-mail abaixo:
SimPSP Redes Sociais
|