|
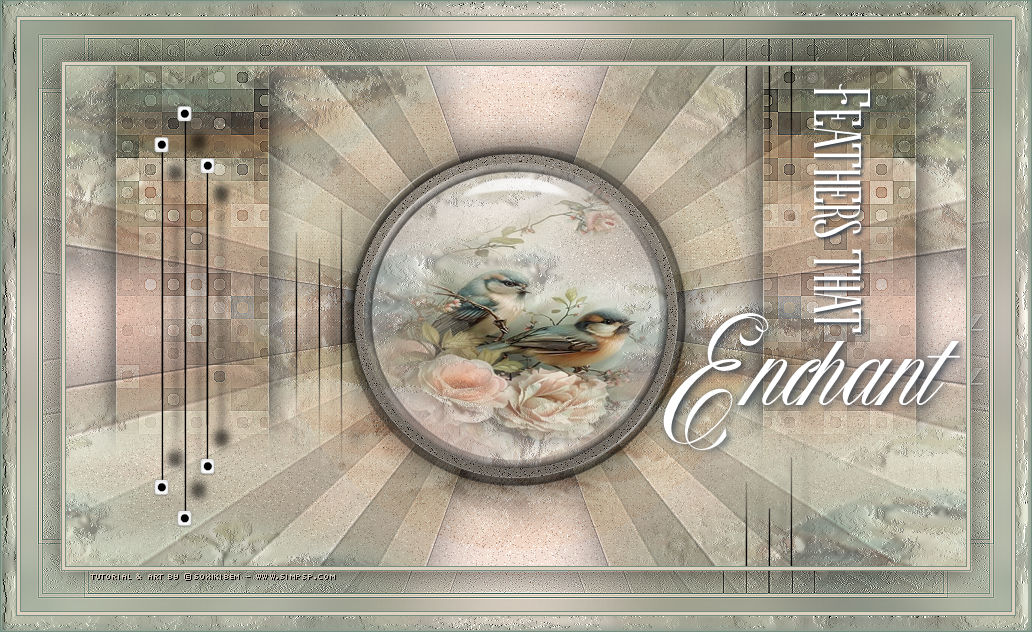
As penas dançam suavemente ao vento, como se carregassem os segredos da natureza. Cada uma, com sua textura única, brilha sob a luz do sol, refletindo um arco-íris de cores suaves. Elas são mais do que simples adornos: são símbolos de liberdade e mistério. A suavidade de suas fibras parece convidar ao toque, enquanto seu vôo leve e gracioso encanta os olhos de quem observa. No silêncio do ar, as penas se tornam poesia, sussurrando histórias de um mundo onde a beleza e a magia se entrelaçam em cada detalhe.
The feathers dance softly in the wind, as if carrying the secrets of nature. Each one, with its unique texture, shines under the sunlight, reflecting a rainbow of soft colors. They are more than mere adornments: they are symbols of freedom and mystery. The softness of their fibers seems to invite a touch, while their light and graceful flight enchants the eyes of those who watch. In the silence of the air, the feathers become poetry, whispering stories of a world where beauty and magic intertwine in every detail.
TRADUÇÕES:
Obrigada aos nossos Tradutores
MATERIAL: 1 Tube Principal ou Personagem à sua escolha 1 Misted Paisagem à sua escolha GlassXikiFeathers & BevelFeathers_Xiki (De dois clicks para instalar o efeito Glass e Bevel) Outros Materiais by Soxikibem
PLUGINS: Alien Skin Eye Candy 5 Impact > Glass Filters Unlimited 2.0 > Bkg Designer sf10 I > 4 Way Average, Cruncher. Filters Unlimited 2.0 > Bkg Designer sf10 II > NEO Vasarely Mosaics Filters Unlimited 2.0 > Deformation > Circulator Mehdi > Sorting Tiles Muras Meister > Pole Transform
Este Tutorial foi escrito por Soxikibem, qualquer semelhança é mera coincidência. Tutorial testado e revisado por Inácia Neves. Cor 3: #ded1c0
2 - Abra uma imagem
transparente de 900x500px. Selections > Select All. Edit > Copy no Misted Paisagem. Edit > Paste Into Selection. Selections > Select None.
3 - Effects > Image Effects > Seamless Tiling: Default. Adjust > Blur > Radial Blur.
4 - Effects > Edge Effects > Enhance. Plugin Mehdi > Sorting Tiles.
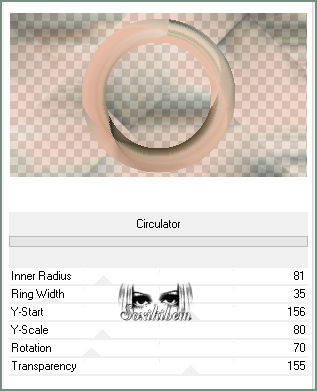
5 - Layers > Duplicate. Filters Unlimited 2.0 > Deformation > Circulator.
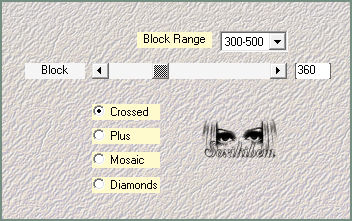
6 - Ativar a Layer Raster 1. Filters Unlimited 2.0 > Bkg Designer sf10 I > 4 Way Average.
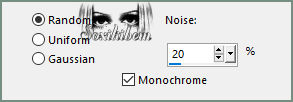
7 - Adjust > Add/Remove Noise > Add Noise.
8 - Layers > New Raster Layer. Selections > Select All. Edit > Copy no Misted Paisagem. Edit Paste Into Selection. Selections > Select None.
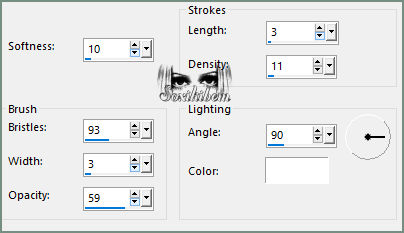
9 - Effects > Art Media Effects > Brush Strokes.
10 - Effects > Image Effects > Seamless Tiling: Default. Ativar a layer Copy of Raster 1.
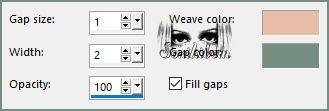
11 - Effects > Texture Effects > Weave. Weave color: Background Gap Color: Foreground Layers > Properties > General > Blend Mode: Screen - Opacity: 75%.
12 - Layers > Merge > Merge Visible. Selections > Load/Save Selections > Load Selection From Disk: Feathers_Xiki1. Selections > Promote Selection to Layer. Filters Unlimited 2.0 > Bkg Designer sf10 II > NEO Vasarely Mosaics: 23.
13 - Selections > Select None. Effects > Edge Effects > Enhance. Effects > 3D Effects > Drop Shadow: color: #000000 (preto) Layers > Properties > General > Blend Mode: Multiply.
14 - Layers > Duplicate. Image > Mirror > Mirror Horizontal. Layers > Merge > Merge Down.
15 - Layers > Duplicate. Ativar a Layer Promote Selection. Plugin Muras Meister > Pole Transform.
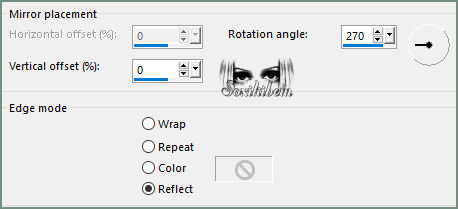
16 - Effects > Reflection Effects > Rotating Mirror.
17 - Selections > Load/Save Selections > Load Selection From Disk: Feathers_Xiki2. Edit > Cut. Effects > 3DEffects > Drop Shadow: color: #000000 (preto)
18 - Layers > New Raster Layer. Pintar com a Cor 3: #ded1c0. Selections > Modify > Contract: 10. Edit > Cut.
19 - Layers > New Raster Layer. Edit > Copy no Misted Paisagem. Edit > Paste Into Selection. Adjust > Sharpness > Sharpen.
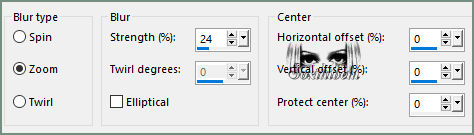
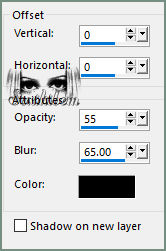
20 - Layers > New Raster Layer. Plugin Alien Skin Eye Candy 5 Impact > Glass: GlassXikiFeathers ou use as configurações do print abaixo.
21 - Selections > Select None. Suas layers devem estar assim.
22 - Ativar a Layer Raster 1. Adjust > Add/Remove Noise > Add Noise.
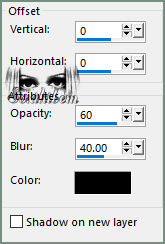
23 - Plugin Alien Skin Eye Candy 5 Impact > Bevel: BevelFeathers_Xiki ou use as configurações do print abaixo.
Adjsut > Sharpness > Sharpen.
24 - Ativar a Layer Copy of Promoted Selection (Topo Layer). Selections > Load/Save Selections > Load Selection From Disk: Feathers_Xiki3. Edit > Cut. Selections > Select None.
25 - Edit > Copy no DecorFeathers_Xiki. (Deletar a minha Marca D'água) Edit > Paste as New Layer. Pick Tool: Position X: 86 - Position Y: 0.
26 - Edit > Copy no TituloFeathers_Xiki. (Deletar a minha Marca D'água) Edit > Paste as New Layer. Pick Tool: Position X: 589 - Position Y: 16.
27 - Image > Add Borders > Symmetric: 1px na cor do Foreground 3px na cor 3 1px na cor Foreground Edit > Copy.
28 - Selections > Select All. Image > Add Borders > Symmetric: 40 px com qualquer cor. Selections > Invert. Edit > Paste Into Selection.
29 - Adjust > Blur > Gaussian Blur: 15. Filters Unlimited 2.0 > Bkg Designers sf10 I > Cruncher.
30 - Effects > Edge Effects > Enhance. Selections > Invert. Effects > 3D Effects > Drop Shadow: Color: #000000 (preto).
Selections > Select None.
31 - Image > Add Borders > Symmetric: 1px na cor do Foreground 3px na cor 3 1px na cor Foreground Selections > Select All.
32 - Image > Add Borders > Symmetric: 15px com qualquer cor. Selections > Invert. Edit > Paste Into Selection. Adjust > Blur > Gaussian Blur: 05.
33 - Effects > Art Media Effects > Brush Strokes.
Selections > Select None.
34 - Image > Add Borders > Symmetric: 1px cor Foreground.
35 - Se você desejar
redimensione seu trabalho.
Versão:
Créditos: Formatação, Arte Final e Tutorial by Soxikibem Misted by Pqna&Alice Outros Materiais: by Soxikibem
Sinta-se à vontade para enviar suas versões. Terei todo o prazer em publicá-las em nosso site.
|