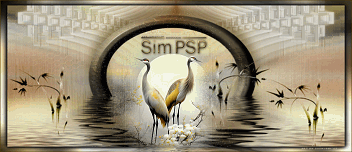
|
Dreams are the bridge between the possible and the impossible, where imagination knows no boundaries. Limitless Dreams is an invitation to push beyond the limits of mind and body, diving into a universe of infinite possibilities, where courage and determination turn the impossible into reality. Dream without restrictions, live without fear, and discover that the only limit is the one you place on yourself.
Os sonhos são a ponte entre o possível e o impossível, onde a imaginação não conhece fronteiras. Sonhos Sem Limites é um convite para ir além dos limites da mente e do corpo, mergulhando em um universo de possibilidades infinitas, onde coragem e determinação transformam o impossível em realidade. Sonhe sem restrições, viva sem medo e descubra que o único limite é aquele que você impõe a si mesmo.
TRADUÇÕES: Obrigada aos nossos Tradutores
MATERIAL: 1 Tube ou Misted Personagem à sua escolha 1 Misted Iluminado ou floral Outros Materiais by Soxikibem
PLUGINS: Penta.com: Drag Penta.com: VTR2 Penta.com: Dot and Cross Simple: Pizza Slice Mirror FM Tile Tools: Blend Emboss Graphics Plus: Cross Shadow Alien Skin | Eye Candy 5 Impact: Glass
Este Tutorial foi escrito por Soxikibem, qualquer semelhança é mera coincidência. Tutorial testado e revisado por Inácia Neves.
Cor 3: #ffffff
2 - Abra uma imagem
transparente de 900x500px.
3 - Plugin Simple > Pizza Slice Mirror. Layers > Duplicate. Image > Mirror > Mirror Horizontal. Layers > Properties > General > Blend Mode: Soft Light. Layers > Merge > Merge Down.
4 - Effects > Reflection Effects > Rotating Mirror.
5 - Selections > Load/Save Selections > Load Selection From Disk: LimitlessDreams_Xiki1. Selections > Promote Selection to Layer. Adjust > Blur > Gaussian Blur: 20.
6 - Plugin Penta.com > Dot and Cross.
7 - Layers > New Raster Layer. Edit > Copy no Misted Iluminado ou floral como preferir. Edit > Paste Into Selection. Adjust > Sharpness > Sharpen. Layers > Properties > General > Blend Mode: Overlay - Opacity: 60%. Layers > Merge > Merge Down.
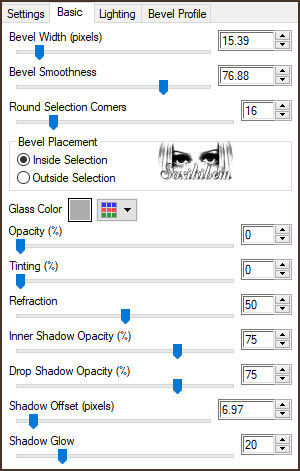
8 - Layers > New Raster Layer. Plugin Alien Skin | Eye Candy 5 Impact > Glass.
9 - Layers > Merge > Merge Down. Selections > Select None.
10 - Ativar a Layer Raster 1. Selections > Load/Save Selections > Load Selection From Disk: LimitlessDreams_Xiki2. Selections > Promote Selection to Layer. Effects > Reflection Effects > Feedback.
11 - Plugin Penta.com > Drag.
12 - Adjust > Sharpness > Sharpen. Selections > Select None. Effects > Refelection Effects > Rotating Mirror.
13 - Effects > Reflection Effects > Feedback.
14 - Plugin FM Tile Tools > Blend Emboss: Default.
15 - Layers > Duplicate. Ative a Layer Promoted Selection 1. Adjust > Blur > Gaussian Blur: 20. Layers > Properties > General > Blend Mode: Multiply.
16 - Ativar a Layer Raster 1. Plugin Penta.com > VTR2.
17 - Layers > New Raster Layer. Selections > Select All. Edit > Copy no Misted Iluminado ou Floral. Edit > Paste Into Selection. Selections > Select None.
18 - Effects > Image Effects > Seamless Tiling: Default. Adjust > Blur > Radial Blur. Layers > Properties > General > Blend Mode: Hard Light. * Na segunda versão eu usei o Blend Mode: Luminance.
19 - Effects > Texture Effects > Mosaic - Antique. Em versões anteriores ao PSP 22, a configuração do Grid settings vai apenas até 100, então aplique a numeração 100 em Number of columns e rows.
20 - Confira as layers.
21 - Com a layer Raster 2 ativa. Edit > Copy no DecorXiki. Edit > Paste As New Layer. * O Decor está com o efeito Blend Mode: Burn, mude se desejar ou ficar melhor para o seu trabalho.
22 - Ativar a Layer Promoted Selection (Top Layer). Merge > Merge All. Selections > Select All. Selections > Modify > Contract: 25. Selections > Invert. Adjust > Blur > Gaussian Blur: 20.
23 - Plugin Graphics Plus > Cross Shadow: Default.
24 - Effects > Texture Effects > Weave, com a cor do Foreground.
25 - Selections > Invert. Effects > 3D Effects > Drop Shadow: 0, 0, 100, 40, com a cor preta. Selections > Select None.
26 - Image > Add Borders > Symmetric: 2px cor Foreground 1px cor Background 2px cor Foreground 15px cor 3 (branca) 2px cor Foreground 1px cor Background 2px cor Foreground 30px cor 3 (branca)
27 - Edit > Copy no Misted Personagem. Edit > Paste As New Layer. Posicione e aplique efeito como preferir.
28 - Edit > Copy no TituloByXiki. *Lembre-se de retirar a Minha marca d'agua. Edit > Paste As New Layer. Pick Tool: Position X: 253 - Position Y: 389.
29 - Image > Add Borders > Symmetric: 2px cor Foreground
30 - Se você desejar
redimensione seu trabalho.
Versão:
Créditos: Formatação, Arte Final e Tutorial by Soxikibem Tube Principal & Misteds: Tubed by Pqna&Alice Outros Materiais: by Soxikibem
Sinta-se à vontade para enviar suas versões. Terei todo o prazer em publicá-las em nosso site.
|


