|
TRADUÇÕES:
Obrigada aos nossos Tradutores
MATERIAL: 1 Tube Principal ou Personagem à sua escolha 1 Misted Paisagem à sua escolha Preset: Preset_UserDefinedFilter_Bords de verre (Salvar o preset na pasta Presets do PSP) Selections : Salvar na Pasta Selections do PSP Outros Materiais by Soxikibem
Plugins: Carolaine and Sensibility > CS-LDots Eye Candy 4000 > Motion Trail Flaming Pear > Flood Mura's Seamless > Duplicate Simple > Blintz Simple > Top Left Mirror Simple > Centre Tile
Este Tutorial foi escrito
por Soxikibem, qualquer semelhança é mera coincidência.
Cor 3: #ffffff Cor 4: #000000
2 - Abra uma imagem
transparente de 850x550px.
3 - Plugins > Simple > Blintz. Image > Mirror > Mirror Vertical. Plugins > Simple > Blintz.
4 - Effects > Reflection Effects > Rotating Mirror.
5 - Effects > Reflection Effects > Rotating Mirror.
6 - Effects > User Defined Filter: Bords de verre
Adjust > Sharpness > Sharpen More.
7 - Plugins > Simple > Top Left Mirror.
8 - Selections > Load/Save Selections > Load Selection from Disk: Selection267_Xiki1. Selections > Promote Selection to Layer. Selections > Modify > Contract: 25. Aperte a tecla Delete do seu teclado.
9 - Layers > New Raster Layer. Edit > Copy no Misted Paisagem. Edit > Paste Into Selection. Adjust > Sharpness > Sharpen.
10 - Layers > New Raster Layer. Effects > 3D Effects > Cutout, com a cor preta.
Selections > Select None. Layers > Merge > Merge Down.
11 - Ativar a Layer Promoted Selection. Layers > Duplicate. Plugins > Mura's Seamless > Duplicate.
12 - Plugins > Carolaine and Sensibility > CS-LDots.
13 - Plugins > Simple > Centre Tile.
14 - Plugins > Eye Candy 4000 > Motion Trail.
15 - Effects > 3D Efects > Drop Shadow, com a cor preta.
Layers > Arrange > Move Down. Layers > Propertie > General > Blend Mode: Difference - Opacity: 50%.
16 - Effects > User Defined Filter: Emboss_3.
17 - Ativar a Layer Promoted Selection. Layers > Arrange > Bring to Top. Adjust > Add/Remove Noise > Add Noise.
18 - Effects > 3D Effects > Inner Bevel.
Effects > 3D Effects > Drop Shadow: 30, 0, 50, 10, cor preta.
19 - Ativar a Layer Raster 2. Layers > Duplicate. Image > Resize: 35%, all layers desmarcado. Pick Tool: Position X: 130 - Position Y: 54. Adjust > Sharpness > Sharpen. Plugins > Simple > Top Left Mirror.
20 - Adjust > Blur > Gaussian Blur: 5. Effects > Texture Effects > Weave, com a cor preta.
Layers > Arrange > Move Down.
21 - Ativar a Layer Promoted Selection. Layers > Merge > Merge Down. Fechar a visibilidade desta layer. Ativar a Layer Copy of Raster 2. Layers > Merge > Merge Visibile.
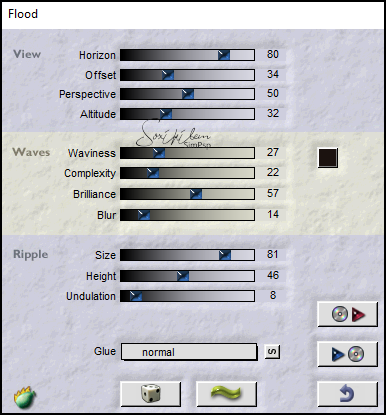
22 - Com a Layer Merged Ativa. Plugins > Flaming Pear > Flood.
23 - Ativar e abrir a visibilidade da layer Raster 2. Plugins > Flaming Pear > Flood.
24 - Edit > Copy no TituloSylvie_ByXiki. Edit > Paste as New Layer. Pick Tool: Position X: 0 - Position Y: 117. Colorize para combinar com as cores de seu trabalho.
25 - Edit > Copy No Tube Personagem. Edit > Paste as New Layer. Posicione à direita do trabalho. Plugins > Flaming Pear >Flood.
26 - Depois de aplicar o Flood, mova o tube mais para baixo e posicione a seu gosto. Veja como eu movi.
27 - Ativar a layer Merged, a primeira layer de baixo para cima. Layers > New Raster Layer. Selections > Select All. Edit > Copy no Misted Paisagem. Edit > Paste Into Selection. Selections > Select None.
28 - Effectes > Image Effects > Seamless Tiling: Side by side.
Layers > Propertie > General > Blend Mode: Soft Light.
29 - Ativar a layer Merged. Adjust > Add/Remove Noise > Add Noise: Gaussian, 6, monochrome marcado.
30 - Edit > Copy Special > Copy Merged.
31 - Image > Add Border > Symmetric: 1px na cor 4 Selections > Select All Image > Add Border > Symmetric: 40px com qualquer cor Selections > Invert Edit > Paste Into Selection
32 - Adjust > Blur > Radial Blur.
Adjust > Add/Remove Noise > Add Noise: Gaussian, 10, Monochrome marcado.
33 - Selections > Invert. Effects > 3D Effects > Drop Shadow: -15, -8, 65, 30, cor preta. Selections > Select None.
34 - Image > Add Border > Symmetric: 1px cor 4 20px cor 3 1px cor 4 20px cor 3 1px cor 4
35 - Selections > Select All. Selections > Modify > Contract: 43. Selections > Invert. Plugins > Toadies > What are you?: 20, 20.
36 - Adjust > Add/Remove Noise > Add Noise: Gaussian, 10, Monochrome marcado. Selections > Invert.
37 - Effects > 3D Effects > Drop Shadow: -15, -15, 100, 10, cor preta. Effects > 3D Effects > Drop Shadow: 15, 15, 100, 10, cor preta. Selections > Select None.
38 - Image > Add Border > Symmetric: 1px cor 4.
39 - Image > Resize: With 1000. Adjust > Sharpness > Unsharp Mask.
40 -
Aplicar sua marca d'água ou assinatura.
Versão:
Créditos: Formatação, Arte Final e Tutorial by Soxikibem Tube Principal & Misted Paisagem: Tubed by Pqna&Alice Outros Materiais: by Soxikibem
Sinta-se à vontade para enviar suas versões. Terei todo o prazer em publicá-las em nosso site.
|