|
TRADUÇÕES:
Obrigada aos nossos Tradutores
MATERIAL: 1 Tube Personagem à sua escolha 1 Misted Floral à sua escolha Selections: Salvar na pasta Selection do seu PSP Outros Materiais by Soxikibem
Plugins: Filter Factory Gallery G > Bevel 2 Filters Unlimited 2.0 > Background Designers IV > sf10 Diamond Flip Mehdi > Vibrations Nik Abstract Efex Pro! 1.0e > Weird Lines Simple > Quick Tile, Simple > Zoom Out and Flip Tramages > Pool Shadow
Este Tutorial foi escrito por Soxikibem, qualquer semelhança é mera coincidência.
Tutorial testado e revisado por Inácia Neves. Cor 3: #ffffff Cor 4: #000000
2 - Abra uma imagem
transparente de 900x650px.
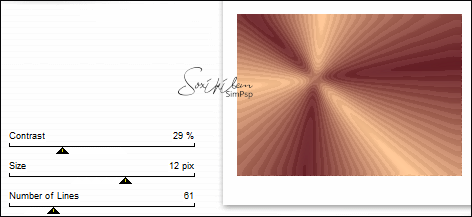
3 - Adjust > Blur > Gaussian Blur: 15. Plugins > Nik Abstract Efex Pro! 1.0e > Weird Lines.
4 - Effects > Image Effects > Seamless Tiling.
5 - Plugins > Filters Unlimited 2.0 > Background Designers IV > sf10 Diamond Flip.
6 - Effects > Distortion Effects > Wave.
7 - Plugins > Mehdi > Vibrations. Cores: Background, Foreground, a terceira cor foi adicionada pelo próprio Plugin .
8 - Selections > Load/Save Selections > Load Selection From Disk: Selection266_Xiki1. Selections > Promote Selection to Layer. Effects > Texture Effects > Mosaic - Glass.
9 - Adjust > Sharpness > Sharpen More. Effects > 3D Effects > Drop Shadow: -9, 0, 45, 20, cor preta. Selections > Select None. Layers > Duplicate. Image > Mirror > Mirror Horizontal. Image > Mirror > Mirror Vertical. Layers > Merge > Merge Down. Layers > Properties > General > Blend Mode: Darken.
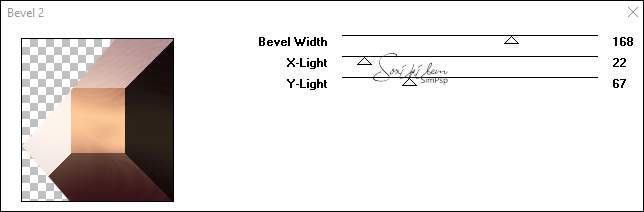
10 - Ativar a Layer Raster 1. Selections > Load/Save Selections > Load Selection From Disk: Selection266_Xiki2. Selections > Promote Selection to Layer. Plugins > Filter Factory Gallery G > Bevel 2.
11 - Mantenha a seleção. Effects > Texture Effects > Weave. Com as cores do Foreground e Background.
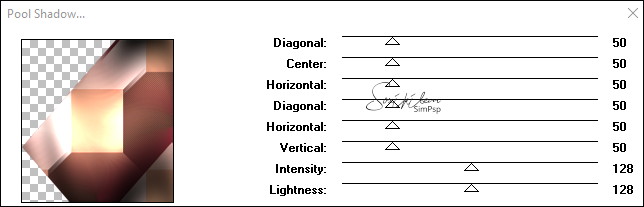
12 - Plugins > Simple > Quick Tile. Plugins > Tramages > Pool Shadow: Default.
13 - Selections > Modify > Select Selection Borders.
Layers > New Raster Layer. Pintar com o gradiente em uso. Effects > 3D Effects > Drop Shadow: 0, -9, 45, 20, cor preta. Selections > Select None. Plugins > Tramages > Pool Shadow: Default.
14 - Ativar a Layer Promoted Selection1. Layers > Properties > General > Blend Mode: Overlay.
15 - Layers > New Raster Layer. Selections > Load/Save Selections > Load Selection From Disk: Selection266_Xiki3. Pintar com o gradient Radial em uso. Selections > Select None.
16 - Layers > Arrange > Move Up. Effects > 3D Effects > Drop Shadow: 0, -9, 45, 20, cor preta. Adjust > Add/Remove Noise > Add Noise: Random, 5, monochrome marcado.
17 - Layers > New Raster Layer. Selections > Load/Save Selections > Load Selection From Disk: Selection266_Xiki4. Edit > Copy no Misted Floral. Edit > Paste Into Selection. Selections > Select None. Adjust > Blur > Gaussian Blur: 10. Layers > Properties > General > Blend Mode: Dissolve.
18 - Layers > New Raster Layer. Selections > Load/Save Selections > Load Selection From Disk: Selection266_Xiki5. Edit > Copy no Misted Floral. Edit > Paste Into Selection. Adjust > Blur > Motion Blur.
Edit > Repeat Motion Blur. Effects > Edge Effects > Enhance. Edit > Repeat Enhance Edges.
19 - Selections > Select None. Pick Tool: Position X: 470, Position Y: 218. Layers > Duplicate. Image > Flip > Flip Horizontal. Image > Flip > Flip Vertical. Pick Tool: Position X: 402, Position Y: 137. Layers > Merge > Merge Down.
20 - Layers > New Raster Layer. Selections > Load/Save Selections > Load Selection From Disk: Selection266_Xiki6. Edit > Paste Into Selection o Misted Floral. Adjust > Sharpness > Sharpen.
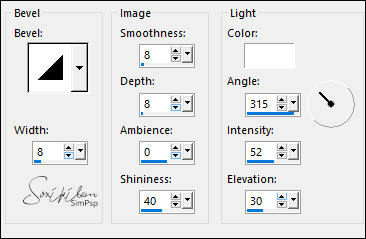
21 - Effects > 3D Effects > Inner Bevel.
Selections > Select None.
22 - Effects > Reflection Effects > Rotating Mirror.
Layers > Arrange > Move Up. Effects > 3D Effects > Drop Shadow: 16, 0, 45, 0, cor preta. Effects > 3D Effects > Drop Shadow: -16, 0, 45, 0, cor preta.
23 - Layers > New Raster Layer. Selections > Load/Save Selections > Load Selection From Disk: Selection266_Xiki8. Pintar com o gradient Radial em uso. Selections > Select None. Effects > 3D Effects > Drop Shadow: 0, 0, 75, 20, cor preta. Plugins > Tramages > Pool Shadow: Default. Layers > Duplicate. Image > Mirror > Mirror Horizontal.
24 - Ativar a Layer Promoted Selection 1. Layers > Duplicate Effects > Image Effects > Seamless Tiling.
25 - Ativar a Layer Raster 1. Layers > New Raster Layer. Selections > Select All. Edit > Copy no Misted Floral. Edit > Paste Into Selection. Selections > Select None. Adjust > Sharpness > Sharpen. Opcional: Se desejar, diminua opacidade ou troque o blend da layer.
26 - Ativar a Layer do topo. Edit > Copy no Misted Personagem. Edit > Paste as New Layer. Posicione à direita.
27 - Edit > Copy no TituloPinuccia_BySoxikibem. Edit > Paste as New Layer. Pick Tool: Position X: 336, Position Y: 131.
28 - Edit > Copy no DecorBySoxikibem. Edit > Paste as New Layer. Pick Tool: Position X: 164, Position Y: 0.
29 - Edit > Copy Special > Copy Merged. Image > Add Borders > Symmetric: 1px cor 4 (preta) 5px cor 3 (branca) 1px cor 4 (preta) Selections > Select All.
30 - Image > Add Borders > Symmetric: 10px com qualquer cor. Selections > Invert. Edit > Paste Into Selection. Adjust > Blur > Gaussian Blur: 20. Plugins > Tramages > Pool Shadow: Default. Selections > Select None.
31 - Image > Add Borders > Symmetric: 1px cor 4 (preta) 30px cor 3(branca) 1px cor 4 (preta)
32 - Se você desejar
redimensione seu trabalho.
Versão:
Créditos: Formatação, Arte Final e Tutorial by Soxikibem Tube Principal & Misted Floral: Tubed by Pqna&Alice Outros Materiais: by Soxikibem
Sinta-se à vontade para enviar suas versões. Terei todo o prazer em publicá-las em nosso site.
|