|
TRADUÇÕES:
Obrigada aos nossos Tradutores
MATERIAL: 1 Misted Personagem à sua escolha 1 Misted Paisagem à sua escolha 1 Misted Borboleta à sua escolha Outros Materiais by Soxikibem
PLUGINS: Bordure Mania (nvr) > Ondulation Filters Unlimited 2.0 > Bkg Designer sf10 I > Cut Glass BugEye Mehdi > Wavy Lab 1.1, Sorting Tiles Mura's Seamless > Emboss at Alpha Simple > Zoom Out and Flip, Top Left Mirror
Este Tutorial foi escrito
por Soxikibem, qualquer semelhança é mera coincidência.
Cor 3: #086b8d Cor 4: #000000
2 - Abra uma imagem
transparente de 900x600px. Sequência das cores: Background, Foreground, Cor 3, Cor 4.
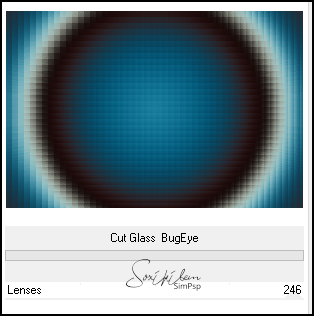
3 - Adjust > Blur > Gaussian Blur: 30. Plugin > Filters Unlimited 2.0 > Bkg Designer sf10 I > Cut Glass BugEye.
4 - Plugin > Mehdi > Sorting Tiles.
5 - Layers > New Raster Layer. Selections > Select All. Edit > Copy no Misted Paisagem. Edit > Paste Into Selection. Selections > Select None.
6 - Effects > Image Effects > Seamless Tiling.
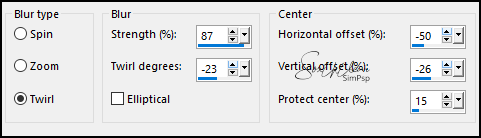
7 - Adjust > Blur > Radial Blur.
Effects > User Defined Filter: Emboss 3.
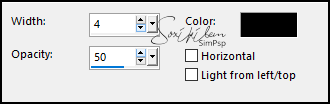
8 - Effects > Texture Effects > Blinds, com a cor preta.
Adjust > Sharpness > Sharpen. Layers > Properties > General > Blend Mode: Screen. Layers > Merge > Merge Down.
9 - Selections > Load/Save Selections > Load Selection From Disk: Selection263_Xiki1. Selections > Promote Selection to Layer. Adjust > Blur > Gaussian Blur: 30. Selections > Select None.
10 - Plugin > Simple > Top Left Mirror.
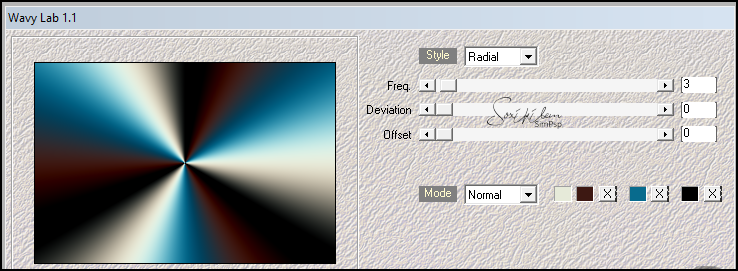
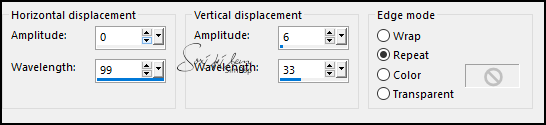
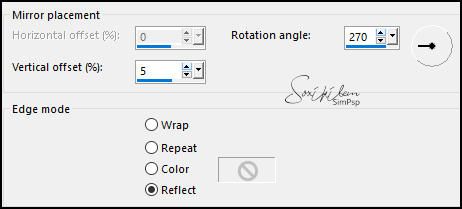
11 - Effects > Distortion Effects > Wave.
12 - Effects > Image Effects > Seamless Tiling.
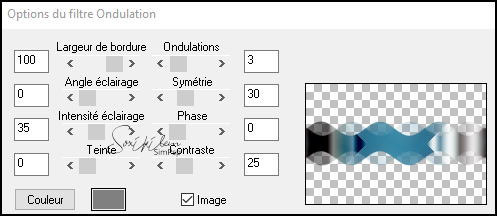
13 - Plugin > Bordure Mania (nvr) > Ondulation.
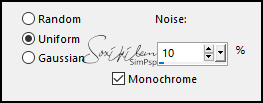
14 - Adjust > Add/Remove Noise > Add Noise.
15 - Plugin > Mura's Seamless > Emboss at Alpha: Default.
Effects > Ed Effects > Drop Shadow: -15, 0, 100, 0, cor branca. Effects > Ed Effects > Drop Shadow: 15, 0, 100, 0, cor branca. Layers > Properties > General > Blend Mode: Overlay.
16 - Ativar a Layer Raster 1. Selections > Load/Save Selections > Load Selection from Disk: Selection263_Xiki2. Layers > Promote Selection to Layer. Adjust > Blur > Gaussian Blur: 30. Selections > Select None.
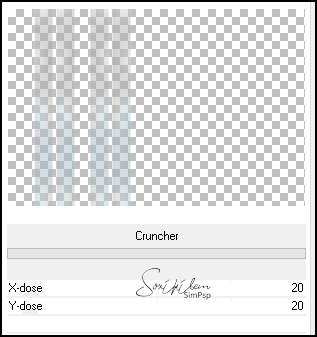
17 - Plugin > Simple > Zoom Out and Flip. Filters Unlimited 2.0 > Bkg Designer sf10 I > Cruncher.
18 - Effects > Distortion Effects > Wave.
Selections > Load/Save Selections > Load Selection From Disk: Selection263_Xiki3. Edit > Cut ou aperte a tecla Delete do teclado. Selections > Select > None. Layers > Properties > General > Blend Mode: Dodge. Image > Flip > Flip Horizontal.
19 - Edit > Copy no Decor263_1_Soxikibem. Edit > Paste a New Layer. Não mover...
20 - Ativar a Layer do Topo. Layers > New Raster Layer. Selections > Load/Save Selections > Load Selection From Disk: Selection263_Xiki4. Selecione a ferramenta Flood Fill > Opacity: 20% Pinte esta seleção com a cor do background. - Selections > Modify > Contract: 50. Edit > Cut ou aperte a tecla Delete do teclado.
- Selections > Modify > Contract: 50. Pinte com a cor do background.
- Selections > Modify > Contract: 50. Edit > Cut ou aperte a tecla Delete do teclado.
- Selections > Modify > Contract: 50. Pinte com a cor do background.
- Selections > Select None. Layers > Properties > General > Blend Mode: Dodge. *Retorne para 100% em opacity do Flood Fill.
21 - Layers > Duplicate. Image > Resize: 30%, all layers desmarcado. Pick Tool: Position X: 155 - Position Y: 274
22 - Layers > Duplicate. Pick Tool: Position X: 600 - Position Y: 356.
23 - Edit > Copy Special > Copy Merged. Edit > Paste a New Layer. Plugin Mura's Meister > Perspective Tiling.
24 - Ative a ferramenta Magic Wand, Tolerance 0, Feather 80. Clique na parte transparente desta layer. Aperte a tecla Delete do teclado 4 vezes. Selections > Select None.
25 - Layers > Duplicate. Pick Tool: Position X: 0 - Position Y: 398. Selections > Load/Save Selections > Load Selection From Disk: election263_Xiki6. Aperte a tecla Delete do teclado. Selections > Select None. Effects > 3D Effects > Drop Shadow: 25, 0, 100, 40, cor preta.
26 - Ative a layer Raster 4. Edit > Copy no Misted Paisagem. Edit > Paste a New Layer. Image > Resize se for necessário, se estiver usando a do material resize para 50%, all layers desmarcado. Posicione conforme o modelo. Layers > Properties > General > Blend Mode: Hard Light - Opacity: 80%.
27 - Ativar a Layer do topo. Layers > New Raster Layer. Selections > Load/Save Selections > Load Selection From Disk: Selection263_Xiki5. Edit > Copy no Misted Borboleta. Edit > Paste Into Selection. Selections > Select None. Adjust > Sharpness > Sharpen. Layers > Properties > > General > Blend Mode: Overlay - Opacity: 40%. Effects > Reflection Effects > Rotating Mirror.
28 - Edit > Copy no Misted Personagem. Edit > Paste as New Layer. Resize se for necessário, se estiver usando o do material de um resize de 60%. Adjust > Sharpness > Sharpen. Pick Tool: Position X: 67, Position Y: 96.
29 - Edit > Copy no Decor263_2_Soxikibem. Edit > Paste a New Layer. Pick Tool: Position X: 19, Position Y: 13.
30 - Image > Add Borders > Symmetric: 2px na cor 4 2px na cor do Background 2px na cor 4 15px na cor Background 2px na cor 4 30px na cor do Background
31 - Edit > Copy no Titulo263Soxikibem. Edit > Paste a New Layer. Pick Tool: Position X: 73, Position Y: 75.
32 - Image > Add Borders > Symetric: 2px na cor 4.
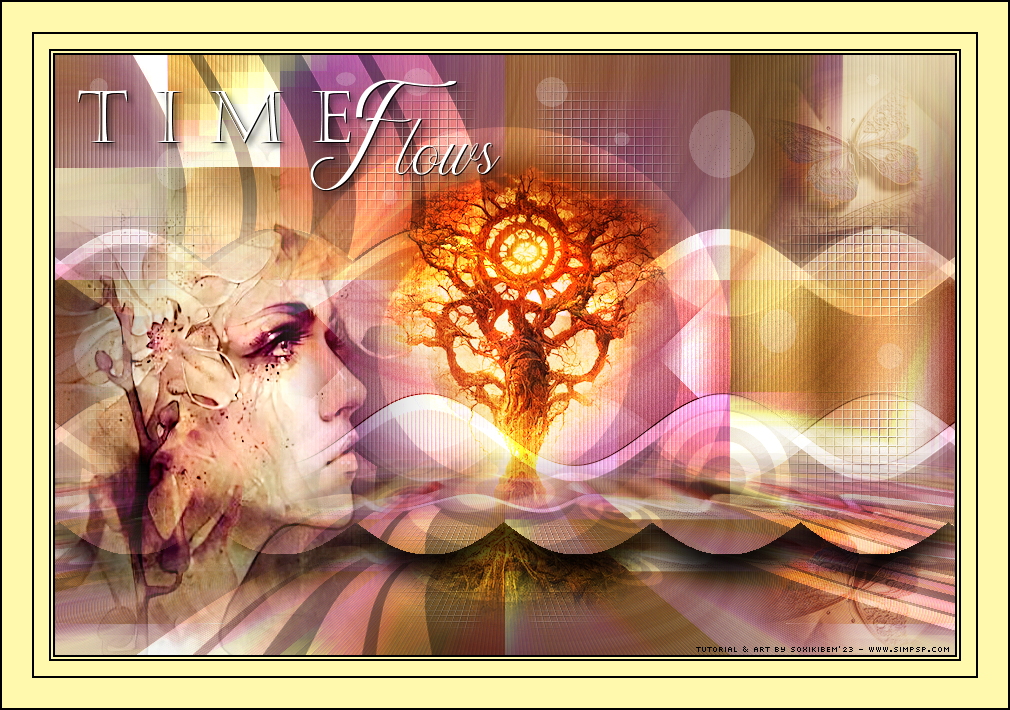
33 - Se você desejar
redimensione seu trabalho.
Versão:
Créditos: Formatação, Arte Final e Tutorial by Soxikibem Tubes Misteds: Tubed by Pqna&Alice Outros Materiais: by Soxikibem
Sinta-se à vontade para enviar suas versões. Terei todo o prazer em publicá-las em nosso site.
|