|
TRADUÇÕES:
Obrigada aos nossos Tradutores
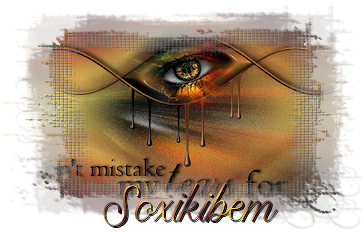
MATERIAL: 1 Misted Eye à sua escolha Preset: De dois cliques no preset 255_Soxikibem para instalar Outros Materiais by Soxikibem
PLUGINS: Alien Skin | Eye Candy 5 Impact > Bevel Alien Skin | Eye Candy 5 > Nature > Drip Funhouse > Faceter Mura's Meister > Perspective Tiling
Este Tutorial foi escrito
por Soxikibem, qualquer semelhança é mera coincidência. Cor 3: #ffffff
2 - Abra uma imagem
transparente de 1000x700px.
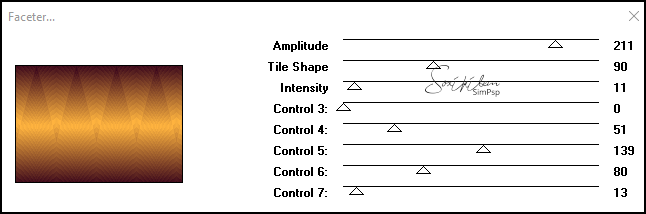
3 - Plugin > Funhouse > Faceter.
4 - Layers > Duplicate. Image > Mirror > Mirror - Vertical. Layers > Properties: Blend Mode Screen.
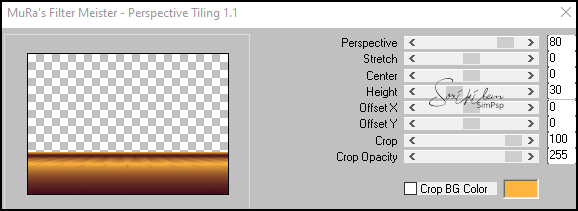
5 - Ativar a Layer Raster 1. Layers > Duplicate. Plugin > Mura's Meister > Perspective Tiling.
6 - Com a ferramenta Magic Wand, Tolerance 0, Feather 80, clique na parte transparente desta layer. Aperte a tecla Delete 4 vezes. Selections > Select None.
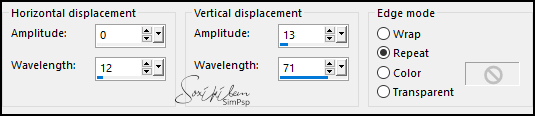
7 - Effects > Distortion Effects > Wave.
8 - Layers > Duplicate. Image > Mirror > Mirror - Vertical. Layers > Merge > Merge Down. Effects > 3D Effects > Drop Shadow: 0, 0, 100, 50, cor preta. Edit > Repeat Drop Shadow.
9 - Ativar a Layer Copy of Raster 1 (Top layer). Layers > New Raster Layer. Pintar com um gradiente Linear formado pelas cores do foreground e background.
10 - Effects > Geometric Effects > Perspective Horizontal: 100, Transparent. Edit > Repeat Horizontal Perspective. Image > Mirror > Mirror Horizontal. Effects > Geometric Effects > Perspective Horizontal: 100, Transparent.
11 - Effects > Distortion Effects > Wave.
Pick Tool: Position X 38, Position Y 274.
12 - Layers > Duplicate. Image > Mirror > Mirror - Horizontal. Image > Mirror > Mirror Vertical. Layers > Merge > Merge Down.
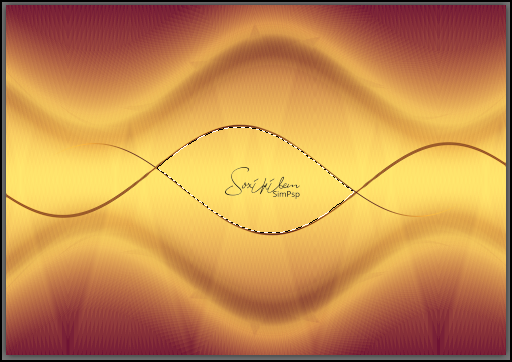
13 - Com a ferramenta Magic Wand, Tolerance e Feather 0, selecione como no print.
14 - Selections > Modify > Expand: 2. Layers > New Raster Layer. Pintar com o gradiente usado no inicio do trabalho.
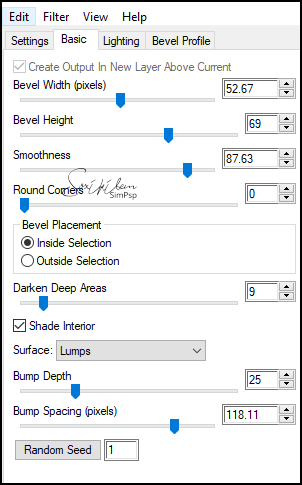
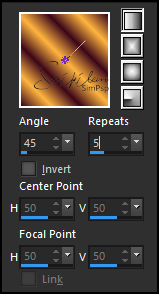
15 - Layers > Arrange > Move Down. Plugin Alien Skin | Eye Candy 5 Impact > Bevel: 255_Soxikibem ou use as configurações abaixo.
Selections > Select None.
16 - Ativar a Layer Raster 2. Effects > 3D Effects > Drop Shadow: 4, 2, 100, 0 cor preta. Effects > 3D Effects > Drop Shadow: -4, -6, 100, 20 cor preta.
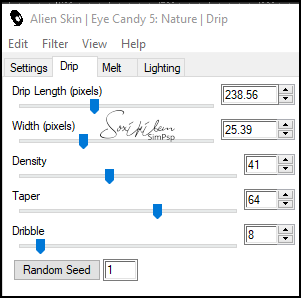
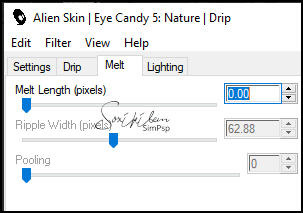
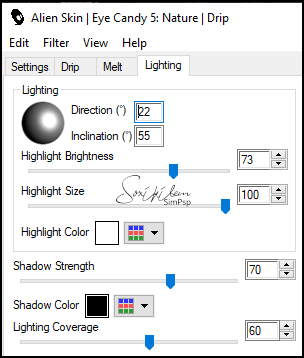
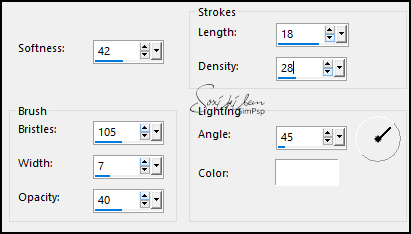
17 - Layers > Merge > Merge Down. Plugin Alien Skin | Eye Candy 5 > Nature > Drip: Drip255Soxikibem ou use as configurações dos prints abaixo.
18 - Image > Mirror > Mirror - Horizontal. Pick Tool: Position X 0, Position Y 84.
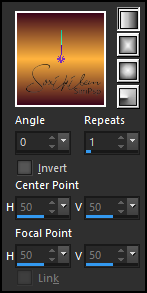
19 - Layers > New Raster Layer. Selections > Select All. Edit > Copy no Misted Eye. Edit > Paste Into Selection. Select None.
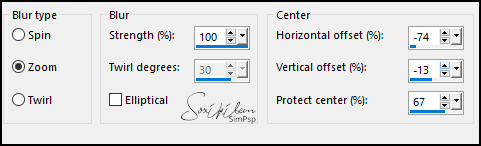
20 - Effects > Image Effects > Seamless Tiling: Default. Adjust > Blur > Radial Blur.
Layers > Arrange > Move Down. Effects > Edge Effects > Enhance. Edit > Repeat Enhance Edges.
21 - Adjust > Add/Remove Noise > Add Noise: Uniform, 30, Monochrome marcado. Se desejar altere o Blend dessa layer.
22 - Ativar a Layer do Topo. Edit > Copy a New layer o Misted Eye. Resize se for necessário e posicione como no modelo.
23 - Layers > Merge > Merge Visibile Edit > Copy. Layers > New Raster Layer. Pintar com um Gradient Linear como abaixo.
24 - Selections > Select All. Selections > Modify > Contract: 3. Aperte a tecla Delete do teclado.
25 - Selections > Modify > Contract: 40. Pintar com o Gradiente em uso. Selections > Modify > Contract: 3. Aperte a tecla Delete do teclado.
26 - Selections > Modify > Contract: 20. Pintar com o Gradiente em uso. Selections > Modify > Contract: 3. Aperte a tecla Delete do teclado.
27 - Layers > New Raster Layer. Edit > Paste Into Selection.
28 - Selections > Invert. Ativar a Layer Merged. Adjust > Blur > Radial Blur.
29 - Effects > Art Media Effects > Brush Strokes.
30 - Selections > Select None. Ativar a layer das bordinhas (Raster 1). Effects > 3D Effects > Drop Shadow: 0, 0, 100, 10, cor preta. Edit > Repeat Drop Shadow.
31 - Ativar a Layer do Topo. Edit > Copy no TituloTearsBySoxikibem. Pick Tool: Position X 82, Position Y 459.
32 -
Aplicar sua marca d'água ou assinatura.
Versão:
Créditos: Formatação, Arte Final e Tutorial by Soxikibem Tube Misted: Tubed by Pqna&Alice Outros Materiais: by Soxikibem
Sinta-se à vontade para enviar suas versões. Terei todo o prazer em publicá-las em nosso site.
|