|
TRADUÇÕES:
Obrigada aos nossos Tradutores
MATERIAL: 1 Tube Principal ou Personagem à sua escolha 1 Misted Personagem à sua escolha Winnies006 - win_054.ffx (Colocar na pasta Filters Unlimited 2.0 > ICNET-Filters) Outros Materiais by Soxikibem
PLUGINS: Filters Unlimited 2.0 > Winnies006: win_054 Graphics Plus > Cross Shadow Mura's Meister > Copies Toadies > Banding Suprress Noise
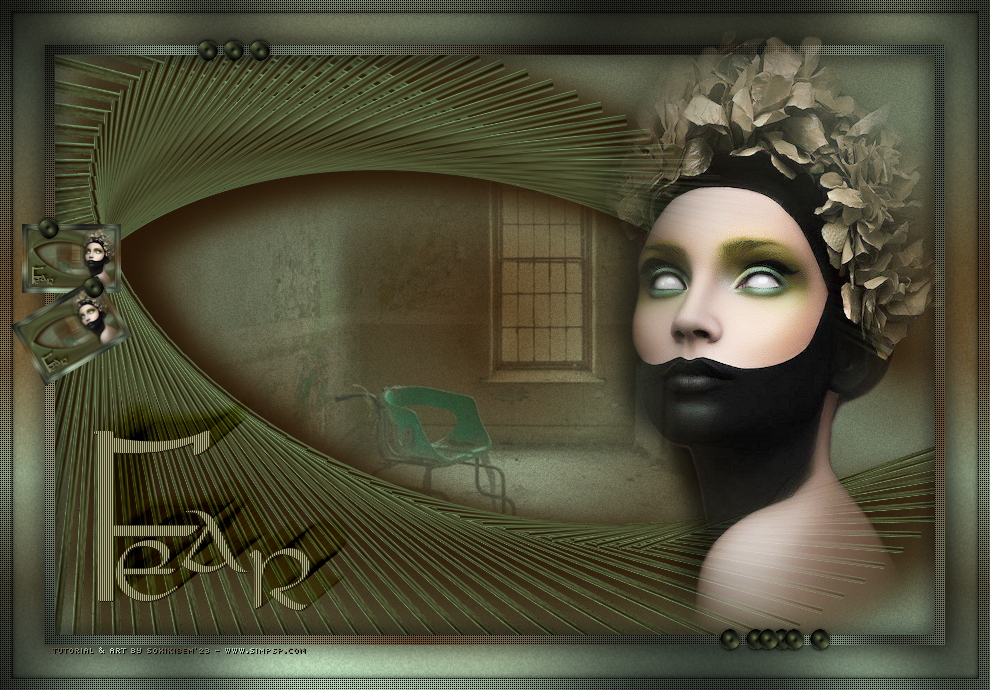
Este Tutorial foi escrito
por Soxikibem, qualquer semelhança é mera coincidência.
2 - Abra uma imagem
transparente de 900x600px.
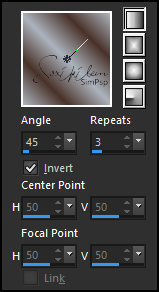
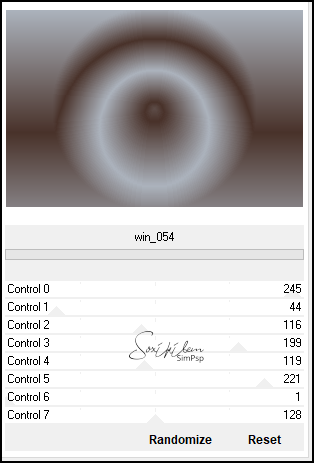
3 - Filters Unlimited 2.0 > Winnies006: win_054.
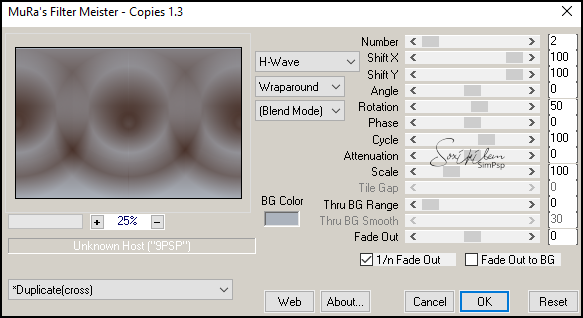
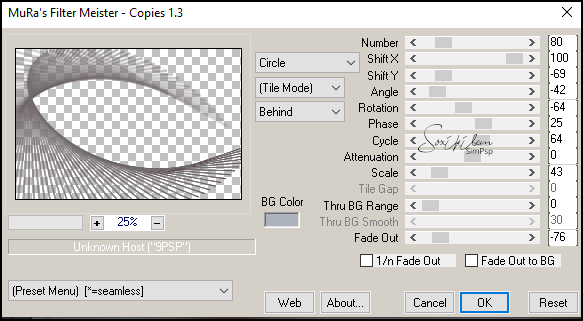
4 - Plugin Mura's Meister > Copies.
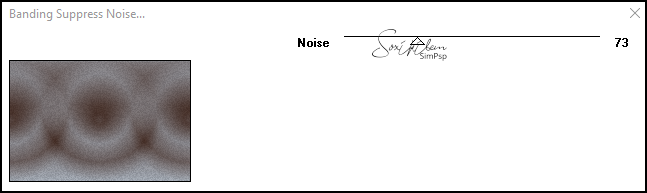
5 - Plugin Toadies > Banding Suppress Noise.
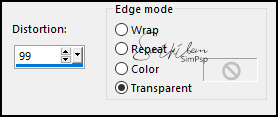
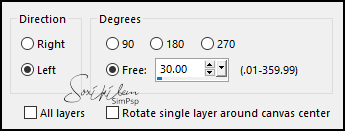
6 - Layers > Duplicate. Effects > Geometric Effects > Perspective - Horizontal.
Repetir o Perspective - Horizontal mudando o valor para -99.
7 - Plugin Mura's Meisteer > Copies.
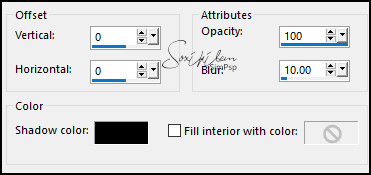
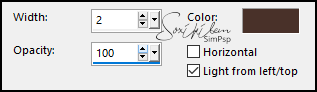
8 - Effects > 3D Effects > Drop Shadow: 13, 28, 100, 50, cor foreground. Layers > Duplicate. Layers > Properties: Blend Mode Overlay.
9 - Ativar a Layer Raster1. Edit > Copy no Misted Paisagem. Edit > Paste as New Layer. Posicione para ficar no centro do efeito. Layers > Properties: Blend Mode Overlay, Opacity 50%. (O blend e a opacidade vai depender da sua imagem).
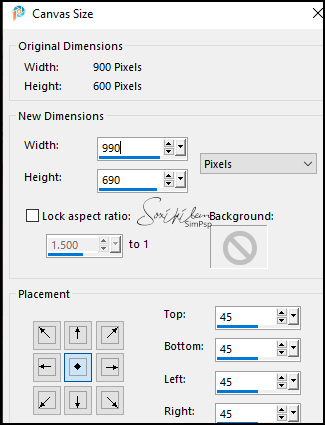
10 - Ativar a Layer Raster 1. Edit > Copy. Image > Canvas Size.
11 - Selections > Select All. Layers > New Raster Layer. Layers > Arrange > Move Down. Image > Paste Into Selection.
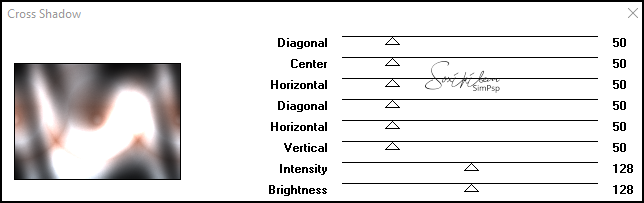
12 - Plugin Graphics Plus > Cross Shadow: Default.
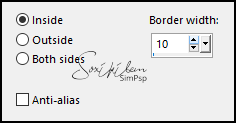
13 - Plugin AFS Importer > sqborder2.
14 - Selections > Modify > Contract: 11. Layers > New Raster Layer. Effects > 3D Effects > Cutout, com a cor preta.
Selections > Select None.
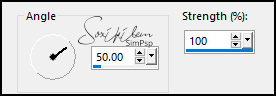
15 - Ativar a Layer Raster 1. Com a ferramenta Magic Wand, Tolerance e Feather 0, clique na parte transparente.
16 - Selections > Invert. Selections > Modify > Select Selection Borders.
17 - Ativar a Layer do Topo ( Copy (2) of Raster1) Layers > New Raster Layer. Pintar com o Gradient em uso.
18 - Plugin Graphics Plus > Cross Shadow: Default.
19 - Plugin AFS Importer > sqborder2.
20 - Selections > Select None. Effecta > 3D Effects > Drop Shadow: 0, 0, 100, 30, cor preta.
21 - Edit > Copy no TituloFearBySoxikibem. Edit > Paste as New Layer. Pick Tool Position X 94, Position Y 430. Colorize para combinar com as cores que estiver trabalhando.
22 - Effects > Texture Effects > Blinds, com a cor do foreground.
23 - Layers > Duplicate. Adjust > Blur > Motion Blur.
Layers > Arrange > Move Down. Layers > Duplicate. Layers > Properties: Blend Mode Burn.
24 - Edit > Copy no Tube Personagem. Edit > Paste as New Layer. Posicione como preferir. Aplique Drop Shadow ou efeito que desejar.
25 - Edit > Copy Special > Copy Merged. Edit > Paste as New Layer. Image > Resize: 10%, all layers desmarcado. Pick Tool: Position X 22, Position Y 224.
26 - Layers > Duplicate. Image > Free Rotate.
Pick Tool: Position X 11, Position Y 276.
27 - Edit > Copy no DecorBySoxikibem. Edit > Paste a New Layer. Pick Tool: Position X 35, Position Y 36.
28 - Se você desejar
redimensione seu trabalho.
Versão:
Créditos: Formatação, Arte Final e Tutorial by Soxikibem Tube Principal & Misted: Tubed by Pqna&Alice Outros Materiais: by Soxikibem
Sinta-se à vontade para enviar suas versões. Terei todo o prazer em publicá-las em nosso site.
|