TRADUÇÕES:
Obrigada aos nossos tradutores!
MATERIAL 1 Tube Principal à sua escolha 1 Misted Paisagem à sua escolha AlphaChannel_MC_BySoxikibem Presets Perspective Shadow: PresetMyriamXiki1, PresetMyriamXiki2 (De dois cliques para instalar o preset no plugin)
PLUGINS Alien Skin | Eye Candy 5 Impact | Perspective Shadow Carolaine and Sensibility > cs_texture Mehdi > Wavy Lab 1.1 Mura's Meister > Copies Mura's Seamless > Emboss at Alpha VM Instant Lines > Lightlines, Tripolis
Este Tutorial foi escrito por
Soxikibem, qualquer semelhança é mera coincidência. Tutorial elaborado no PSP 2022
O meu agradecimento as Tubeiras pelos Tubes e Masks
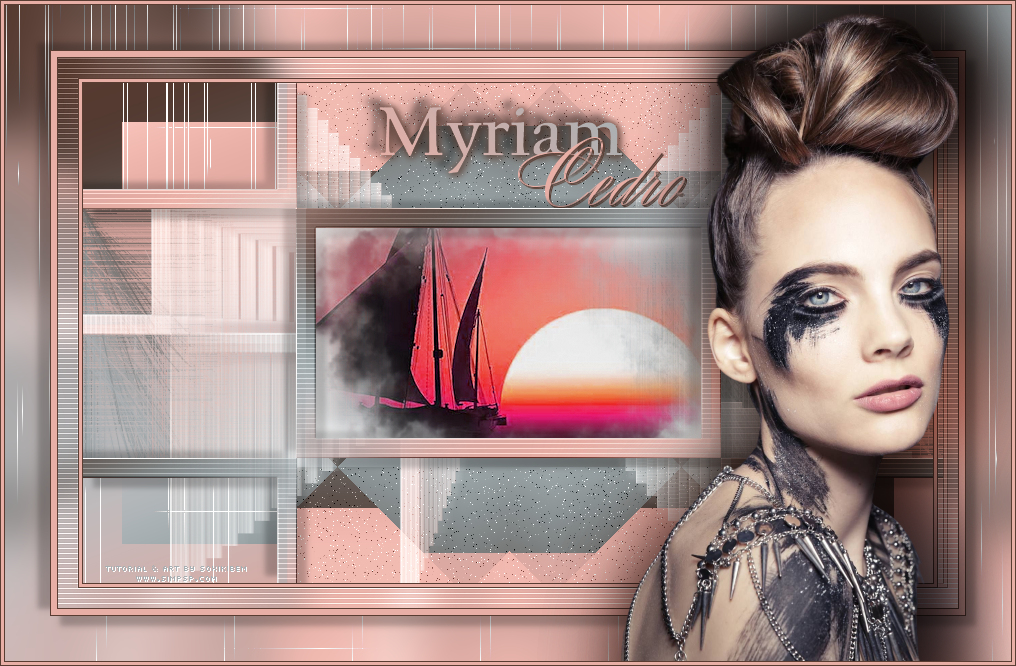
TUTORIAL
1 - Abrir o material no PSP, duplique e feche os originais. Escolha quatro cores para trabalhar. Foreground: #514e61 Background: #c2c9c1 Cor 3: #7b9cb9 Cor 4: #ffffff
2 - Abra o AlphaChannel_MC_BySoxikibem. Effects > Plugins > Mehdi > Wavy Lab 1.1: Seqüência das cores: 1, 2, 3, 4.
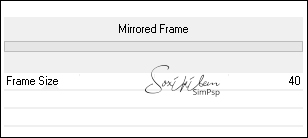
3 - Effects > Plugins > Filters Unlimited 2.0 > Buttons & Frames > Mirrored Frame:
4 - Selections > Load/ Save Selections > Load Selection From Alpha channel: Selection #1. Selections > Promote Selection to Layer. Selections > Select None. Image > Resize: 50%, all layers desmarcado. Effects > Image Effects > Seamless Tiling: Default.
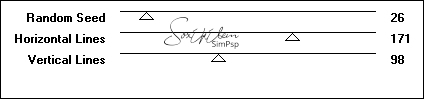
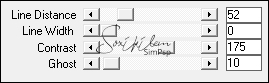
5 - Ativar a layer Merged. Selections > Load/ Save Selections > Load Selection From Alpha channel: Selection #3. Selections > Promote Selection to Layer. Effects > Plugins > VM Instant Art > Lightlines:
Layers > Properties > General > Blend Mode: Lighten. Effects > Edge Effects > Enhance. Selections > Select None.
6 - Ativar a layer Merged. Selections > Load/ Save Selections > Load Selection From Alpha channel: Selection #4. Selections > Promote Selection to Layer. Effects > Plugins > VM Instant Art > Tripolis:
Effects > Reflection Effects > Rotating Mirror: Default.
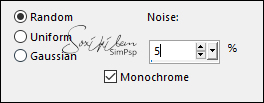
7 - Adjust > Add/Remove Noise > Add Noise.
Selections > Select None.
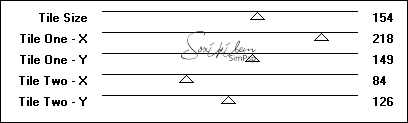
8 - Ativar a layer Merged. Selections > Load/ Save Selections > Load Selection From Alpha channel: Selection #2. Selections > Promote Selection to Layer. Effects > Texture Effects > Fur:
Nota*** Se estiver usando PSP 2020 ou versões anteriores o valor em Density vai até 100. (Não fará diferença no resultado final do trabalho) Selections > Select None.
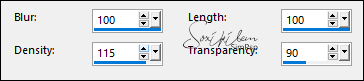
9 - Fechar a visibilidade da Layer Promoted Selection (Layer do Topo). Ativar a Layer > Merged Layers > Merge > Merge Visible. Abrir a visibilidade e ativar a Layer Promoted Selection. Selections > Load/ Save Selections > Load Selection From Alpha Channel: Selection #6. Effects > Plugins > Carolaine and Sensibility > cs_texture:
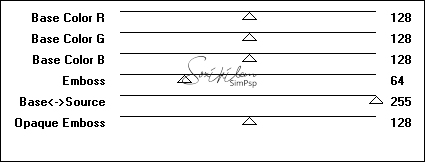
10 - Effects > Plugins > Mura's Seamless > Emboss at Alpha: Default.
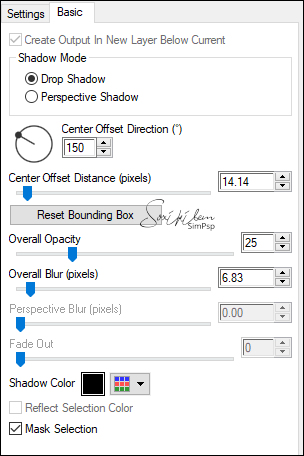
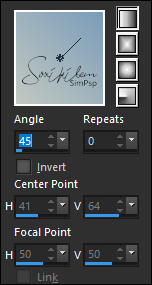
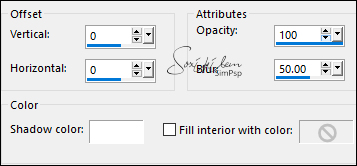
11 - Effects > Plugins > Alien Skin | Eye Candy 5 Impact | Perspective Shadow: PresetMyriamXiki1, ou use as seguintes configurações:
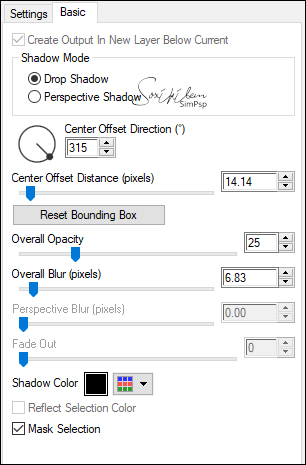
12 - Effects > Plugins > Alien Skin | Eye Candy 5 Impact | Perspective Shadow: PresetMyriamXiki2, ou use as seguintes configurações:
13 - Selections > Select None. Layers > Duplicate. Effects > Reflection Effects > Rotating Mirror:
Layers > Arrange > Move Down.
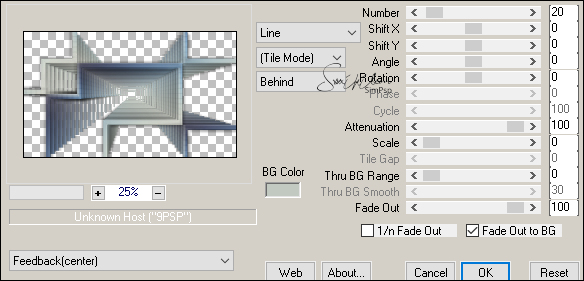
14 - Effects > Plugins > Mura's Meister > Copies:
Layers > Properties > General: Blend Mode: Screen.
15 - Selections > Load/ Save Selections > Load Selection From Alpha channel: Selection #5. Pressionar a tecla Delete do teclado. Edit > Copy no Misted Paisagem. Edit > Paste As New Layer. Resize se for necessário, no misted do material o resize foi de 70%. Adjust > Sharpness > Sharpen. Com a ferramenta Move Tool, posicionar o Misted dentro da seleção. Selections > Invert. Pressionar a Tecla Delete do teclado. Selections > Select None.
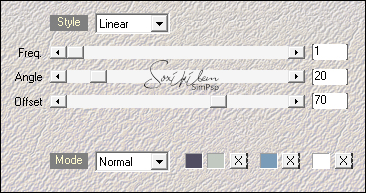
16 - Layers > New Raster Layer. Selections > Load/ Save Selections > Load Selection From Alpha channel: Selection #7. Pintar esta seleção com um gradiente Linear, formado pelas cores 02 no foreground e 03 no background:
Selections > Select None.
17 - Effects > 3D Effects > Drop Shadow: 1, 1, 100, 10, Color: cor 1. Edit > Repeat Drop Shadow. Effects > Plugins > Alien Skin | Eye Candy 5 Impact | Perspective Shadow: PresetMyriamXiki1, ou use as seguintes configurações:
Edit > Repeat Perspective Shadow.
18 - Layers > New Raster Layer. Selections > Load/ Save Selections > Load Selection From Alpha channel: Selection #8. Pintar a seleção com a cor 2. Selections > Select None. Effects > 3D Effects > Drop Shadow: 1, 1, 100, 0, Color: cor 1. Edit > Repeat Drop Shadow.
19 - Ativar a Layer Copy of Promoted Selection. Selections > Load/ Save Selections > Load Selection From Alpha channel: Selection #5. Layers > New Raster Layer. Effects > 3D Effects > Cutout: Shadow color: cor #ffffff (branco)
Layers > Duplicate. Selections > Select None.
20 - Edit > Copy Special > Copy Merged. Image > Add Borders > Symmetric: 1px - color: com a cor do foreground 3px - color: com a cor do background 1px - color: com a cor do foreground
21 - Selections > Select All. Image > Add Borders > Symmetric: 20px com qualquer cor. Selections > Invert. Edit > Paste Into Selection. Adjust > Blur: Gaussian Blur: 15. Effects > Plugins > Carolaine and Sensibility > cs_texture:
Adjust > Sharpness > Sharpen. Selections > Select None.
22 - Image > Add Borders > Symmetric: 1px - color: com a cor do foreground 6px - color: com a cor do background 1px - color: com a cor do foreground
23 - Selections > Select All. Image > Add Borders > Symmetric: 45px com qualquer cor. Selections > Invert. Edit > Paste Into Selection. Adjust > Blur: Gaussian Blur: 25.
24 - Layers > New Raster Layer. Effects > Plugins > VM Instant Art > Lightlines:
Layers > Properties > General: Blend Mode Lighten. Layers > Merge > Merge Visibile.
25 - Selections > Invert. Effects > Plugins > Alien Skin | Eye Candy 5 Impact | Perspective Shadow: PresetMyriamXiki1, ou use as seguintes configurações:
26 - Effects > Plugins > Alien Skin | Eye Candy 5 Impact | Perspective Shadow: PresetMyriamXiki2, ou use as seguintes configurações:
Selections > Select None.
27 - Edit > Copy no Tube Principal. Edit > Paste as New Layer. Posicionar e aplicar Drop Shadow ou efeito como preferir.
28 - Image > Add Borders > Symmetric: 1px - color: com a cor do foreground 3px - color: com a cor do background 1px - color: com a cor do foreground
29 - Aplicar sua marca d'água ou assinatura. File > Export > JPEG Optimizer.
CRÉDITOS: Criação - Formatação e Art Final by Soxikibem Tubes Principais & Misteds Paisagens: Tubed by Pqna&Alice
Sinta-se à vontade para enviar suas versões. Terei todo o prazer em publicá-las em nosso site.
|