|
Tutorial dedicado as Lesadas do SimPsp. Carinhosamente nós elogiamos umas as outras com este termo quando erramos... e isto gera um clima de alegria quebrando o receio do erro e de ser cobrada. Seja doido... Seja fofo... Seja divertido... Seja Lesado... Seja amigo... Seja qualquer coisa, o importante é ser você.
TRADUÇÕES:
Obrigada aos nossos tradutores!
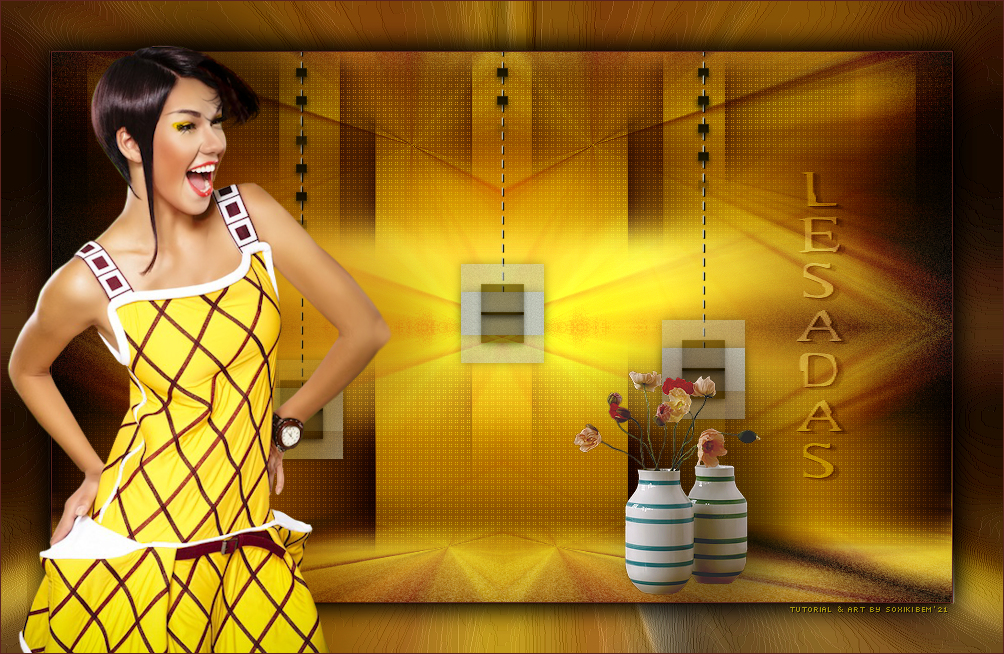
MATERIAL 1 Tube Principal à sua escolha 1 Tube Decorativo à sua escolha titulolesadasXiki decorLesadasXiki
Plugins Carolaine and Sensibility Mehdi Mura's Meister Filter Unlimited 2.0: AFS Import, Bkg Kaleidoscope
Nota: Fique à vontade para alterar os Blends Mode de acordo com o material e cores escolhidas para o seu trabalho.
Tutorial elaborado no PSP 2020 Ultimate
Execução
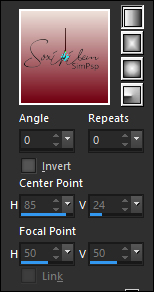
1 - Abrir o material no PSP, duplique e feche os originais. Escolha duas cores para trabalhar: Foreground: #710010 Background: #ede0d9
2 - Abra uma transparência de 900x550px. Pintar com um gradiente Linear formado pelas cores escolhidas:
3 - Layers > New Raster Layer. Selections > Select All. Edit > Copy no tube principal. Edit > Paste Into Selection. Selections > Select None. Effects > Image Effects > Seamless Tiling: Default. Adjust > Sharpness > Sharpen.
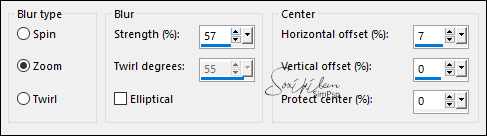
4 - Adjust > Blur > Radial Blur:
Edit > Repeat Radial Blur. Layers > Merge > Merge Down. Effects > Edge Effects > Enhance.
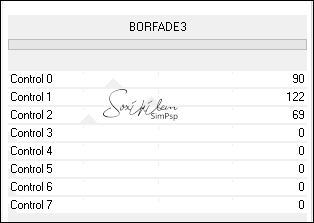
5 - Effects > Plugins > Filters Unlimited 2.0 > AFS Import > BORFADE3:
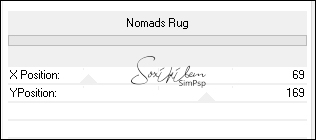
6 - Layers > Duplicate. Effects > Plugins > Filters Unlimited 2.0 > Bkg Kaleidoscope > Nomads Rug:
Layers > Properties > General > Blend Mode: Hard Light.
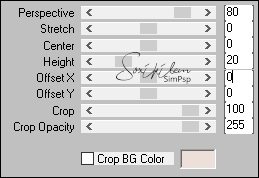
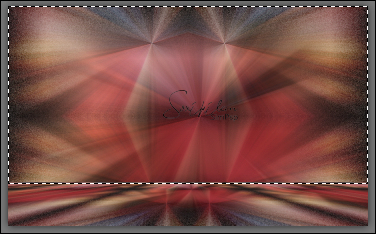
7 - Edit > Copy Special > Copy Merged. Edit > Paste as New Layer. Effects > Plugins > Mura's Meister > Perspective Tiling:
8 - Com a ferramenta Magic Wand: Tolerance e Feather: 0, clicar parar selecionar a parte de cima:
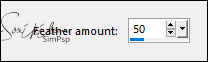
Selections > Modify > Feather...: 50.
Pressionar a tecla Delete do teclado 4 vezes. Selections > Select None.
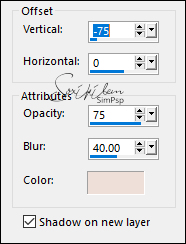
9 - Effects > 3D Effects > Drop Shadow: com a cor do background, shadow on new layer marcado.
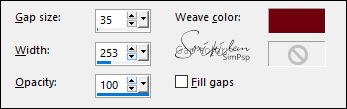
10 - Com a layer Raster2Shadow1 ativa. Effects > Texture Effects > Weave: Weave color: cor do foreground.
Layers > Arrange > Bring to Top. Layers > Duplicate. Layers > Properties > General > Blend Mode: Multiply.
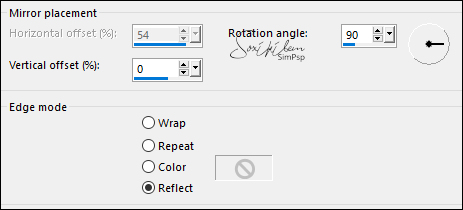
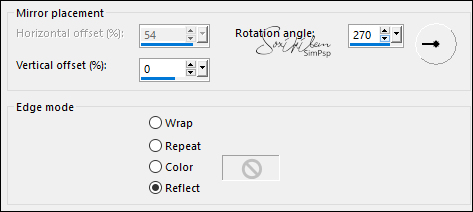
11 - Effects > Reflection Effects > Rotating Mirror
12 - Layers > Duplicate. Effects > Image Effects > Seamless Tiling: Stutter Diagonal
Layers > Duplicate. Image > Mirror > Mirror Horizontal. Layers > Merge > Merge Down.
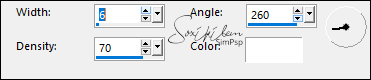
13 - Effects > Texture Effects > Weave: Weave color: cor do Foreground.
14 - Effects > Plugins > Carolaine and Sensibility > CS-LDots:
15 - Ativar a Layer > Raster 1. Effects > Reflection Effects > Rotating Mirror.
16 - Layers > Duplicate. Image > Mirror > Mirror Horizontal. Layers > Properties > general > Opacity: 50%. Layers > Merge > Merge Down.
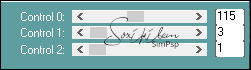
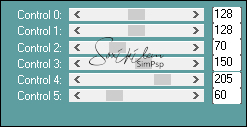
17 - Effects > Plugins > Carolaine and Sensibility > CS-Reflection: Obs.: Diminua o valor em Control 4 caso fique muito claro. Na minha segunda versão eu usei 155 em Control 4.
18 - Ativar a layer do topo. Edit > Copy no titulolesadasXiki. Edit > Paste as New Layer. Com a ferramenta Pick Tool, posicionar: Position X: 744, Position Y: 120. Layers > Properties > General > Blend Mode: Soft Light.
19 - Edit > Copy no decorLesadasXiki. Edit > Paste a New Layer. Com a ferramenta Pick Tool, posicionar: Position X: 196, Position Y: 0.
20 - Edit > Copy no tube decorativo. Edit > paste as New Layer. Posicionar à sua escolha. Effects > 3D Effects > Drop Shadow à sua escolha.
21 - Image > Add Borders > Symmetric: 1px - cor do foreground. Edit > Copy. Selections > Select All. Image > Add Borders > Symmetric: 50px com qualquer cor. Selections > Invert. Edit > Paste Into Selection.
22 - Adjust > Blur > Radial Blur.
23 - Effects > Artistic Effects > Topography:
Adjust > Sharpness > Sharpen.
24 - Selections > Invert. Effects > 3D Drop Shadow: 0, 0, 100, 40, Color: #000000 (preta) **shadow on new layer desmarcado. Edit > Repeat Drop Shadow. Selections > Select None.
25 - Edit > Copy no Tube Principal. Edit > Paste a New Layer. Posicione à esquerda. Effects > 3D Effects > Drop Shadow à sua escolha.
26 - Image > Add Border > Symmetric: 1px - cor do foreground.
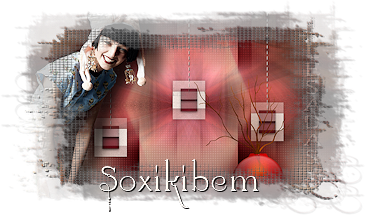
27 - Aplicar sua marca d'água ou assinatura. File > Export > JPEG Optimizer.
CRÉDITOS Versão 1 Tube Principal & Decorativo by Nicole
CRÉDITOS Versão 2 Tube by Gabry - Tube Decorativo by Nena Silva
Sinta-se à vontade para enviar suas versões. Terei todo o prazer em publicá-las em nosso site.
|