|
TRADUÇÕES:
Obrigada aos nossos tradutores!
MATERIAL 1 Tube Principal à sua escolha 1 Misted Paisagem à sua escolha Callitubes-139misted decorByllinaByXiki tituloByllina Callitubes-60diversos Preset_UserDefinedFilter_Emboss_4.PspScript (Salvar na pasta Presets de seu PSP)
Plugins Mura's Meister > Pole Transform Alien Skin Eye Candy 5 > Textures Flaming Pear > India Ink (versões que usei)* Flaming Pear > Flexify 2 (versões que usei)* * Outras versões dos plugins os efeitos podem ser diferentes
Nota: Fique à vontade para alterar os Blends de acordo com o material e cores escolhidas para o seu trabalho.
Tutorial elaborado no PSP 2020 Ultimate
Execução
1 - Abrir o material no PSP, duplique e feche os originais. Escolha três cores para trabalhar: Foreground: #58646d Background: #d3a28c Cor 3: #fcf9d9
2 - Abra uma transparência de 900x550px. Pintar com a cor 3. Selections > Select All.
3 - Edit > Copy no Callitubes-60diversos. (Colorize se acaso estiver usando outras cores) Edit > Paste Into Selection. Selections > Select None.
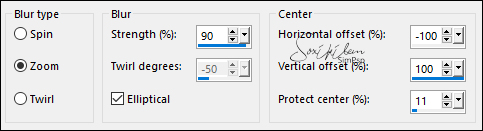
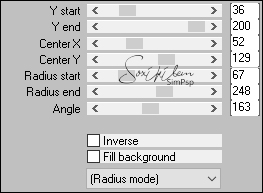
4 - Effects > Image Effects > Seamless Tiling: Default. Adjust > Blur > Radial Blur:
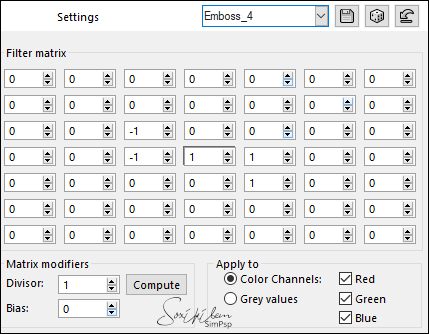
5 - Effects > Distortion Effects > Pinch: 100. Effects > User Defined Filter: Emboss_4:
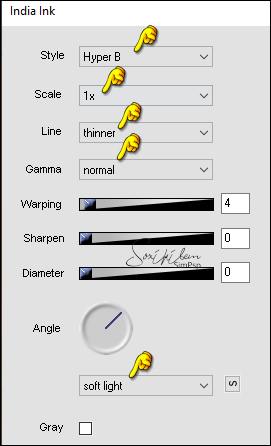
6 - Layers > Duplicate. Effects > Plugins > Flaming Pear > India Ink:
Layers > Properties > General > Opacity: 60%.
07 - Ativar a Layer Raster 1. Layers > Duplicate. Layers > Arrange > Move Up.
08 - Image > Resize: 50%, all layers desmarcado. Effects > Distortion Effects > Polar Coordinates: Rectangular, Transparent. Layers > Duplicate. Image > Mirror > Mirror Vertical. Layers > Merge > Merge Down.
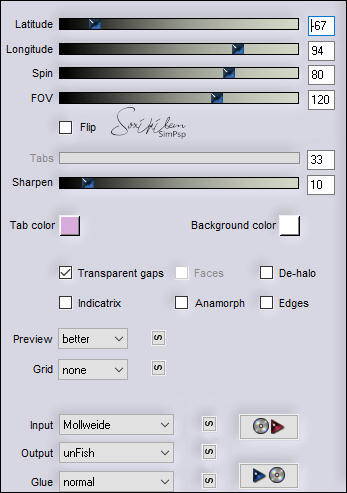
09 - Effects > Plugins > Flaming Pear > Flexify 2:
Com a ferramenta Magic Wand: Tolerance 0 - Feather: 20, clique fora do efeito.
Pressionar a tecla Delete do teclado 5 vezes. Selections > Select None.
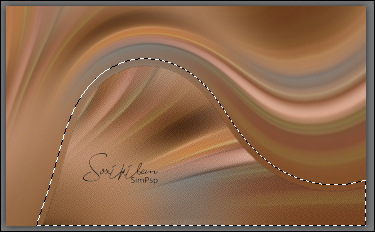
10 - Effects > Plugins > Mura's Meister > Pole Transform:
11 - Com a ferramenta Magic Wand: Tolerance e Feather: 0, selecione dentro do circulo formado:
Layers > New Raster Layer. Edit > Copy no Misted Paisagem escolhido para o circulo. Edit > Paste Into Selection. Adjust > Sharpness > Sharpen.
12 - Layers > New Raster Layer. Effects > 3D Effects > Cutout:
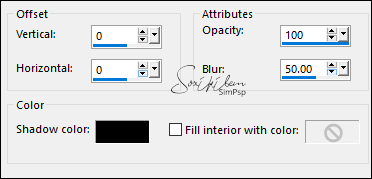
Effects > 3D Effects > Drop Shadow: 0, 0, 100, 45, Color: #000000 (preto). Selections > Select None. Layers > Merge > Merge Down.
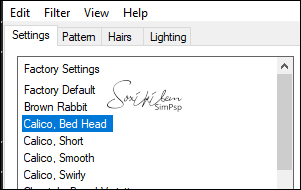
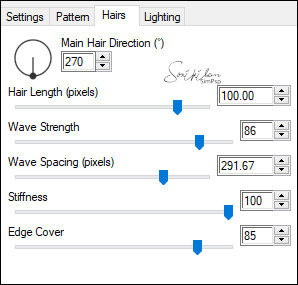
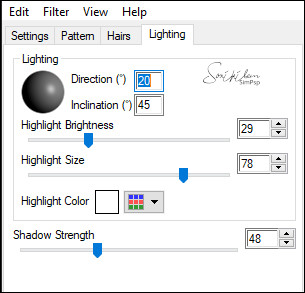
13 - Ativar a layer Copy of raster 1 (efeito que formou o circulo). Layers > Duplicate. Effects > Plugins > Alien Skin Eye Candy 5: Textures > Animal Fur: Em Settings escolha: Calico, Bed Head. Com as cores Foreground e Background.
Layers > Properties > General > Blend Mode: Soft Light. Effects > Edge Effects > Enhance. Layers > Arrange > Move Up.
14 - Edit > Copy no Callitubes-139misted. Edit > Paste as New Layer. Image > Flip > Flip Horizontal. Layers > Arrange > Move Down. Com a ferramenta Pick Tool, posicionar: Position X: 450, Position Y: 5.
15 - Layers > Properties > General > Blend Mode: Soft Light. Layers > Duplicate. Layers > Properties > General > Blend Mode: Multiply.
16 - Ativar a Layer do topo. Edit > Copy no tube principal. Edit > Paste a New Layer. Posicionar à direita. Effects > 3D Effects > Drop Shadow: à sua escolha ou outro efeito que preferir.
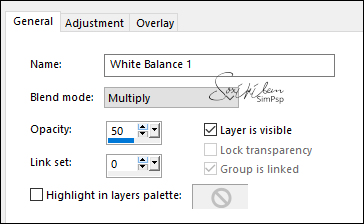
17 - Opcional este item. Layers > New Adjustment Layer > White Balance. Na aba General mudar em Blend Mode para Multiply, Opacity 50%.
18 - Fechar a visibilidade da layer do tube. Edit > Copy Special > Copy Merged. Abra a visibilidade da layer do tube. Obs.: Se desejar, Paste as New Image para não se perder, usaremos nas bordas.
19 - Image > Add Borders > Symmetric: 1px - color: foreground 1px - color: background 1px - color: foreground 3px - color: 3. 1px - color: foreground 1px - color: background 1px - color: foreground
20 - Selections > Select All. Image > Add Borders > Symmetric: 50px com qualquer cor. Selections > Invert. Edit > Paste Into Selection.
21 - Adjust > Blur > Gaussian Blur: 15. Effects > Plugins > Flaming Pear > India Ink:
22 - Selections > Invert. Effects > 3D Effects > Drop Shadow: 0, 0, 100, 50, Color: #000000 (preto). Edit > Repeat Drop Shadow.
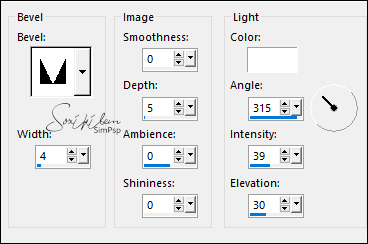
23 - Selections > Invert. Effects > 3D Effects > Inner Bevel:
Selections > Select None.
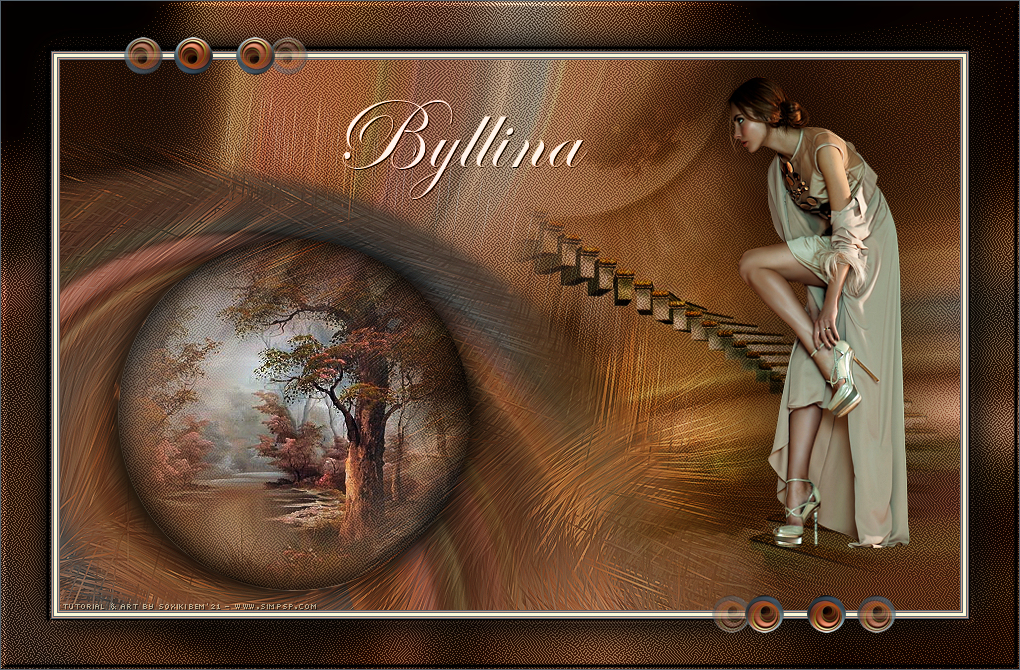
24 - Edit > Copy no tituloByllina. Edit > Paste as New Layer. Com a ferramenta Pick Tool, posicionar: Position X: 341, Position Y: 99. Layers > Properties > General > Blend Mode: Luminance (L).
25 - Edit > Copy no decorByllinaByXiki. Edit > Paste as New Layer. Com a ferramenta Pick Tool, posicionar: Position X: 123, Position Y: 36. Layers > Duplicate. Image > Mirror > Mirror Horizontal. Image > Mirror > Mirror Vertical.
26 - Image > Add Borders > Symmetric: 1px - Color: foreground.
27 - Aplicar sua marca d'água ou assinatura. File > Export > JPEG Optimizer.
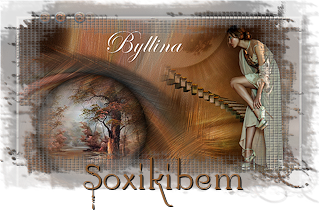
CRÉDITOS Tutorial & Arte by Soxikibem Tubes & Mistedes by CalliTubes
Sinta-se à vontade para enviar suas versões. Terei todo o prazer em publicá-las em nosso site.
|