|
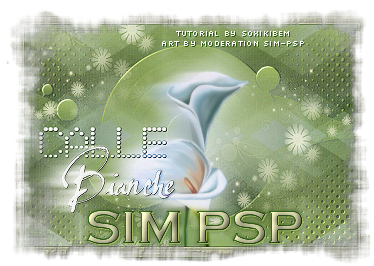
Tutorial By Soxikibem English Translation by SIM-PSP moderation Original Tutorial
MATERIAL 1 Tube Flower of your choice. Narah_Mask_1240 NarahsMasks_1592 tituloCalleBiancheBySoxikibem Selection GM2020 (Save to PSP Selections Folder)
PLUGINS Graphics Plus ScreenWorks Simple
TUTORIAL
1 - Open the material on the PSP, duplicate and close the original. Choose four colors to work with:
Color1 - Foreground: #2e5b17 Color 2 - Background: #a4c05e Color 3: #d4d2ab Color 4: #133108
2 - Open a transparent image of 900x600px. Paint with the color of the foreground. Selections > Select All. Edit > Copy the tube flower. Edit > Paste Into Selection. Selections > Select None.
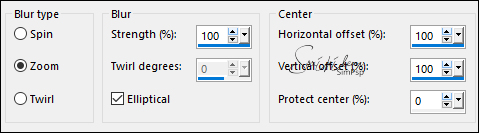
3 - Effects > Image Effects > Seamless Tiling: Default. Adjust > Blur > Radial Blur.
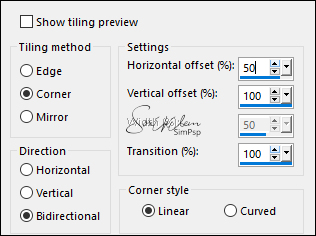
4 - Effects > Plugin Simple > Top Left Mirror.
5 - Selections > Load/Save Selections > Load Selection From Disk: GM2020. Selections > Promote Selection to Layer. Selections > Select None.
6 - Effects > Geometric Effects > Circle: Transparent. Effects > Plugin Filters Unlimited 2.0 > Bkg Designers sf10 IV > @ THE BLAST: 20, 211. Layers > Properties > General > Blend Mode: Luminance (L), Opacity: 70%.
7 - Activate the Raster layer 1. Selections > Load/Save Selections > Load Selection From Disk: GM2020. Selections > Invert. Selections > Promote Selection to Layer. Selections > Select None.
8 - Effects > Plugin Simple > Zoom Out and Flip. Effects > Image Effects > Seamless Tiling.
Layers > Properties > General > Blend Mode: Multiply.
9 - Effects > Plugin Graphics Plus > Horizontal Mirror: 170, 170.
10 - Effects > Plugin ScreenWorks > Dot Screen.
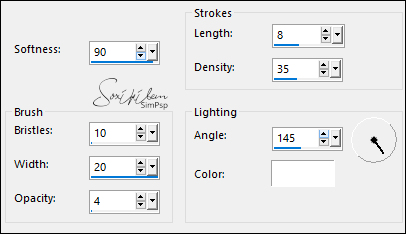
11 - Activate the Raster layer 1. Effects > Art Media Effects > Brush Strokes.
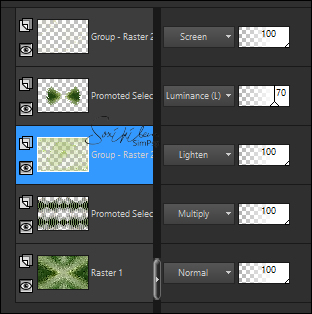
12 - Activate the top layer. Layers > New Raster Layer. Paint with color 3. Layers > New Mask layer > From Image: Narah_Mask_1240. Effects > Edge Effects > Enhance. Layers > Merge > Merge Group.
13 - Effects > Image Effects > Seamless Tiling: Default. Layers > General > Properties > Blend Mode: Screen.
14 - Layers > New Raster Layer. Paint with color 2. Layers > New Mask layer > From Image: NarahsMasks_1592. Layers > Merge > Merge Group. Layers > Duplicate. Layers > Merge > Merge Down. Layers > General > Properties > Blend Mode: Lighten.
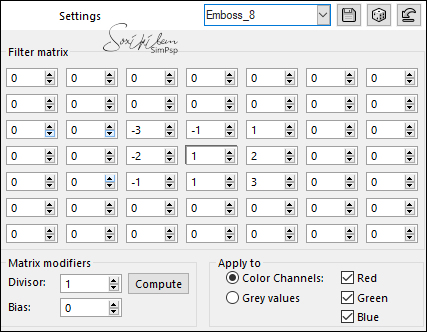
15 - Effects > User Defined Filter: Emboss_8.
16 - Layers > Arrange > Move Down... Edit > Repeat > Move Down.
17 - Activate the top layer. Edit > Copy the Tube flower. Edit > Paste a New Layer. Objects > Align > Horz Center in Canvas. Objects > Align > Bottom.
18 - Layers > Duplicate. In the original layer of the flower apply: Adjust > Blur > Gaussian Blur: 45. Layers > General > Properties > Blend Mode: Screen.
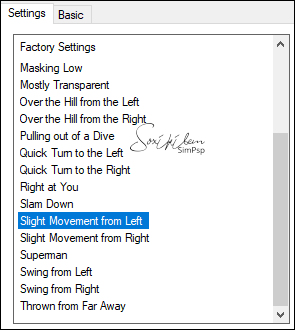
19 - Activate the Flower Copy layer. Effects > Plugin Alien Skin Eye Candy 5 Impact > Motion Trail > Settings: Slight Movement from left.
20 - Image > Add Borders: 1px color 4 5px color 3 1px color 4 15px color 3 1px color 4 5px color 3 1px cor 4 30px color 3 1px color 4 5px color 3 1px color 4
21 - With the Magic Wand Tool: Tolerance and Feather: 0, select the 30px border. Layers > New Raster Layer. Paint the selection with the color of the Foreground. Layers > New Mask layer > From Image: NarahsMasks_1592. Layer > Merge > Merge Group. Layers > Duplicate. Layers > Merge > Merge Down.
22 - Effects > User Defined Filter: Emboss_8.
Selections > Select None. Layers > Merge > Merge Down.
23 - Edit > Copy the tituloCalleBiancheBySoxikibem. Edit > Paste a New Layer. Pick Tool: Position X 75, POsition Y 342. Layers > General > Properties > Blend Mode: Luminance.
24 - Apply your watermark or signature.File > Export > JPEG Optimizer.
CREDITS: Tutorial by Soxikibem'21 English Translation by Moderation SIM-PSP Tube Flower: confinianima WordArt by Soxikibem Masks by Narah
Feel free to send your versions.
|