|
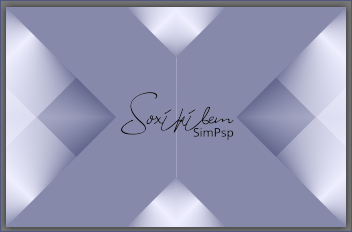
MATERIAL 1 Main Tube of your choice titulo_gabry_bysoxikibem
SELECTIONS seletion124_1 seletion124_2 *Save selections to your PSP's Selections folder
Pluguins AAA Frames Carolaine and Sensiblity Filters Unlimited 2.0 Simple
TUTORIAL
1 - Open the material on the PSP, duplicate and close the original.Choose two colors to work with. Foreground #525780 Background #efefff
2 - Open a transparent 850x550px image. Paint with the Radial gradient formed by the colors in use.
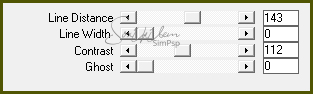
3 - Effects > Plugin Simple > Diamonds.
4 - Effects > Plugin Simple > Pizza Slice Mirror. Repeat the plugin 4 more times A total of 5 times the Pizza Slice Mirror Plugin is applied.
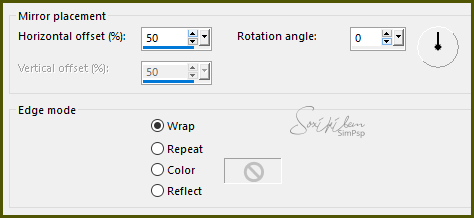
5 - Effects > Reflection Effects > Rotating Mirror.
6- Selections > Load/Save Selections > Load Selection From Disk: seletion124_1. Selections > Promote Selection to Layer.
7 - Close the visibility of the Promoted Selection layer. Activate the Raster 1 layer.
8 - Effects > Plugin Carolaine and Sensiblity > cs_texture.
9 - Effects > Texture Effects > Blinds, foreground color.
10 - Selections > Invert. Effects > Texture Effects > Weave. With foreground and background colors.
11 - Selections > Modify > Contract: 70. Layers > New Raster Layer. Paint these two selections with the background color. Selections > Select None.
12 - Filters Unlimited 2.0 > Bkg Designer sf10 I > Cruncher: 164, 20.
13 - Layers > Properties > General > Blend Mode Soft Light. Effects > Edge Effects > Enhance.
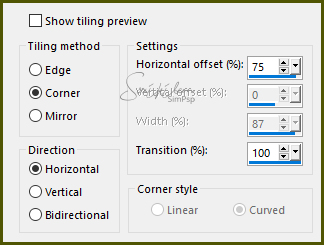
14 - Activate and open the visibility of the Promote Selection layer. Effects > Image Effects > Seamless Tiling: Default.
15 - Layers > Properties General > Blend Mode Multiply, Opacity 70%.
16 - Effects > Image Effects > Seamless Tiling.
17 - Layers > Duplicate. Image > Mirror > Mirror Horizontal.
18 - Layers > New Raster Layer. Paint this layer with white. Layers > New mask Layer > From Image: NarahsMasks_1527. Layers > merge > Merge Group.
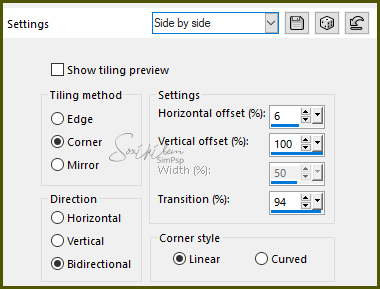
19 - Effects > Image Effects > Seamless Tiling: Side by Side.
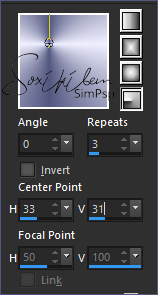
20 - Layers > New Raster Layer. Selections > Load/Save Selections > Load Selection From Disk: seletion124_2. Paint this selection with a Linear gradient formed by the colors in use: Angle 90, Repeats 0, Invert marked.
21 - Selections > Select None. Effects > Filters Unlimited 2.0 > Background Designers IV > sf10 Diamond Flip.
22 - Effects > Filters Unlimited 2.0 > Background Designers IV > sf10 Slice N Dice.
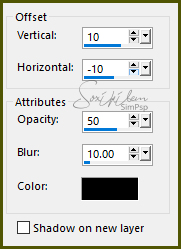
23 - Effets > 3D Effects > Drop Shadow: 10, -10, 50, 10, black color.
24 - Effects > Texture Effects > Blinds, foreground color.
25 - Adjust > Sharpness > Sharpen.
26 - Edit > Copy in misted_fractal_1_tubed_by_thafs. Edit > Paste a New Layer.
27 - Image > Resize: 70% , all layers unchecked. Layers > Properties > General > Blend Mode Luminence (L), Opacity 70.
28 - Edit > Copy in decor124_1. Edit > Paste a New Layer.
29 - Edit > Copy in titulo_gabry_bysoxikibem. Edit > Paste a New Layer. With the Pick Tool, position: Position X 431.00, Position Y 146.00.
30 - Edit > Copy in Main Tube. Edit > Paste a new Layer. Position left. Effects > 3D Effects > Drop Shadow as you wish.
31 - Image > Add Borders: 1px foreground color 1px background color 1px foreground color
32 - Selections > Select All. Image > Add Borders: 60px with any color. Selections > Invert.
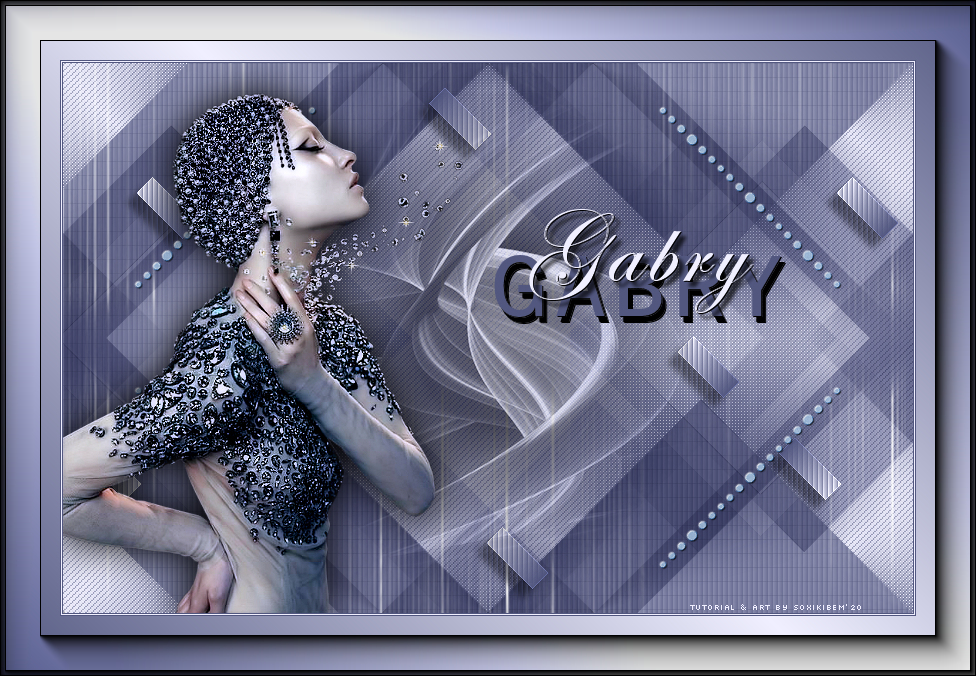
33 - Paint this border with a Linear gradient, Angle 45, Repeats 1, Invert unchecked.
34 - Effects > Plugin AAA Frames > Foto Frame: 40, 0, 0, 0, 0, 0, 0, 100.
35 - Effects > Plugin AAA Frames > Foto Frame: 5, 0, 0, 0, 0, 0, 0, 100.
36 - Selections > Select None.
37 - If you wish, resize your work. Apply your watermark or signature. File > Export > JPEG Optimizer.
CREDITS Tube by Gabry - misted_fractal_1_tubed_by_thafs - Mask by Narah
Tutorial by Soxikibem'20
Feel free to send your versions. I will be happy to publish them on our website.
|