|
English Translation by Soxikibem Original Tutorial MATERIAL 1 Tube of your choice. grafico_76_soxikibem disco76_xiki - mini_disco76_xiki - mini_disco2_76_xiki, setas76_xiki, spade, heart, card_sleeve_xiki
PLUGINS AAA Frames, DC Layer, L en K's , Mehdi, Mura's Meister, Toadies imported by Unlimited 2.0
EXECUTION
1 - Open your material, duplicate and close the original.Choose two colors to work with. Here I used the colors black in the foreground and white in the background.
2 - Open the grafico_76_soxikibem.pspimage. Paint with a gradient formed by the colors you choose: Linear, Angle 45, Repeats 1, invert unchecked.
3 - Adjust > Blur > Gaussian Blur: 80.
4 - Effects > Filters Unlimited 2.0 > Toadies > Bitches Crystal: 255, 255.
5 - Effects > Plugin Mehdi > Weaver: 300-500, 500.
6 - Effects > Plugin Mehdi > Sorting Tiles: 150-300, 150, Crossed.
7 - Layers > New Adjustment Layer > Invert: General tab change in Blend Mode for Difference. Layers > Merge > Merge Visibile. Effects > Plugin L en K's > Palmyre: 255, 155.
8 - Layers > New Raster Layer. Selections > Load/Save Selection > Load Selection From Alpha Channel: Slection #1. Paint the selection with the foreground color. Selections > Select None
9 - Effects > Filters Unlimited 2.0 > Tile & Mirror > Mirrored & Scaled.
10 - Selections > Load/Save Selection > Load Selection From Alpha Channel: Slection #2.
11 - Effects > Plugin DC Layer > SideMerge: 76, 90, 74.
12 - Effects > Plugin L en K's > Mayra: 3, 73, 255, 43.
13 - Effects > Edge Effects > Enhance. Selections > Select None.
14 - Selections > Load/Save Selection > Load Selection From Alpha Channel: Slection #3.
15 - Selections > Promote Selection to layer. Keep selection. Enable Raster Layer 1. Hit the Delete key on the keyboard. Enable the Promoted Selection layer. Layers > Properties > General > Blend mode: Overlay. Selections > Select None.
16 - Edit > Copy on disco76_xiki. Edit > Paste a new layer. Effects > Image Effects > Offset: -228, -3, Custom, Transparent.
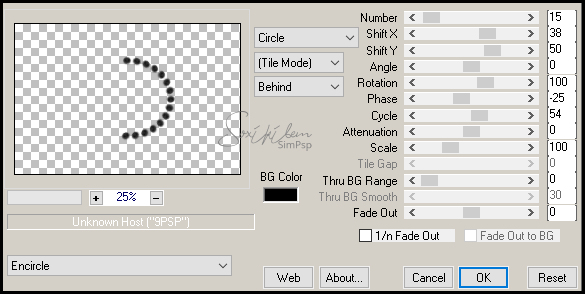
17 - Edit > Copy no mini_disco76_xiki. Edit > paste a new layer. Effects > Plugin Mura's Meister > Copies:
18 - Effects > Image Effects > Offset: -300, 0, Custom, Transparent. Effects > 3D Effects > Drop Shadow: 0, 0, 100, 5. Adjust > Sharpness > Sharpen.
19 - Edit > Copy no setas76_xiki. Edit > Paste as new layer. Effects > Image Effects > Offset: 250, 45, Custom, Transparent.
20 - Effects > 3D Effects > Drop Shadow: 0, 0, 100, 10, in background color. Adjust > Sharpness > Sharpen.
21 - Edit > Copy mini_disco2_76_xiki. Edit > Paste as new layer. Effects > Image Effects > Offset: 230, 110, Custom, Transparent.
22 - Layers > Duplicate. Effects > Image Effects > Offset: 150, -40, Custom, Transparent.
23 - Edit > Copy in the main tube. Edit > Paste as new layer. Effects > 3D Effects > Drop Shadow: of your choice.
24 - Edit > Copy on png spade. Edit > Paste as new layer. Image > Resize in 50%, all layers unchecked. Effects > Image Effects > Offset: -227, -6, Custom, Transparent.
25 - Edit > Copy on png heart. Edit > Paste as new layer. Image > Resize em 50%, all layers unchecked. Effects > Image Effects > Offset: 360, -210, Custom, Transparent.
26 - Image > Add Borders > 1px - simmetric - color: #000000
27 - Selections > Select All. Image > Add Borders > 50px - simmetric. Selections > Invert. Paint the border selection with the gradient formed by the colors in use: Linear, Angle 45, Repeats 1, invert unchecked.
28 - Effects > Plugin AAA Frames > Foto Frame just changing in with to 20. Selections > Select None.
29 - Edit > Copy on card_sleeve_xiki. Edit > Past as new layer. Or export as Custom brush and apply with the Brush tool in a new layer. I applied it as a brush and put Effects > 3D Effects > Drop Shadow 0, 0, 100, 10
30 - If you want to resize your work now.Apply your watermark or signature. File > Export > JPEG Optimizer...
CREDITS: Tube by AnaRidzi - Clipart Spade e Heart received in exchange group
Tutorial by Soxikibem'19
Feel free to submit your versions. I'll be happy to post them on our site.
|


