|
English Translation by Soxikibem Original Tutorial
MATERIAL 1 Tube of your choice 1 Tube decorative of your choice Narah_Mask_1211 grafico_72, rec72_xiki bordeverne_72_xiki, litlesquares_xiki WA_out_of_my_mind_soxiki
Plugins AAA Frames, AP (Lines), Carolaine and Sensibility, Filter Factory Gallery M, Italian Editors Effect, Mehdi, Toadies imported by Unlimited 2.0
Execution
1 - Open the tube, duplicate and close the original.Choose two colors: Foreground: #8e2516 Background: #e5b92b
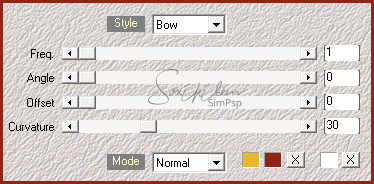
2 - Open the grafico_72. Effects > plugin Mehdi > Wavy Lab. The first color is background, the second is foreground, change the third to white,
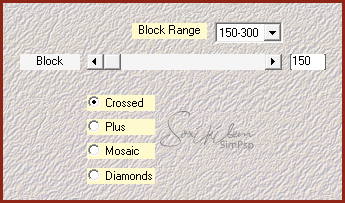
3 - Effects > Plugin Mehdi > Sorting tiles.
4 - Effects > Filters Unlimited 2.0 > Toadies > What Are You?: 165, 119.
5 - Effects > Filters Unlimited 2.0 > BKg Designer sf10 II > NEO Vasarely Mosaics: 20.
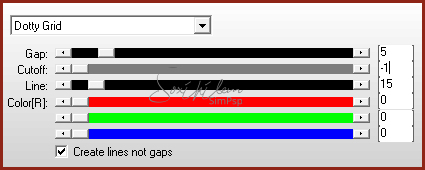
6 - Effects > Plugin Carolaine and Sensibility > CS-LDots: 50, 3, 2.
7 - Adjust > Sharpness > Sharpen More.
8 - Layers > New Raster Layer Selections > Load/Save Selections > Load Selection frm Alpha Channel: rec72_xiki.
9 - Paint the selection with the foreground color. Selections > Select None.
10 - Effects > Plugin Italian Editors Effect > Effetto Fantasma: 20, 20.
11 - Effects > Plugin AP (Lines) > Lines - Silverlining.
12 - Layers > Properties > General > Blend Mode: Multiply - Opacity: 50%
13 - Layers > Duplicate. Effects > Geometric Effects > Skew: Horizontal, 45, Transparent.
14 - Edit > Copy in gráfico bordeverne_72_xiki. Edit > Paste as new layer. Effects > Image effects > Offset: Horizontal 180, Vertical 0, Custom, Transparent. Layers > Properties > General > Blend Mode: Luminence (L)
15 - Layers > Duplicate. Image > Flip > Flip Horizontal. Layers > Merge > Merge Down.
16 - Layers > Duplicate. Effects > Image effects > Offset: Horizontal 80, Vertical 0, Custom, Transparent. Layers > Merge > Merge Down.
17 - Edit > Copy no gráfico litlesquares_xiki. Edit > paste as new layer. Effects > Image effects > Offset: Horizontal 220, Vertical 0, Custom, Transparent.
18 - Layers > New Raster Layer. Paint with white color. Apply the mask by going to Layers > New Mask Layer > From Image > Narah_Mask_1211. Layers > Merge > Merge Group.
19 - Layers > New Raster Layer. Paint with background color.
20 - Effects > Plugin Filter Factory Gallery M > Ambrosia: 108, 136, 33, 9, 183, 0.
21 - Adjust > Blur > Gaussian Blur: 50.
22 - Layers > Properties > General > Blend Mode: Burn - Opacity: 55%
23 - New Adjustment Layer > Fill Light/Clarity. Change only in the General tab in Blend mode to Multiply.
24 - Edit Copy in the main tube. Edit > paste as new layer and position left. Effects > 3D Effects > Drop Shadow of your choice.
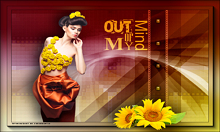
25 - Layers > New Raster Layer. Esport as Custom Brush the wordart WA_out_of_my_mind_soxiki and apply with a color that matches your work.
26 - SIf you wish, move this layer below the layer that applied the Ambrosia effect. Test and see which one looks better.
27 - Close tube and WordArt layer visibility.
28 - Edit > Copy Special > Copy Merged.
29 - Open tube and WordArt layer visibility.
30 - Image > Add borders > symmetric: 1px in the black color.
31 - Selections > Select All. Image > Add borders > symmetric: 50px Selections > Invert. Edit > Paste Into Selection.
32 - Adjust > Blur > Gaussian Blur: 50.
33 - Plugin AAA Frames > Foto Frame just changing the value in Width to 30.
34 - Selections > Select None.
35 - Edit Copy in the decorative tube. Edit > paste as new layer e posicione. Effects > 3D Effects > Drop Shadow and position on the right side.
36 - If you want to resize your work now. Apply your watermark or signature. File > Export > JPEG Optimizer...
CREDITS: Tube by CibiBijoux - Tube Fiore by GB - Mask by Narah
Tutorial by Soxikibem'19
Feel free to submit your versions. I'll be happy to post them on our site.
|