|
English Translation by Soxikibem Original Tutorial
MATERIAL 1 Tube of your choice pontilhados_xiki1, buttom_xiki2, buttom_xiki3, elegant WA spoiled, Narah_Mask_1441
Pluguins AAA Frames, Carolaine and Sensibility, Italian Editors Effect Mehdi, Mura's Meister, Toadies importado pelo Unilimited 2.0,
Execution
1 - Open the tube, duplicate and close the original. Choose two colors: Foreground: #402267 Background: #2bbfa6
2 - Open 900x600px transparency. Selections > Select All. Edit > Copy in the tube. Edit > paste into selection. Selections > Select None.
3 - Effects > image Effects > Seamless Tiling: Default.
4 - Adjust > Blur Gaussian Blur: 50. Layers > Duplicate. Image > Mirror > Mirror Horizontal. Image > Flip > Flip Vertical. Layers > Merge > Merge Down.
5 - Effects > Plugin Carolaine and Sensibility > cs_Texture.
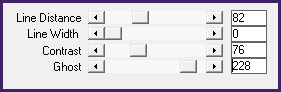
6 - Effects > Filters Unlimited 2.0 > Toadies > Weaver: 46, 46, 255. Adjust > Sharpness > Sharpen More.
7 - Layers > New Raster Layer. Paint with the gradient formed by the chosen colors: Linear, Angle 0, Repeats 0, Invert marked.
8 - Layers > Arrange > Move Down.
9 - Enable layer Raster 1. Layers > Properties > General > Blend Mode: Luminence. Layers > Merge > Merge Down.
10 - Layers > New Raster Layer. Paint with the same gradient, changing in Repeats 1, uncheck the Invert.
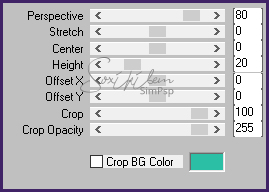
11 - Effects > Geometric Effects > Perspective - Vertical: 95, Transparent. Repeat changing the value to -95.
12 - Layers > Duplicate. Close the visibility of the duplicate layer.
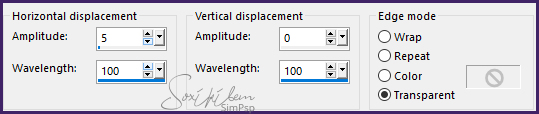
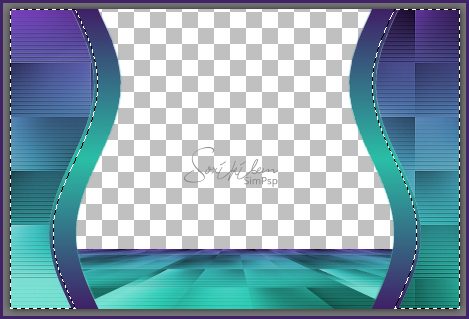
13 - Enable layer Raster 1. Effects > Distortion Effects > Wave.
14 - Effects > image Effects > Offset: Horizontal -300, Vertical 0, Custom, Transparent.
15 - Layers > Duplicate. Image > Mirror > Mirror Horizontal. Layers > Merge > Merge Down.
16 - Image > Flip > Flip Vertical.
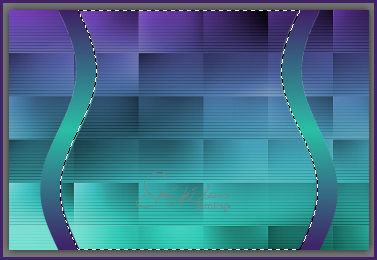
17 - With the Magic Wand tool, Feather 5, click between the curved lines.
18 - Keep selection. Enable layer Raster 2. Effects > Plugin Mura's Meister > Perspective Tiling.
Selections > Select None.
19 - Enable layer Raster 1. With the magic wand tool, Feather 10, select as shown in the print. Hit the keyboard Delete key 7 times.
Selections > Select None.
20 - Effects > 3D Effects > Drop Shadow: 0, 0, 100, 50.
21 - Open the vizibility of the Copy of Raster1 layer. Image > Free Rotate: Right, 90, all layers unchecked.
22 - Layers > Arrange > Send to Bottom.
23 - Effects > Plugin Italian Editors Effect > Effetto Fantasma: 30, 30.
24 - Effects > Image Effects > Offset: Horizontal 0, Vertical -120, Custom, Transparent.
25 - Layers > New Raster Layer. Paint with the gradient: Linear, Angle 0, Repeats 0, Invert marked.
26 - Layers > Arrange > Send to Bottom.
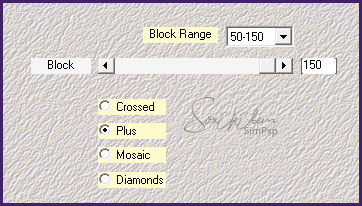
27 - Effects > Plugin Mehdi > Sorting Tiles.
28 - Enable layer Copy of Raster 1. Effects > Plugin Carolaine and Sensibility > cs-LDots: 106, 3, 2.
29 - Layers > Duplicate. Layers > Merge > Merge Down.
30 - Enable layer Raster 1. Layers > New Raster Layer. Paint with color #FFFFFF (white). Apply the mask by going to Layers > New Mask Layer > From Image > Narah_Mask_1441.
31- With the mask layer active apply: Effects > Image effects > Offset: Horizontal 0, Vertical 50, Custom, Color.
32 - Layers > Merge > Merge Group. Layers > Properties > General > Blend Mode: Soft Light. Layer > Arrange > Move Down. Edit > Repeat Move Layer Down.
33 - Enable top layer. Edit > Copy in pontilhados_xiki. Edit > paste as new layer.
34 - Effects > Image Effect > Offset: Horizontal -295, Vertical 0, Custom, Transparent.
35 - Layers > Duplicate. Image > Mirror > Mirror Horizontal.
36 - Edit > Copy no buttom_xiki2.png. Edit > paste as new layer. Effects > Image Effect > Offset: Horizontal -295, Vertical 0, Custom, Transparent.
37 - Layers > Duplicate. Image > Mirror > Mirror Horizontal.
38 - Edit > Copy no buttom_xiki3. Edit > paste as new layer. Effects > Image Effect > Offset: Horizontal -100, Vertical 60, Custom, Transparent.
39 - Layers > Duplicate. Image > Mirror > Mirror Horizontal. Layers > Merge > Merge Down.
40 - Layers > Duplicate. Effects > Image Effect > Offset: Horizontal 0, Vertical 85, Custom, Transparent.
41 - Layers > Merge Down. Layers > Properties > General > Blend Mode: Luminense (L)
42 - Edit > Copy no tube principal. Edit > paste ar new layer. Effects > 3D Effects > Drop Shadow: as you wish.
43 - Open elegant WA spoiled file, export as Custom Brush. Layers > New Raster Layer. Apply the WordArt brush with a color of your choice.
44 - Image > Add Borders > 1px - simmetric - color: #000000 (preto). Selections > Select All.
45 - Image > Add Borders > 50px - simmetric .Selections > Invert. Paint with the gradient formed by the chosen colors: Linear, Angle 45, Repeats 1, Invert unchecked.
46 - Adjust > Blur > Gaussian Blur: 50.
47 - Effects > Plugin AAA Frames > Foto Frame, chance the value in Width to 20. Selections > Select None.
48 - If you want to resize your work now. Apply your watermark or signature. File > Export > JPEG Optimizer...
CREDITS: Tube by VeryMany - Mask by Narah - WordArt by Bethany
Tutorial by Soxikibem'19
Feel free to submit your versions. I'll be happy to post them on our site.
|