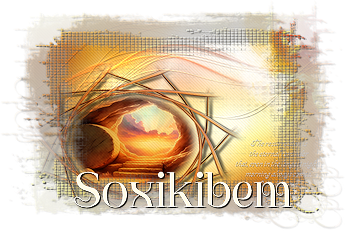
A ressurreição é o lembrete eterno de que, mesmo nas noites mais longas, a manhã sempre chega. O amor venceu. A vida continua. E a esperança nunca morre.
The resurrection is the eternal reminder that, even in the longest nights, morning always comes. Love has won. Life goes on. And hope never dies.
TRADUÇÕES: Obrigada aos nossos tradutores!
MATERIAL 1 Tube ou Misted Principal a sua escolha 1 Misted Paisagem a sua escolha NarahsMasks_1512
PLUGINS Alien Skin | Eye Candy 5 Impact > Perspective Shadow Flaming Pear > Flexify 2 Mura's Meister > Copies Penta.com > Jeans Unlimited 2.0 > Bkg Designer sf10 II > DIS Warp (Vertical) VM Natural > Splash Xero > Tekstya
Este Tutorial foi escrito por Soxikibem, qualquer semelhança é mera coincidência. Tutorial testado e revisado por Márcinha.
Tutorial elaborado no PSP 2022
O meu agradecimento as Tubeiras pelos Tubes e Masks
Fique a vontade para mudar os Blends das layers, pois dependendo das cores e imagens o resultado pode mudar.
TUTORIAL
1 - Abrir o material no PSP, duplique e feche os originais. Escolha 3 cores para trabalhar. Cor 1: #1d0600 Cor 2: #b17711 Cor 3: #fffae4
2 - Abra uma Transparência de 950 x 700px. Pintar com um Gradiente Sunburst formado pelas cores 2 e 3.
3 - Plugin VM Natural > Splash.
4 - Filters > Unlimited 2.0 > Bkg Designer sf10 II > DIS Warp (Vertical).
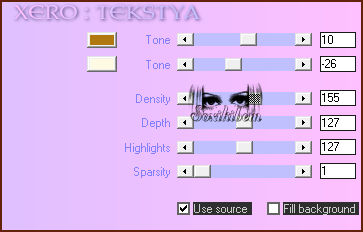
5 - Layers > Duplicate. Fechar a visibilidade da Layer Copy of Raster 1. Ativar a Layer Raster 1. Plugin Xero > Tekstya.
6 - Layers > New Raster Layer. Pintar com a Cor 1: #1d0600. Selections > Select All. Selections > Modify > Contract: 3. Edit > Cut ou aperte a tecla Delete do teclado. Selections > Select None. Plugin Alien Skin | Eye Candy 5 Impact > Perspective Shadow.
7 - Ativar e abrir a visibilidade da layer Copy of Raster 1. Image > Resize: 85%, All Layers desmarcado. Magic Wand > Tolerance e Feather: 0, clique na área transparente da layer e selecione como no print abaixo. Selections > Invert.
8 - Layers > New Raster Layer. Pintar com a Cor 1: #1d0600 Selections > Modify > Contract: 5. Edit > Cut ou aperte a tecla Delete do teclado. Selections > Select None. Plugin Alien Skin | Eye Candy 5 Impact > Perspective Shadow.
9 - Ativar a Layer Copy Of Raster 1. Layers > New Raster Layer. Selections > Select All. Edit > Copy no Misted Paisagem. Edit > Paste Into Selection. Selections > Select None. Effects > Image Effects > Seamless Tiling: Default. Adjust > Blur > Gaussian Blur: 30.
10 - Ativar a Layer Copy of Raster 1. Magic Wand > Tolerance e Feather: 0, clique na área transparente da layer e selecione como no print abaixo. Ativar a Layer Raster 4. Edit > Cut ou aperte a tecla Delete. Selections > Select None.
11 - Layers > Duplicate 3 vezes.
12 - Fechar a visibilidade das layers Copy of Raster 4, Copy (2) of Raster 4 e Copy (3) of Raster 4. Ativar a Layer Raster 4. Plugin Penta.com > Jeans. Layers > Properties > General > Blend Mode: Overlay.
13 - Ativar e abrir a visibilidade da layer Copy of Raster 4. Effects > Geometric Effects > Perspective - Horizontal: 98, Transparent. Effects > Geometric Effects > Perspective - Horizontal: -98, Transparent. Plugin Flaming Pear > Flexify 2.
14 - Image > Resize: 70%, All Layers desmarcado. Plugin Mura's Meister > Copies.
Selections > Load/Save Selections > Load Selection From disk: TMOR_Xixi1. Edit > Cut ou aperte a tecla Delete do teclado. Selections > Select None.
15 - Effects > Distortion Effects > Polar Coordinates.
Adjust > sharpness > Sharpen.
16 - Plugin Alien Skin | Eye Candy 5 Impact > Perspective Shadow.
17 - Ativar a Layer Raster 4. Layers > New Raster Layer. Selections > Load/Save Selections > Load Selection From disk: TMOR_Xixi2. Edit > Copy no Misted Paisagem. Edit > Paste Into Selection. Adjust > Sharpness > Sharpen. Selections > Select None.
18 - Ativar a Layer Copy of Raster 4. Layers > Merge > Merge Down. Layers > Properties > General > Blend Mode: Multiply. Pick Tool: Position X: 76, Position Y: 220.
19 - Ativar e abrir a visibilidade da Layer Copy (2) of Raster 4. Layers > New Mask Layer > From Image: NarahsMasks_1512. Layers > Merge > Merge Group. Image > Mirror > Mirror Horizontal. Image > Mirror > Mirror Vertical. Layers > Properties > General > Blend Mode: Dodge. Effects > 3D Effects > Drop Shadow, Shadown on new Layer marcado.
20 - Ativar e abrir a visibilidade da Layer Copy (3) of Raster 4. Layers > Arrange > Send to Bottom. Layers > Arrange > Move Up. Effects > Image Effects > Seamless Tiling: Default. Layers > Properties > General > Blend Mode: Dissolve, Opacity: 60%. Ativar a layer Raster 3. (Topo)
21 - Edit > Copy no Tube ou Misted Personagem. Edit > Paste as New Layer. Image > Resize se necessário... No misted 052PascoaByPqnaAlice do material o resize foi de 63%. Posicione na parte superior à direita, ou se estiver usando o misted do material: Pick Tool: Position: X: 580 / Position: Y: -47 Layers > Properties > General > Blend Mode: Overlay.
22 - Edit > Copy no TextoTMOR_Xiki. Edit > Paste as New Layer. Pick Tool: Position X: 622, Position: Y: 418.
23 - Edit > Copy no Titulo TituloTMOR_Xiki. Edit > Paste as New Layer. Pick Tool: Position X: 123, Position: Y: 4.
24 - Aplicar sua marca d'água ou assinatura. Aplicar a marca dos créditos Creditos-bySoxikibem. File > Export > JPEG Optimizer.
CRÉDITOS: Criação - Formatação e Art Final by Soxikibem Tube Misted: Tubed by Pqna&Alice Mask: by Narah
Sinta-se à vontade para enviar suas versões. Terei todo o prazer em publicá-las em nosso site.
|


