|
English Translation by Soxikibem Original Tutorial
Material: 1 Main tube of your choice. 1 tube misted of your choice. 1 decorative tube of your choice. Masks: smArt_maszk_53 - Monaiekje mask 34 decor_inacia_bymarcinha titulo_inacia_byMarcinha
Plugins: Graphics Plus > Cross Shadow Mehdi > Wavy Lab 1.1 MuRa's Meister > Perspective Tiling
Tutorial:
01- Open the material on the PSP, duplicate and close the
original. and two extra colors > #a6aa5d - #93acb1
02- Open a transparent 900 X 500px image.
03- Effects > Plugin Mehdi > Wavy Lab 1.1
04- Effects > Image Effects > Seamless Tiling > Default.
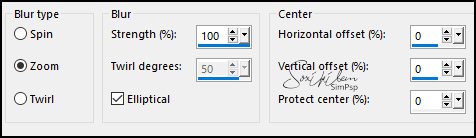
05- Adjust > Blur > Radial Blur
06- Effects > Edge Effect > Enhance.
07- Layers > New Raster Layer.
Paint with the color of the Foreground. 08- Layers > New Mask Layer > From Image > Monaiekje mask 34 Layers > Merge > Merge Group.
09- Layers > Duplicate Image > Mirror > Mirror horizontal Layers > Properties > General > Opacity: 50 Layers > Merge > Merge Down.
10- Layers > New Mask Layer > From Image > smArt_maszk_53 Layers > Merge > Merge Group. Adjust > Sharpness > Sharpen.
11- Effects > 3D Effect > Drop Shadow: 1/1/100/0/ with the 3rd chosen color.
12- Layers > Duplicate. Image > Mirror > Mirror Vertical. Layers > Merge > Merge Down.
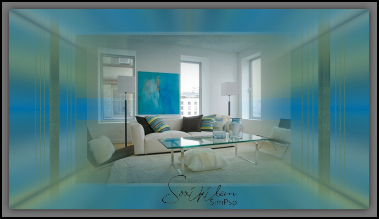
13- Edit > Copy in the Tube misted. Edit > Paste New Layer. Position it in the center. Rezise if necessary.
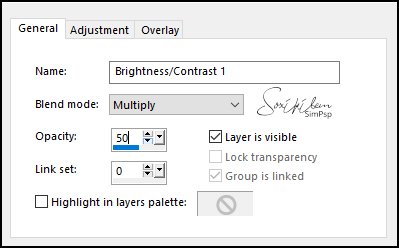
14- Layers > New Adjustment > Brightness/Contrast... General > Blend mod: Multiply / Opacity: 50
14- Layers > Merge > Merge Visible. Layers > Duplicate. Adjust > Blur > Gaussian Blur: 10.
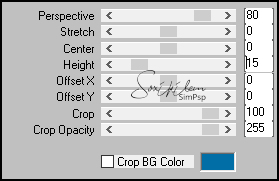
15 - Plugin MuRa's Meister > Perspective Tiling:
Adjust > Sharpness > Sharpen.
16- Effects > 3D Effect > Drop Shadow: -10 / 1 / 80 / 30 Color: #000000
17- Edit > Copy in the main tube. Edit > Paste as New Layer. Resize the tube as you wish. Adjust > Sharpness > Sharpen. Position to your choice. Effects > 3D Effect > Drop Shadow as you prefer.
18- Layers > Merge > Merge Visible. Edit > Copy.
19- Image > Add Borders > 2px, Foreground color. Image > Add Borders > 2px in the 3rd chosen color. Image > Add Borders > 2px, Foreground color.
20- Selections > Select All. Image > Add Borders > 18px with any color. Selections > Invert. Edit > Paste Into Selection. Adjust > Blur > Gaussian Blur: 10.
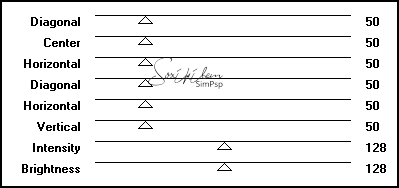
21- Effects > Graphics Plus > Cross Shadow > Default
Selections > Select None.
22- Edit > Copy in the decorative tube. Edit > Paste as New Layer. Resize the tube to your liking. Adjust > Sharpness > Sharpen. Position to your choice. Effects > 3D Effect > Drop Shadow as you prefer.
23- Edit > Copy in titulo_inacia_byMarcinha. Edit > Paste as New Layer. Position to your choice.
24 - Image > Add Borders > 1px, color #000000.
25- Edit > Copy in decor_inacia_bymarcinha. Edit > Paste as New Layer. Colorize if you want: Adjust > Hue and Saturation > Colorize according to the colors you used. Layers > Merge > Merge Visible.
26- If desired, resize your work.
CREDITOS Version 1 & 2 Tutorial by Marcinha - Art by Soxikibem Tube & Misted by Ana Ridzi - Tube Vase by Nicole Masks: Monaiekje mask 34, smArt_maszk_53 - Remaining material provided by Marcinha
Feel free to submit your versions. I will be happy to publish them on our website.
|