|
Tutorial By Li Pereira English Translation by Soxikibem Original Tutorial
MATERIAL Attached tubes or use others of your choice
PLUGINS Adjust AP 1 Liner Silverlining
TUTORIAL Selections > Select All.
Edit > Paste Into Selection. Colorize the image to match the colors of your tube. Selections > Select None.
Paint with white color. Layers > New Mask Layer > From Image: Cubes. Layers > Merge > Merge Group.
4. Effects > Edge Effects > Enhance.
5. Image > Resize: 80%. Layers > Properties: Blend Mode Diferrence or another of your choice. Effects > 3D Effects > Drop Shadow: 5, 5, 80, 50, black color.
6. Selections > Load/Save Selections > Load Selection from Disk: cubes_li.
Layers > Properties: Blend Mode Darken or another of your choice.
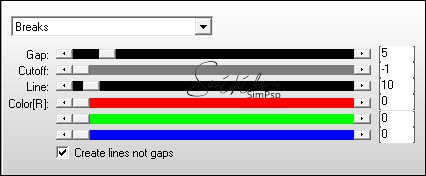
8. Plugin Ap Lines > Lines - Silverling.
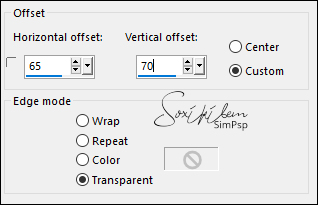
9. Edit > Copy in the moca_grande. Edit > Paste a New Layer, over the Group layer - raster 2. Image > Resize 80%. Effects > Image Effects > Offset.
10. Selections > invert. Press the delete key on your keyboard. Layers > Properties: Opacity 50%. Selections > invert.
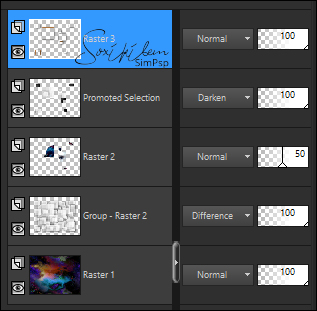
Layers > New Raster Layer. Paint with color #ffff80. Selections > Modify > Contract: 3px and delete on the keyboard. Effects > 3D Effects > Drop Shadow: 5, 5, 80, 50, #000000. Selections > Select None. See how the layers are now.
12. Layers > Merge > Merge Visible.
13. Edit > Copy in the naise2. Edit > Paste a New Layer. Image > Mirror > Mirror Horizontal. Position the left according to my version.
14. Layers > Duplicate.
Layers > Properties: Blend Mode Multiply. apply the same AP1 plugin with the same configuration.
Layers > Arrange > Move Down. Layers > Merge > Merge Visible.
16. Plugin Adjust > Variation clicking "Original" and then "Darker". (Optional, depending on the brightness of your tubes) Image > Add Borders: 3px color #ffff80.
17. Image > Resize: 95%. Copy and paste the watermark from the tutorial author.
Sign or apply your watermark and save it in jpg. Credits Main Tube by Verlaine - Remaining material provided by Li Pereira
Tutorial by Li Pereira
Feel free to send your versions. I will be happy to publish them on our website.
|