PLUGINS
Nick Color Efex Pro 1.0e
adjust/variations
AP 1/Lines
Mehedi/sorting tiles
Guidance for this tutorial by Li Pereira
To give the noise effect as I did on the parts of the tube,
colorize the images at 156 and 21
and apply the Nick Color Efex Pro 1.0e plugin with bright 0;
(in the tube boy it is Optional): do the same procedure with
brigh 30.
Depending on the tubes and colors you use, use other shades
of the same Plugin.
TUTORIAL
1. Open a 950 x 550 px transparency.
2. Foreground color: #6a6977
Background color: #9d9da9
3. Make a gradient like the print below.
Adjust > Blur > Gaussian Blur: 40.
Selections > Selection All.
4. Edit > Copy in moço-2020.
Edit > Paste Into Selection.
Selections > Select None.
Effects > Image Effects > Seamless Tiling: Default.
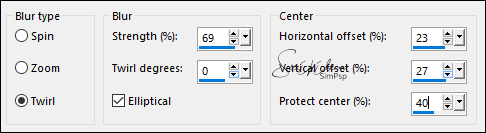
Adjust > Blur > Radial Blur.
5. Plugin Mehedi > Sorting Tiles.

6. Selections > Load/Save Selection > Load Selection From
Disk: tatoo_2.
Layers > Lew Raster Layer.
Paint with the background color with opacity 40% in flood
fill. (then return to 100%)
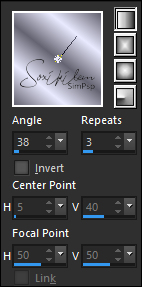
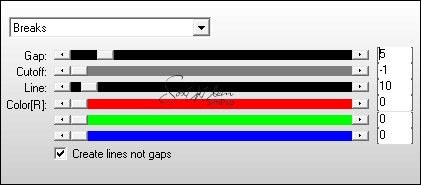
7. Plugin AP 1/lines > Silverlining.
Effects > 3D Effects > Drop Shadow: 0, -50, 100, 100,
background color.
Selections > Select None.
8. Layers > New Raster Layer.
Selections > Load/Save Selection > Load Selection From Disk:
tatoo_3.
Copy in the in_tatoo_3 and paste in the selection.
Plugin Adjust > VAriation >dark;
Effects > 3D Effects > Drop Shadow: 0, 0, 100, 50, black
color.
Selections > Select None.
9. Selections > Load/Save Selection > Load Selection From
Disk: tatoo_0, drop shadow as above; deselect
abrir in_tatoo_a, position at work,
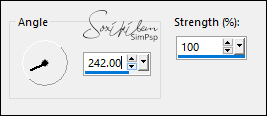
duplicate this image and in the original apply adjust / blur
/ motion blur.
enhance more and decrease the opacity to 80%;
10. stay on the top layer;
New Layer, Selections > Load/Save Selection > Load Selection
From Disk: tatoo_4, copy in the in_tatoo_b e cole na
seleção.
If you use the same tube and colors, adjust/dark twice
repeat the same drop shadow; deselect.
11. open selection tatoo_5, give the same drop shadow;
New Layer, copy the sun tube and paste in the selection;
blend mode "multiply"; deselect.
12. New Layer, Selections > Load/Save Selection > Load
Selection From Disk: tatoo_6, copy the image moço2020 and
paste it as a new layer;
resize 80% and make the selection; invert the selection and
delete on the keyboard;
invert again and give the same drop shadow; deselect.
13. Open text_li , copy and paste at work, fix as in the
model;
drop shadow 1/1/70/1 #000000 and change the blend mode to "multiply"
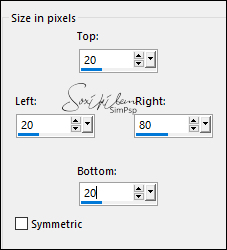
border:
with color # 1f2d36, add a border as below
14. Open brush tribal_li and with the color # 414f5c
configured as below

merge all
15. if necessary, resize 90%
put my mark, sign your work and save it in jpg;