English Translation by Soxikibem
Original Tutorial
Material
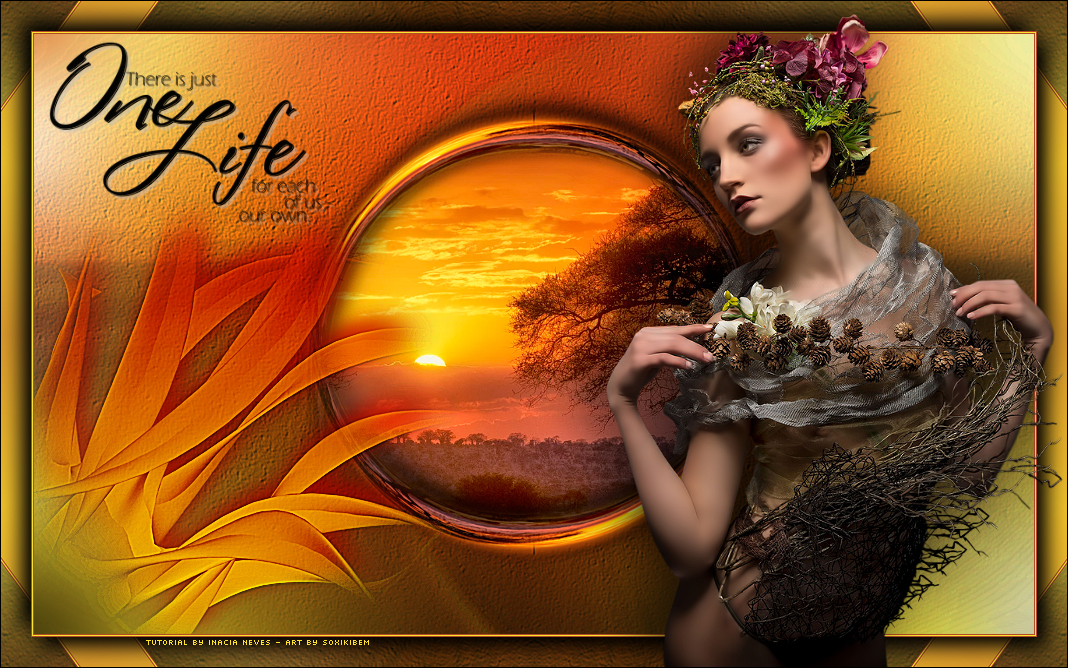
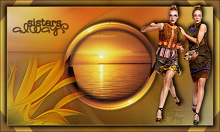
Main Tube of your
choice
Landscape Misted
of your choice
Brush 3D Brush 003_DWorish
WordArt of
your choice
Plugins
Flaming Pear > Flexify 2
Tutorial
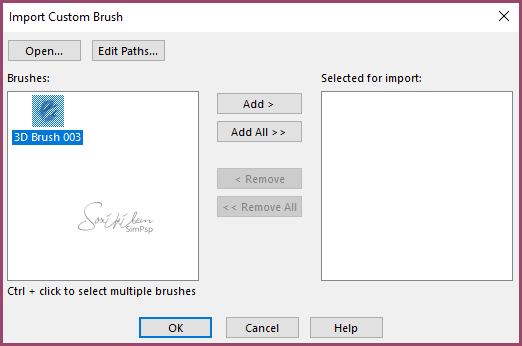
1- Import the 3DBrush_003
Brush that is in the material,
like this.
File > Import > Custom Brush.
In the window
that opens, click Open.
Your Documents will appear.
Search for the Brush. Select and
click open.
It will appear on the left side
of the window.
Click on Add All.
The brush will
move to the right side and click
OK.
The
brush is on your PSP and you can
use it later.
2 -
Enable chosen
landscape.
Edit > Copy.
Choose 2
colors from the landscape.
Here I used: Foreground:
#9a456a e Background:
#fba8d7
3 -
Open a
transparency 1000x600px.
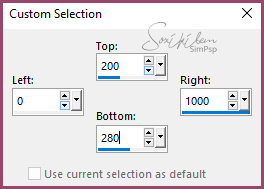
4 -
Enable Selections
tools,
click in Custom
Selection.
Edit > Paste Into Selection (landscape
that is in the memory of the PSP)
Selections >
Select None.
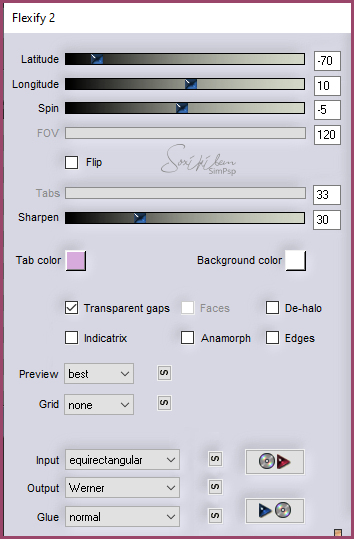
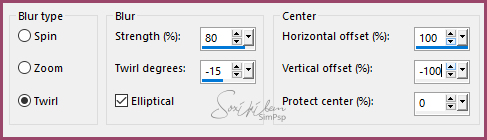
5 - Effects > Plugin > Flaming
Pear > Flexify 2.
6 -
Layers > Duplicate.
Image > Mirror
> Mirror Horizontal.
Image >
Mirror > Mirror Vertical.
Layers > Merge
> Merge
Down.
Adjust > Sharpness > Sharpen
More.
Effects > 3D > Drop Shadow >
-10/10/100/30
Black Color.
7 -
Layers >
Duplicate.
Enable
Raster 1.
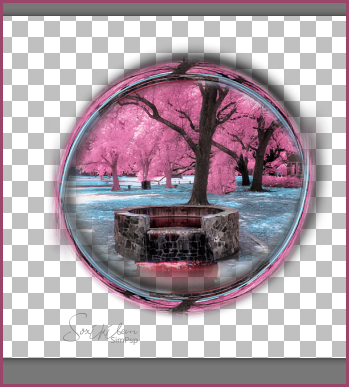
Adjust > Blur > Radial Blur.
Effects > Edge Effects > Enhance
More
8 -
Layers > New
Raster layer.
With the Clone
Brush tool, right-click on the
landscape.
I used the size
325 and gradually filled the
circle with the landscape.
Take care that
the tube does not come out of
the circle.
If this happens, use the eraser
to erase.
Adjust > Sharpness > Sharpen.
9 -
Enable layer Copy of
Raster 1
Layer > New
Raster layer.
Selections > Select All
Edit > Copy
in the Misted
Landscape.
Edit > Paste Into Selection,
in your work.
Selections >
Select None.
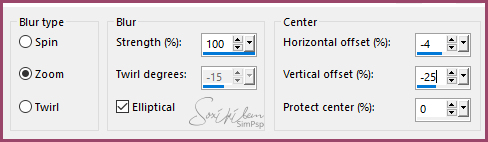
10 - Adjust > Blur > Radial
Blur.
Layers >
Duplicate.
Image > Mirror
> Mirror Horizontal.
Decrease
visibility by 50%
Layers > Merge
> Merge
Down
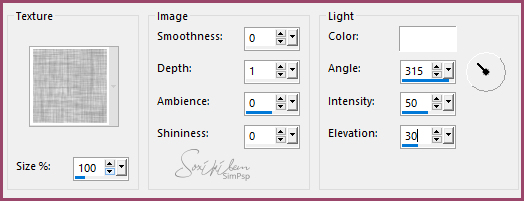
11- Effects > Texture Effects >
Texture, choose a texture to
your liking, as in the print
below:
I chose the
Hatch fine
texture.
Effects > User Defined Filter >
Emboss 3.
Layers > Arrange > Send to
Bottom.
Change the Blend
Mode of this layer to your
liking. I used Multiply.
12 -
Enable layer Copy of
Raster 1.
Layer > New
Raster Layer.
With the Paint Brush tool,
configured as below:
Stamp 2 times on
the lower left side.
Effects > 3D > Drop Shadow >
-10/10/100/30,
Dark color in use.
Adjust > Sharpness > Sharpen
More
Change the Blend
Mode of this layer to your
liking. I used Multiply.
Layers >
Duplicate.
Change Blend Mode
to your liking. I used Hard
Light
13 -
Layers > New Raster Layer.
Paint with a
Linear gradient> 0/0> with the
colors in use. Dark color on top
of gradient.
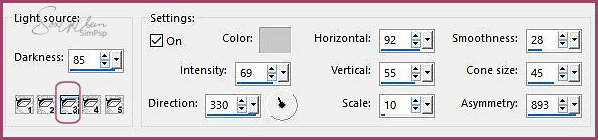
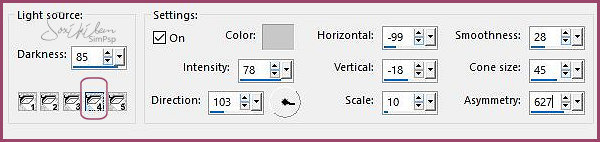
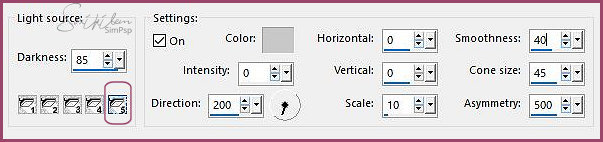
Effects > Illumination Effects
> Lights.
Adjust > Blur > Gaussian Blur >
Radius 40.
Layers > Arrange > Send to
Bottom.
Layers >
Merge > Merge All.
14 -
Add 3 borders as below:
1 px
dark color
1 px
light color
1 px
dark color
15 -
Image > Add
Borders: 30 px,
contrasting color.
Select and paint
with gradient use.
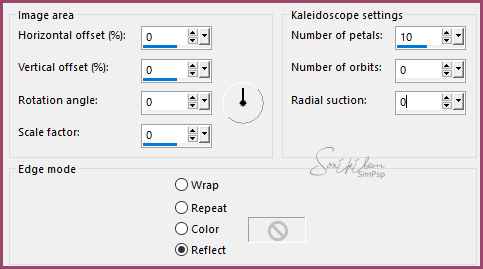
Effects > Reflection Effects >
Kaleidoscope.
Selections > Invert
Effects > 3D > Drop Shadow >
10/10/100/30
black color
Repeat Drop Shadow
with
-10/-10
Selections >
Select None.
16 - Copy and paste main
tube.
Reduce, position
and apply a Drop Shadow to your
liking.
17 -
Decorate as you
prefer.
18 -
New layer to sign.
Layers >
Merge > Merge All.
19 -
Finish with a 1px border in black
color.
20 -
Save as jpg.
Crédits:
Version 1 & 2:
Main Tube, Flower &
Landscape by
Animabelle
Brush: DWorish