|
English Translation by Soxikibem Original Tutorial
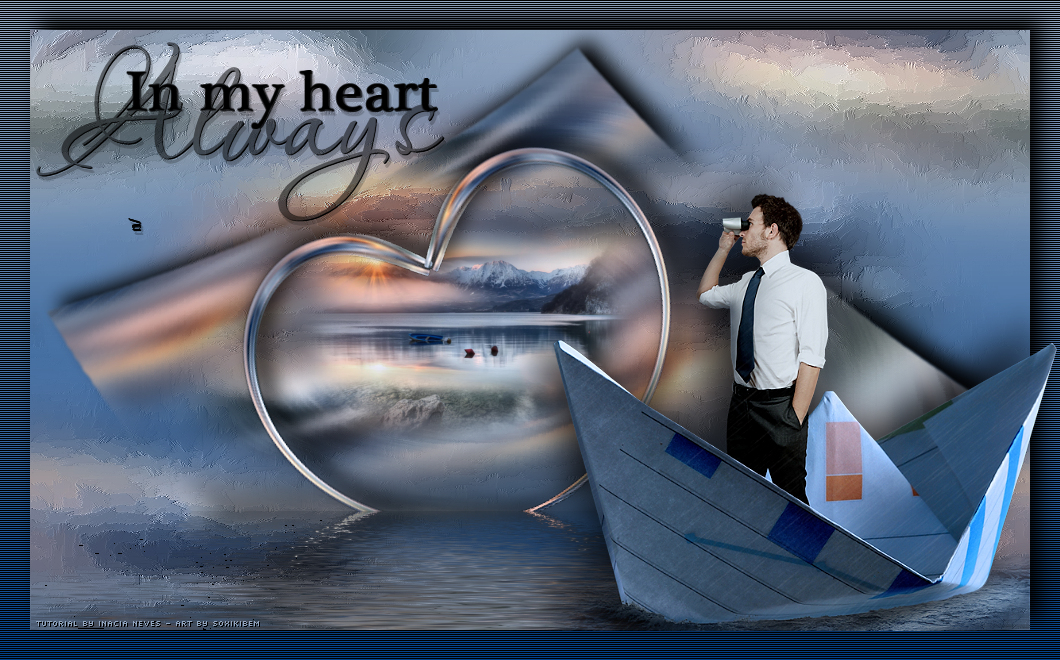
Material Main Tube of your choice Misted Landscapeof your choice WordArt of your choice.
Plugins: Filter Factory Gallery L > Perspecular Flaming Pear > Flood Flaming Pear > Flexify 2 Jeux de Lignes > Entrelacement
TUTORIAL 1 - Open your Misted Paisagem. Edit > Copy.
2 - Open a transparency 1000x600px. Selections > Select All. Edit > Paste Into Selection. Selections > Select None. Effects > Image Effects > Seamless Tiling > Default.
3 - Adjust > Blur > Radial Blur.
Layers > Duplicate 2 Times. Close the visibility of the Copy and Copy (2) of Raster layers.
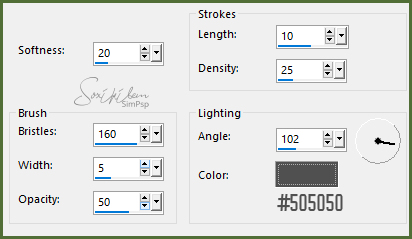
4 - Enable Raster 1. Effects > Art Media Effects > Brush Strokes.
Close visibility of this layer.
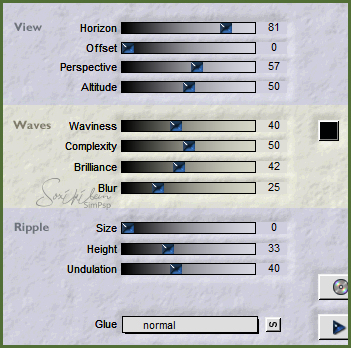
5 - Open visibility and activate the Copy of Raster layer 1. Plugin > Filter Factory Gallery L > Perspecular.
6 - With Magic Wand, click on the transparent part. Selections > Modify > Feather > 5. Delete 5 times (to remove aliasing). Selections > Select None. Effects > 3D Effects > Drop Shadow > -10/10/100/30 Black Color. Plugin > Flaming Pear > Flood.
Close visibility of this layer.
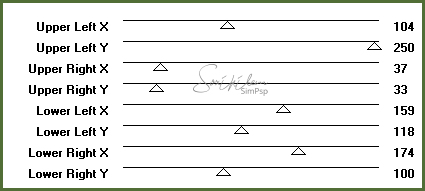
7 - Open visibility and activate layer Copy (2) of Raster 1. Effects > Geometric Effects > Perspective Vertical.
Repeat Perspective Vertical with -98 (minus).
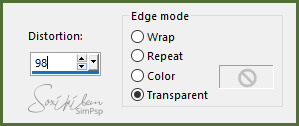
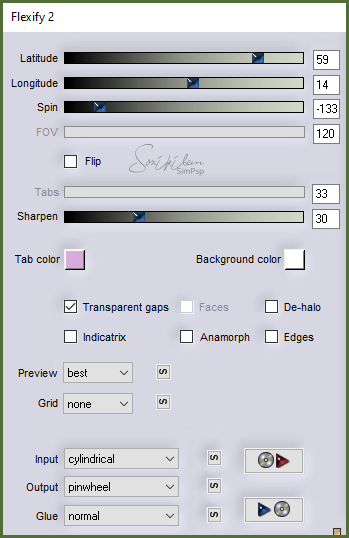
8 - Effects > Plugin > Flaming Pear > Flexify 2.
Image > Free Rotate > Left > 100,00 > All Layers unchecked. Layers > Duplicate. Image > Mirror > Mirror Horizontal. Layers > Merge > Merge Visible.
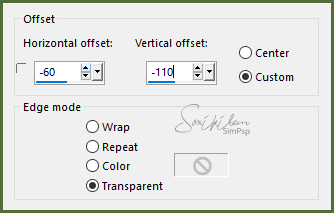
9 - Open the visibility of Layer Copy of Raster 1, but keep the Merged layer active. Image > Free Rotate > Left > 25,00 > All Layers unchecked. Effects > Image Effects > Offset.
Layers > Duplicate. Layers > Merge Down.
10 - With Magic Wand, Select Heart Center. Layers > New Raster layer. Selections > Modify > Expand: 2. Enable landscape tube. Edit > Copy. Activate your work. Edit> Paste Into Selection. Selections > Select None. Layers > Arrange > Move Down.
11 - Enable layer Merged. Effects > 3D > Drop Shadow > -10/10/100/30 Black Color. Adjust > Sharpness > Sharpen More. Layers > Merge Down. Effects > Plugin > Flaming Pear > Flood, in the settings already used in item 6. Open visibility of Raster layer 1.
12 - Layers > New Raster Layer. Paint with a 0/0 linear gradient with two colors taken from the landscape tube. I used the colors: #485101 and #bcaa0b. Light color on top of gradient.
Layers > Arrange > Send to Bottom. Layers > Merge All.
13 - Image > Add Borders > 30 px > Symmetric Marked > Contrasting color. Select and paint with the gradient of use.
14 - Plugin > Jeux de Lignes > Entrelacement, in aperture settings.
Selections > Invert. Effects > 3D > Drop Shadow: in the settings already used. Selections > Select None.
15 - Open the main tube. Edit > Copy. Activate your work. Edit > Paste a New Layer. Reduce, position and apply a Drop Shadow to your liking. Adjust > Sharpness > Sharpen.
16 - Decorate as you prefer.
17 - New layer to sign.
18 - Finish with a 1px border in black.
19 - Save as jpg.
Crédits:
Version 1 & 2:
Main Tube & Misted Paisage
by Animabelle
WordArt
by KathyFrances
Tutorial by InaciaNeves'2018
|