|
|
|
|
 English Translation by Soxikibem Original Tutorial
Material
Main Tube of your
choice
Misted Landscape of your choice
Mask
Narah_mask_0347
WordArt
 Plugin
AAA Frames > Foto
Frame
Tutorial
1- Choose 2
colors from misted landscape and form a gradient:
Style Linear >
Angle 145 > Repeats 0
Here I used:
Foreground:
#a05f15
Background:
#f6da54
2 - Open 700
x 500 px transparency and paint with gradient.
3 - Layers >
New Raster Layer
Selections >
Select All.
Enable landscape. Edit >
Copy.
Get back to your
work and Edit > Paste Into
Selection.
Selections > Select
None.
4 - Effects >
Image Effects > Seamless Tiling > Default.
Layers > Duplicate.
Close layer
visibility Copy of Raster 2.
5 - Enable
Layer Raster 2.
Adjust > Blur >
Gaussian Blur > Radius: 35
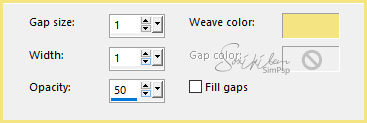
Effects > Texture
Effects > Weave, with the light color in use.
 6 - Open
visibility and activate Copy of Raster 2 layer.
Adjust > Blur >
Radial Blur.
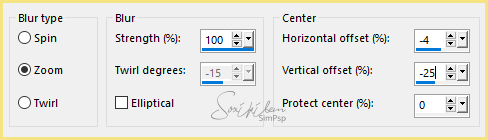 7 - Effects >
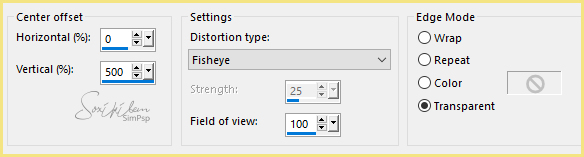
Distortion Effects > Lens Distortion.
 8 -
Close visibility of Raster 1 and Raster 2 layers.
9 - With the
Magic Wand tool, select transparent parts.
Selections >
Invert.
Selections >
Modify > Select Selection Borders.
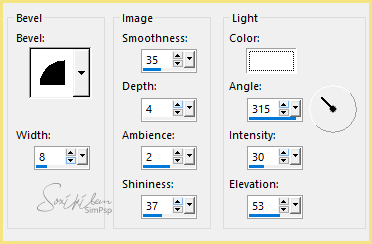
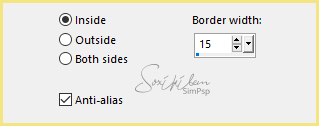 Effects > 3D
Effects >
Inner Bevel.
 Selections > Select None.
Layers > Duplicate.
10 -
Close visibility of Layer Copy (2) of Raster 2.
Enable Layer Copy
of Raster 2.
Adjust> Blur>
Radial Blur, in the same settings as item 6.
Effects > Edge
Effects > Find Vertical
Effects > Plugin
> AAA Frames > Foto Frame.
 Change the Blend Mode of this layer to your
liking.
I used Blend
Mode Difference.
(If you wish you can decrease the
visibility of this layer a little to 50 or 60% after you open
the visibility of all layers.)
(I only decrease the visibility of
this layer in my version.)
11 -
Open visibility for all layers.
Enable layer Copy
(2) of Raster 2.
With the Magic Wand tool, select the top and bottom of
the effect.
Selections >
Invert
Selections >
Modify > Contract: 15
Layers > New Raster Layer.
12 - Enable
Misted landscape.
Edit >
Copy.
Edit > Paste Into
Selection.
Selections > Select None.
Adjust > Sharpness
> Sharpen More.
13 - Enable layer
Copy (2) of Raster 2.
Effects > 3D >
Drop Shadow > 0/0/100/40, Black Color.
Adjust > Sharpness
> Sharpen More
14 - Layer >
New Raster layer.
Layers > Arrange
> Bring to top
Paint with light color in use (background color)
Open Mask Narah_mask_0347 on PSP.
Layers > New Mask
Layer > From Image: Narah_mask_0347.
Layers > Merge
Group.
Effects >
Distortion Effects > Lens Distortion, in the same settings as item 7.
Adjust > Sharpness
> Sharpen.
15 - Enable
Main Tube.
Edit > Copy.
Edit > Paste a New Layer.
Resize and position to your liking.
Apply Drop
Shadow as you wish.
16 -
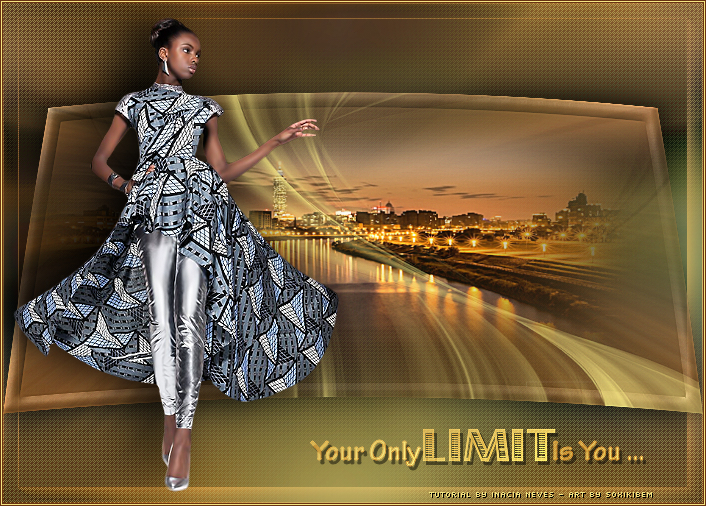
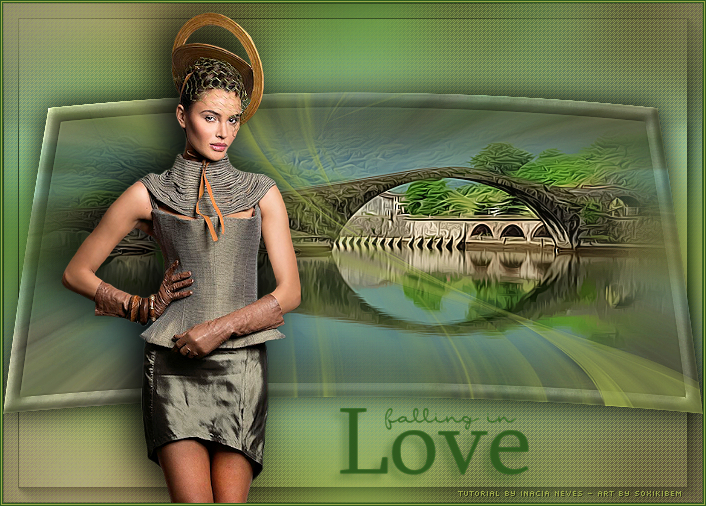
Decorate your work as you prefer.
17 - Sign
your work.
18 -
Image > Add Borders:
1 px dark color
1 px light color
1 px dark color
19 -
Save as jpg.
 Créditos:
Version 1: Main Tube by Isa -
Misted Landscape by
Kamil
Version 2:
Main Tube by Isa - Misted
Landscape by NenaSilva
Mask: Narah_mask_0347 - WordArt: Inacia
Tutorial by
Inácia Neves - 03/03/2018
|