|
Tutorial By Emilieta English Translation by Soxikibem Original Tutorial
MATERIAL 1 Main tube of your choice 1 Landscape of your choice Fonte: ClevelandLithoNF Flechas oro Texto
Pluguins Eye Candy 5 Filters Unlimited 2.0 Flaming Pear FM Tile Tools AFS Import Simple
TUTORIAL 1 - Open a 900x600 transparency.
2 - Choose two colors to work with. Here I used the colors: Foreground #f8c6b7 Background #7f574d
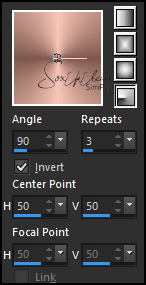
3 - Form a Radial Gradient, Angle 90, repeat 3.
4 - Paint the transparency with the gradient.
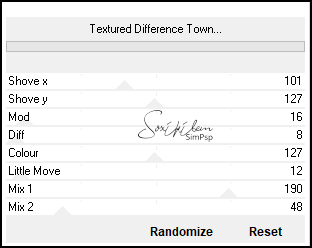
5 - Filters Unlimited 2.0 > AB 21 > Textured Difference Town
6 - Layers > Duplicate.
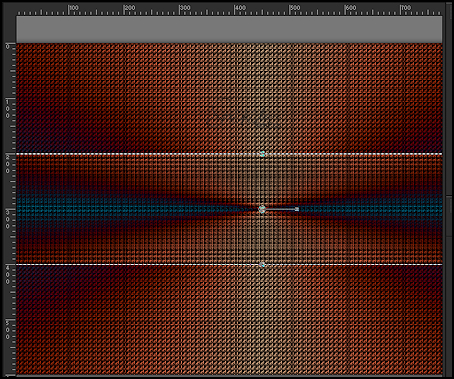
7 - With the Pick Tool, scale mode, lower the top part up to 200 and the bottom part up to 400. See the print below.
8 - With the Magic Wand tool select the top and bottom.
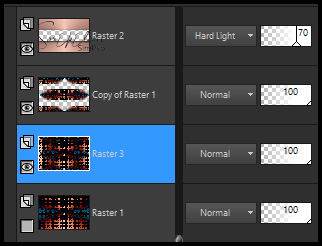
9 - Layers > New Raster Layer. Paint with the gradient. Layers > Properties: Blend Mode Hard Light, Opacity 70%.
10 - Selections > Invert. Effects > 3D Effects > Drop Shadow: 0, 0, 100, 50, back color. Selections > Select None.
11 - Activate the Copy of Raster 1 layer. Effects > Image Effects > Seamless Tiling: Default.
12 - Activate the Raster 1 layer. Layers > Duplicate. Close the visibility of the Raster 1 layer.
13 - With the Copy of Raster 1 layer activated apply: Effects > Image Effects > Seamless Tiling: Default. Rename this layer to Raster 3.
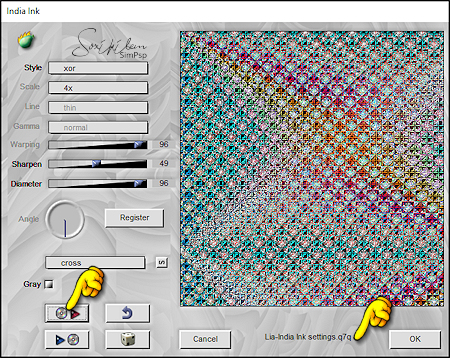
14 - Plugin Flaming Pear > India Ink: Preset Lia-India Ink. Plugin Here
15 - Layers > Merge > Merge Visibile. Image > Resize: 85%, all layers unchecked.
16 - Effects > 3D Effects > Drop Shadow: 0, 0, 100, 50.
17 - Open the visibility of the Raster 1 layer.
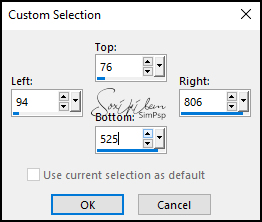
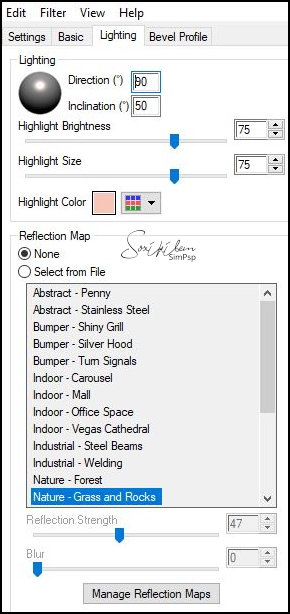
18 - Selection Tool> Custon Selection.
19 - Layers > New Raster Layer. Paint with the gradient. Selections > Modify > Contract: 20px. Press the delete key on the keyboard. Selections > Select None.
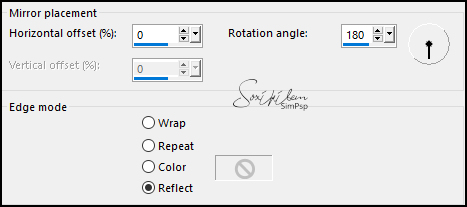
20 - Filters Unlimited 2.0 > AB 21 > Textured Difference Town.
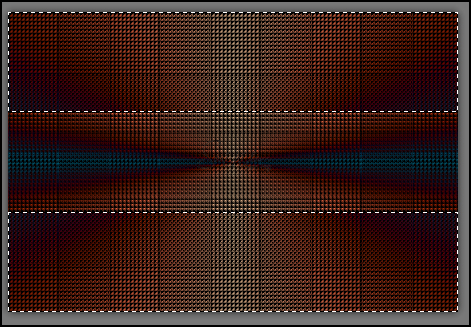
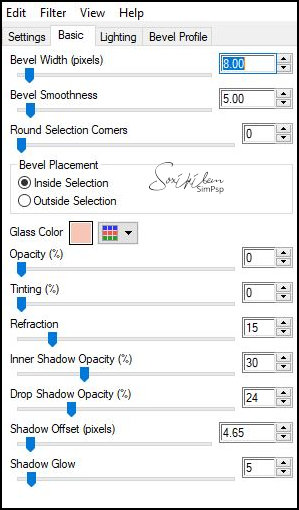
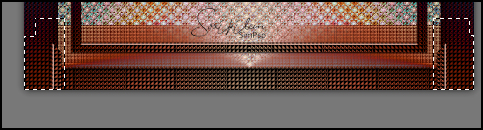
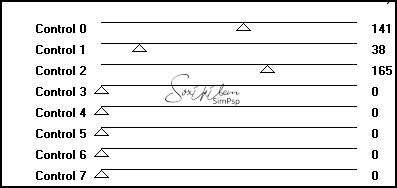
21 - Plugin Eye Candy 5 > Impact > Glass. in setting choose Clear.
22 - Layers > Duplicate. Plugin Simple > Blintz.
23 - Effects > Reflection Effects > Rotating Mirror.
24 - Select the parts as shown in the print below and press the delete key on the keyboard.
Selections > Select None.
25 - Layers > Duplicate. Imagens > Mirror > Mirror Vertical. Layers > Merge > Merge Down.
26 - Layers > Arrange > Move Down. Layers > Merge > Merge Visibile.
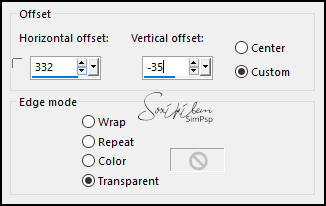
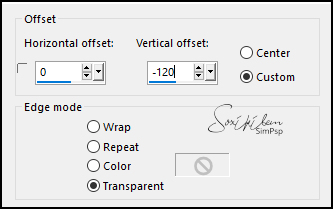
27 - Edit > Copy in the Landscape. Edit > Paste a New Layer. Adjust > Sharpness > Sharpen.
28 - Plugin FM Tile Tools > Saturation Emboss: Default.
29 - Edit > Copy in the Flechas oro. Edit > Paste a New Layer.
30 - Edit > Copy the Main Tube. Edit > Paste a New Layer. Image > Resize: 70%, all layers unchecked. (depends on the size of your tube).
31 - Effects > Image Effects > Offset.
32 - Effects > 3D Effects > Drop Shadow: 0, 0, 100, 100, black color.
33 - Edit > Copy on the Texto. Edit > Paste a New Layer. Effects > Image Effects > Offset.
34 - Image > Add Borders: 2px foreground color 6px background color 2px foreground color 40px background color
35 - Select this border with the Magic Wand tool. Layers > New Raster Layer. Paint with the gradient.
36 - Plugin AFS > Import > Sqborder2.
37 - Layers > Properties: Blend Mode Diference. Selections > Select None.
38 - Image > Add Borders: 2px, foreground color.
39 - Sign your work.
40 - File > Export > Jpeg Optimizer.
CREDITS: Main Tube by Animabelle - Landscape by Jewel - Remainder of material provided by Emilieta
Tutorial by Emilieta
Feel free to submit your versions. I'll be happy to post them on our site.
|