|
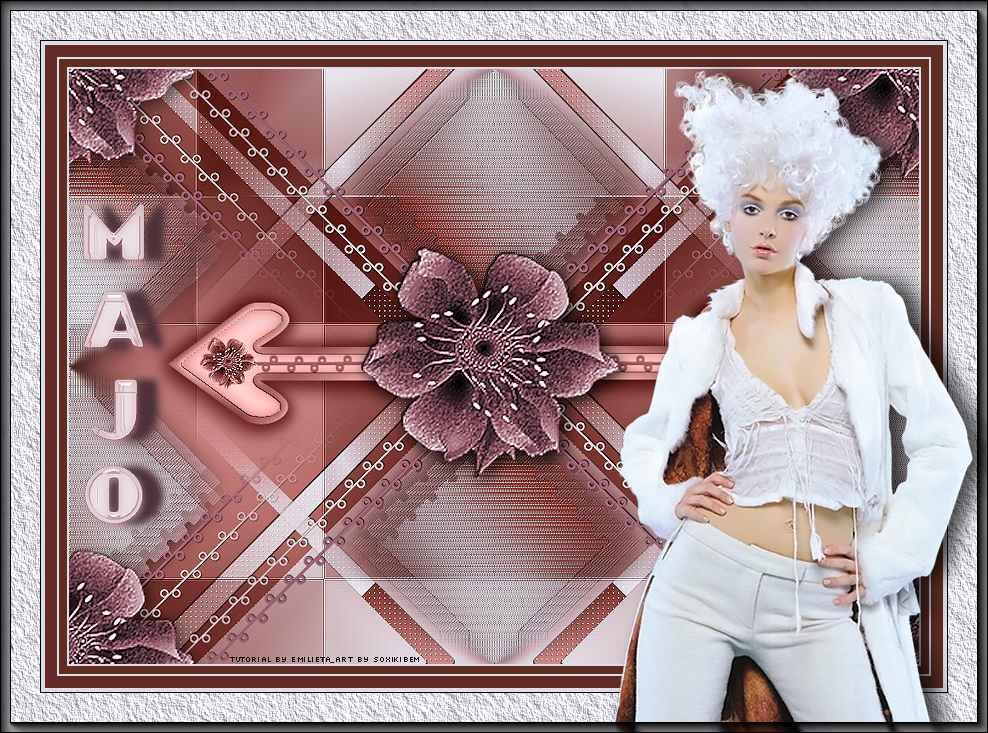
Tutorial By Emilieta English Translation by Soxikibem Original Tutorial
MATERIAL 1 Main Tube of your choice Adorno Flechas Adorno-cir.png-rosa_Lia 1 Tube Flor Majo-Canal Alfa pincel-Majo
Pluguins AAA Frames AP Lines Carolaine and Sensibility FM Tile Tools Italian Editors Mehdi
TUTORIAL 1 - Choose two colors to work with.Here I used: Foreground: #602c24 Background: #dddfe8
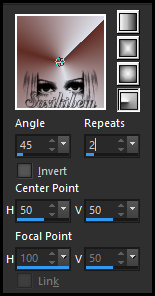
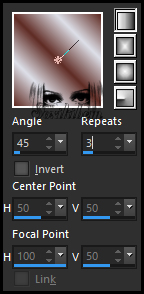
2 - Form a Radial Gradient as below.
3 - Open the file Majo-Canal Alfa, duplicate and close the original. Paint with the gradient.
4 - Layers > Duplicate. Image > Mirror > Mirror Horizontal.
5 - Layers > Properties: Opacity 50%.
6 - Layers > Merge > Merge Visibile.
7 - Image > Free Rotate: Left, 90, all layers unchecked.
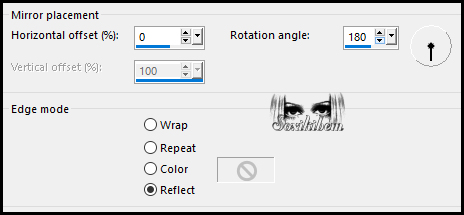
8 - Effects > Reflection Effects > Rotating Mirror.
9 - Image > Free Rotate: Right, 90, all layers unchecked.
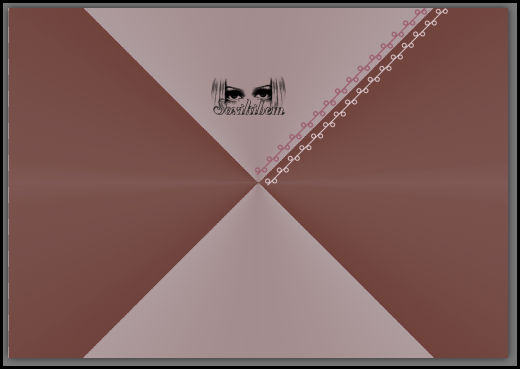
10 - Edit > Copy on the Adorno-cir.png-rosa_Lia. Edit > Paste a New Layer.
11 - Position according to model.
12 - Make sure it is well positioned.
13 - Layers > Duplicate. Image > Mirror > Mirror Horizontal.
14 - Layers > Merge > Merge Down.
15 - Effects > 3D Effects > Drop Shadow: 1, 1, 60, 1, black color.
16 - Layers > Duplicate.
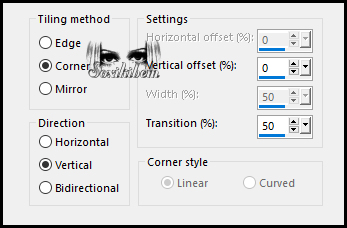
17 - Effects > Image Effects > Seamless Tiling: Default.
18 - Adjust > Sharpness > Sharpen. Layers > Merge > Merge Down. Layers > Duplicate. Image > Mirror > Mirror Vertical. Layers > Merge > Merge Down.
19 - Selections > Load/Save Selections > Load Selection From Alpha Channel: Majo-1.
20 - Selections > Promote Selection to Layer. Paint with the gradient.
21 - Plugin Carolaine and Sensibility > CS_LDots: 140, 3, 2.
22 - Plugin FM Tile Tools > Blend Emboss: Default.
23 - Effects > 3D Effects > Drop Shadow: 1, 1, 60, 1, black color. Effects > 3D Effects > Drop Shadow: -1, -1, 60, 1, black color.
24 - Selections > Select None.
25 - Layers > Duplicate. Image > Mirror > Mirror Horizontal.
26 - Layers > Merge > Merge Down.
27 - Layers > Duplicate. Effects > Image Effects > Seamless Tiling.
28 - Layers > Duplicate. Layers > Merge > Mer Down 2 times.
29 - Layers > Arrange > Move Down.
30 - Selections > Load/Save Selections > Load Selection From Alpha Channel: Majo-2. Selections > Promote Selection to Layer.
31 - Paint with the gradient.
32 - Plugin AP (Lines) > SilverLining.
33 - Plugin FM Tile Tools > Blend Emboss: Default.
34 - Plugin Italian Editors Effect > Effetto Fantasma: 25, 25.
35 - Adjust > Sharpness > Sharpen. Selections > Select None.
36 - Effects > Image Effects > Seamless Tiling: Default.
37 - Plugin FM Tile Tools > Saturation Emboss: Default.
38 - Effects > 3D Effects > Drop Shadow: 5, 5, 60, 30, black color. Effects > 3D Effects > Drop Shadow: -5, -5, 60, 30, black color.
39 - Layers > New Raster Layer. Paint with the gradient.
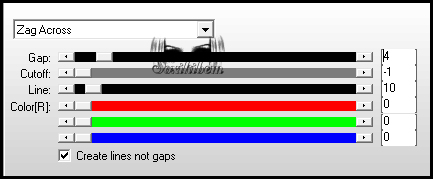
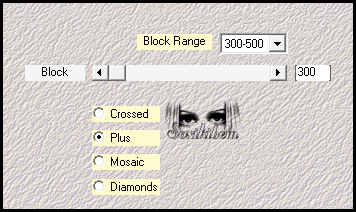
40 - Plugin > Mehdi > Sorting Tiles.
41 - Effects > Edge Effects > Enhance Edit > Repeat Enhance Edges.
42 - Layers > Properties: Blend Mode Overlay.
43 - Effects > Reflection Effects > Rotating Mirror.
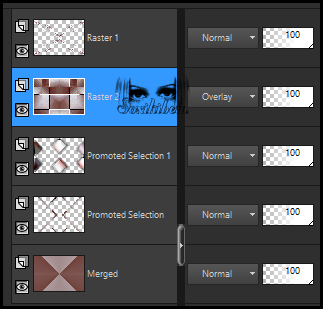
44 - Check the layers.
45 - Layers > Merge > Merge Visible.
46 - Edit > Copy in the Adorno Flechas. Edit > Paste a New Layer.
47 - Layers > Properties: Blend Mode Luminence (L).
48 - Edit > Copy in the Flower Tube. Edit > Paste a New Layer. Layers > Duplicate.
49 - Effects > Image Effects > Seamless Tiling: Default.
50 - Layers > Merge > Merge Visible.
51 - Image > Resize: 85%, all layers marked.
52 - Adjust > Sharpness > Sharpen.
53 - Image > Add Borders: 2px background color 8px foreground color 2px background color 12px foreground color 45px background color
54 - With the Magic Wand tool select the 45px border.
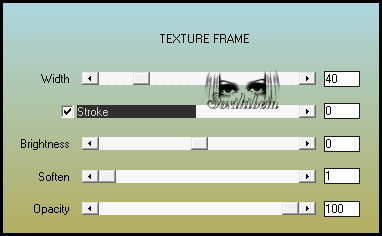
55 - Plugin AAA Frames > Texture Frame.
56 - Selections > Select None.
57 - Edit > Copy in the Main Tube. Edit > Paste a New Layer.
58 - Image > Resize: 85%, all layers unchecked. If using another tube, resize if necessary. Adjust > Sharpness > Sharpen.
59 - Effects > Image Effects > Offset: 270, -15, Custom, Transparent.
60 - Effects > 3D Effects > Drop Shadow: 0, 14, 70, 30, black color.
61 - Edit > Copy in the pincel-Majo. Edit > Paste a New layer.
62 - Position according to model.
63 - Sign your work. Layers > Merge > Merge All.
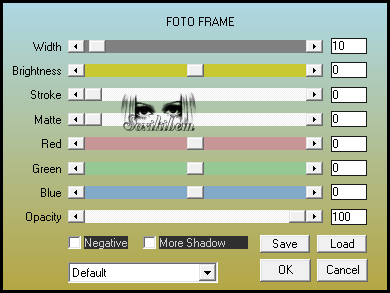
64 - Plugin AAA Frames > Foto Frame.
65 - File > Export > Jpeg Optimizer.
CREDITS: Main Tube by Colybrix - Remainder of material provided by Emilieta
Tutorial by Emilieta
Feel free to submit your versions. I'll be happy to post them on our site.
|
