|
Tutorial By Emilieta English Translation by Soxikibem Original Tutorial
MATERIAL 1 Main Tube of your choice 1 Landscape Image Mask: 175.jpg-Mask Selections (Save Selections to PSP Selections Folder) Brush @M&M_Floral-109 (Export Brush as Custom Brush)
Pluguins AAA Frames Eye Candy 5 FM Tile Tools L en K's
EXECUTION -1- Open your material, duplicate and close the originals. Choose two colors to work with .Here I used: Foreground: white color Background: #443d45
-2- Prepare a gradient formed by the colors you choose. We will use it later.
-3- Open a 1000x700px Transparency. Paint with background color.
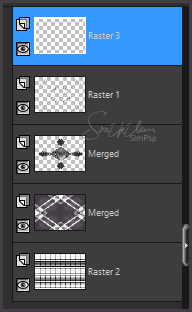
-4- Layers > New Mask Layer > From Image: 175.jpg-Mask. Layers > Merge > Merge Group.
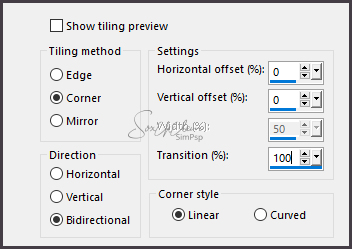
-5- Effects > Image Effects > Seamless Tiling.
-6- Layers > Duplicate. Layers > Merge > merge Visible.
-7- Selections Load/Save Selections > Load Selection From Disk: Vera Mendez. Edit > Copy. Selections > Promote Selection to Layer. Edit > Paste Into Selection.
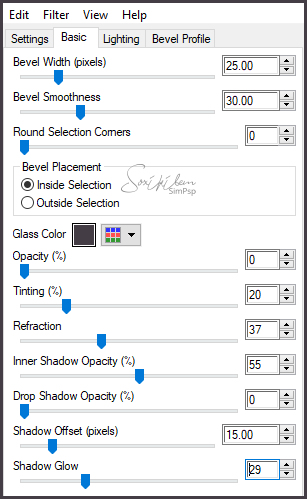
-8- Plugin Eye Candy 5 > Impact: Glass. Choose Clear from Settings.
-9- Effects > 3D Effects > Drop Shadow: 1, 1, 60, 0, with foreground color. Effects > 3D Effects > Drop Shadow: -1, -1, 60, 0, with foreground color. Selections > Select None.
-10- Layers > Duplicate. Image > Mirror > Mirror Vertical. Layers > Merge > Merge Down.
-11- Enable Layer Merged. Selections Load/Save Selections > Load Selection From Disk: Vera Mendez-2. Edit > Copy. Selections > Promote Selection to Layer. Edit > Paste Into Selection. Repeat itens 8 and 9.
-12- Layers > Duplicate. Image > Mirror > Mirror Horizontal.
-13- Close visibility of Merged layer. Layers > Merge > Merge Visible.
-14- Open the visibility of the Merged layer. With the merged layer of diamonds active. Layers > Duplicate. Image > Resize: 110%, all layer unchecked. Layers > Arrange > Move Down.
-15- Enable Layer Merged. Enable layer merged from the top of all. Layers > Duplicate. Image > Resize: 90%, all layer unchecked.
-16- Close visibility of Merged layer (Mask Layer). Layers > Merge > Merge Visible. Effects > 3D Effects > Drop Shadow: 0, 0, 60, 25, color #404040.
-17- Selections Load/Save Selections > Load Selection From Disk: Vera Mendez-3. Layers > new Raster Layer. Edit > Copy in the Landscape Image. Edit > Paste Into Selection. Adjust > Sharpness > Sharpen.
-18- Layers > new Raster Layer. Paint with foreground color. Selections > Modify > Contract: 3. Hit the delete key on the keyboard. Selections > Select None. Layers > Merge > Merge Visible.
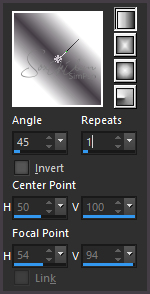
-19- Layers > Merge > Merge Visible. Layers > New Raster Layer. With the Paint Brush Tool configured as below.
-20- Stamp using foreground color and giving 3 mouse clicks. With the Pick Tool rotate the image a litle to fit the model or use Free Rotate: in 32 Degrees.
-21- Plugin FM Tile Tools > Blend Emboss: Default. Effects > Edge Effects > Enhance. Effects > 3D Effects > Drop Sahdow: 1, 1, 60, 1, color #404040.
-22- Layers > Duplicate. Image > Mirror > Mirror Horizontal. Layers > Merge > Merge Down. Layers > Duplicate. Image > Mirror > Mirror Vertical. Layers > Merge > Merge Down.
-23- Effects > Image Effects > Seamless Tiling.
-24- Layers > New Raster Layer. Paint with the Gradient. Layers > Arrange > Send To Botton.
-25- Plugin L en K's > Jeffrey: 110. Effects > Edge Effects > Enhance, 2 Times.
-26- Layers > New Raster Layer. Layers > Arrange > Bring to Top. Paint with the foreground color. Selections > Select All. Selections > Modify > Contract: 3px. Hit the delete key on the keyboard. Selections > Select None.
-27- Layers > Merge > Merge Visible. Image > Resize: 85%, all layer checked.
-28- Selections > Select All. Image > Add Borders: 30px, foreground color. Selections > Invert.
-29- Plugin L em K's > Palmyre: 35, 5. Effects > Edge Effects > Enhance. Effects > 3D Effects > Drop Shadow: 2, 2, 60, 2, black color. Effects > 3D Effects > Drop Shadow: -2, -2, 60, 2, black color.
-30- Layers > New Raster Layer. Selections > Modify > Contract: 3px. Hit the delete key on the keyboard. Selections > Invert. Effects > 3D Effects > Drop Shadow: 2, 2, 60, 2, black color. Effects > 3D Effects > Drop Shadow: -2, -2, 60, 2, black color. Selections > Select None. Layers > merge > Merge Visible.
-31- Image > Resize: 85%, all layers checked.
-32- Image > Add Borders: 3px foreground color 30px background color With the Magic Wand Tool select this border. Layers > New Raster Layer. Paint with the gradient.
-33- Effects > Edge Effects > Enhance More, 3 Times. Selections > Select None.
-34- Layers > New Raster Layer. Paint with the foreground color. Selections > Select All. Selections > Modify > Contract: 3px. Hit the delete key on the keyboard.
-35- Selections > Invert. Effects > 3D Effects > Drop Shadow: 2, 2, 60, 2, black color. Effects > 3D Effects > Drop Shadow: -2, -2, 60, 2, black color. Selections > Select None.
-36- Image > Add Borders: 6px background color 30px foreground color Plugin AAA Frame > Foto Frame.
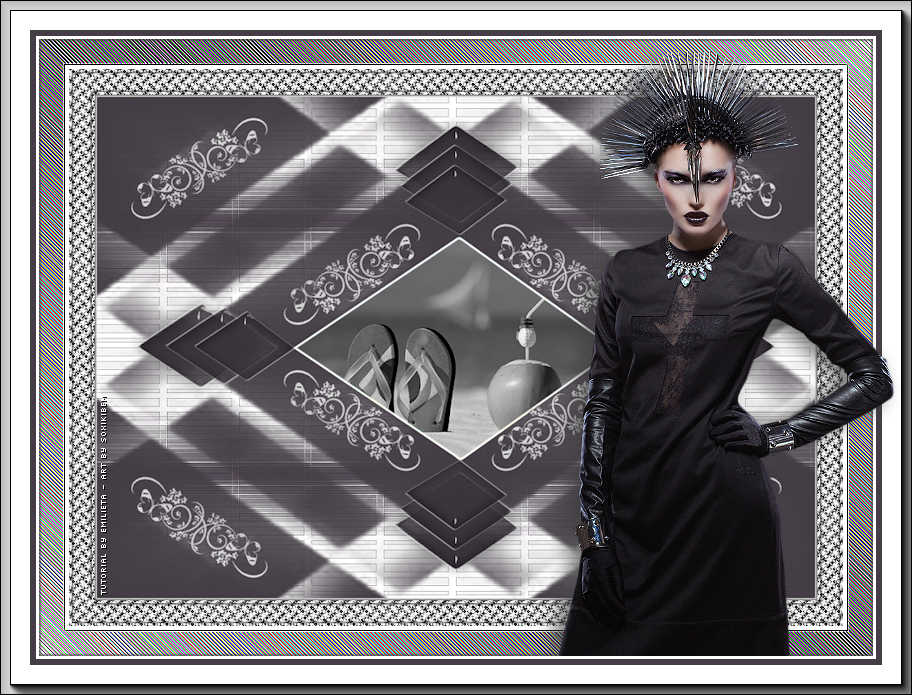
-37- Edit > Copy in the Main Tube. Edit > Paste a New Layer. Resize if necessary. Effects > 3D Effects > Drop Shadow: 3, -10, 70, 30, black color. Plugin FM Tile Tools > Saturation Emboss: Default.
-38- Apply your watermark or signature. File > Export > JPEG Optimizer...
CREDITS: Main Tube by Animabelle - Landscape here - Remainder of material provided by Emilieta
Tutorial by Emilieta
Feel free to submit your versions. I'll be happy to post them on our site.
|