|
Tutorial By Emilieta English Translation by Soxikibem Original Tutorial
MATERIAL 1 Main Tube of your choice Landscape Tube of your choice Narah_Mask_1470 Adorno marco.png Sparcles.png Gradient teom_12 (Save to PSP Gradients folder)
Pluguins Lotis Filters > Mosaic Toolkit v1.07 Flaming Pear > Flexify 2 FM Tile Tools
EXECUTION
-1- Open your material, duplicate and close the originals. Choose a color to put in the foreground. Here i used #ab1400. Use the white color for the background.
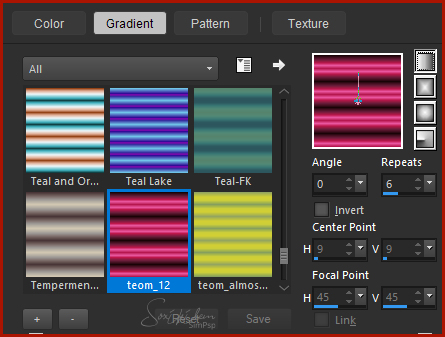
-2- Open a 1000x700px Transparency. In Materials, select Gradient / select gradient (Teom_12).
Paint the transparency with the gradient. * As I am using a different color from the tutorial, I have colored the gradient to match the chosen color.
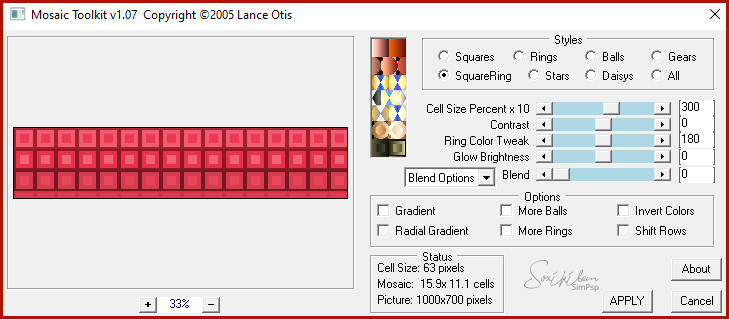
-3- Plugin Lotis filters > Mosaic Toolkit v1.07 > Squares.
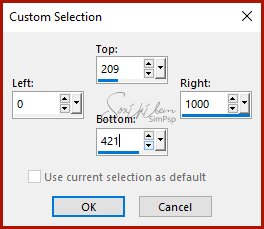
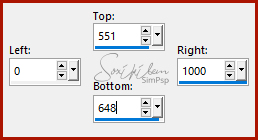
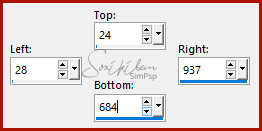
-4- Selections Tool Custom Selection.
-5- Layers > New Raster Layer. Paint with the Gradient.
-6- Plugin Lotis Filters > Mosaic Toolkit v1.07 > SquareRing.
-7- Effects > Edge Effects > Enhance More. Effects > Edge Effects > Enhance.
-8- Layers > New Raster Layer. Paint with the color #ffffff Selections > Modify > Contract: 2px Hit keyboard delete key. Selections > Select None. Layers > Merge > Merge Down. Layers > Duplicate.
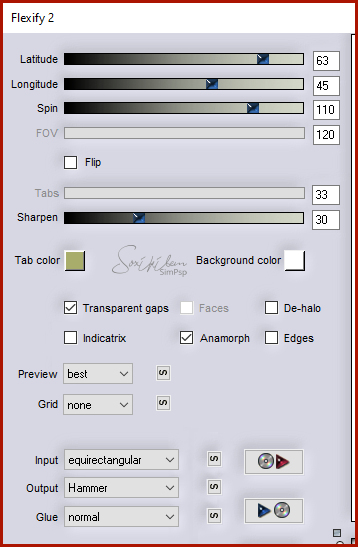
-9- Plugin Flaming Pear > Flexify 2.
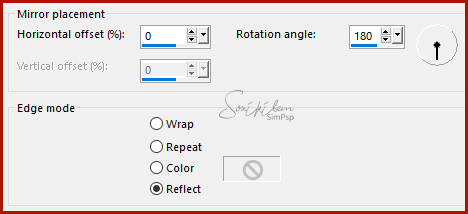
Do not move the image. Effects > Reflection Effects > Rotating Mirror.
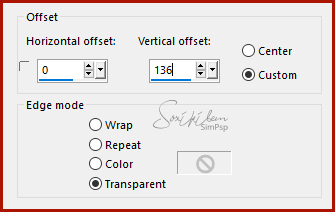
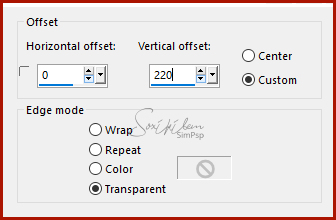
-10- Image Resize: 90% all layers unchecked. Effects > Image Effects > Offset.
-11- Effects > 3D Effects > Drop Shadow: 7, 0, 60, 15, black color. Effects > 3D Effects > Drop Shadow: -7, 0, 60, 15, black color.
-12- Selection Tool > Custom Selection.
-13- Layers > New Raster Layer. Change the gradient by placing 90 in Angle. Paint selection with this gradient.
-14- Plugin Lotis Filters > Mosaic Toolkit as in item 6.
-15- Effects > Edge Effects > Enhance More. Effects > Edge Effects > Enhance.
-16- Layers > New Raster Layer. Paint the layer with the color #ffffff. Selections > Modify > contract: 2px. Press Delete from your keyboard. Layers > Merge > Merge Down. Slections > Select None.
-17- Effects > 3D Effects > Drop Shadow: 7, 0, 60, 15, black color.
-18- Enable Layer Raster 1. Layers > New Raster Layer. Paint the layer with the color #ffffff.
-19- Layers > New Mask Layer> From Image: Narah_Mask_1470. Layers > Duplicate. Layers > Merge > Merge Group. Layers > Duplicate. Image > Mirror > Mirror Horizontal. Layers > Merge > Merge Down.
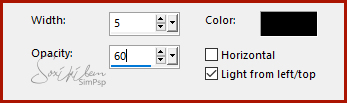
-20- Effects > Edge Effects > Enhance More. Layers > Properties > Opacity: 60.
-21- Enable Layer Raster 2. Open your landscape tube > Copy and paste as new layer. Effects > Image Effects > Offset.
-22- Adjust > Sharpeness > Sharpen. Plugin FM Tile Tools > Blend Emboss: Default. Layers > Duplicate. Layers > Merge > Merge Down.
-23- Enable layer Raster 1. Effects > Texture Effects > Blinds: black color.
Layers > Merge > Merge All.
-24- Image > Resize: 85%. Image > Add Borders: 2px, foreground color. Image > Add Borders: 4px, white color. Image > Add Borders: 2px, foreground color. Image > Add Borders: 50px, white color.
-25- Selection Tool > Custom Selection.
Effects > 3D Effects > Drop Shadow: 2, 2, 100, 2, foreground color. Effects > 3D Effects > Drop Shadow: -2, -2, 100, 2, foreground color. Selections > Select None.
-26- Open the tube (Adorno marco) > Copy and paste as new layer.
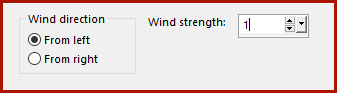
-27- Open tube (sparcles) / Copy and paste as new layer. Effects > Distortion Effects > Wind.
Effects > Image Effects > Offset.
-28- Open your Main Tube > Copy and paste as new layer.Image > Resize: 85%, all layers unchecked (It will depend on the size of your tube). Look at the model to see how to position. Effects > 3D Effects > Drop Shadow: 0, 0, 60, 50, black color. Layers > Duplicate. Layers > Properties: Blend Mode > Multiply, Opacity > 36
-29- Apply your watermark or signature. File > Export > JPEG Optimizer...
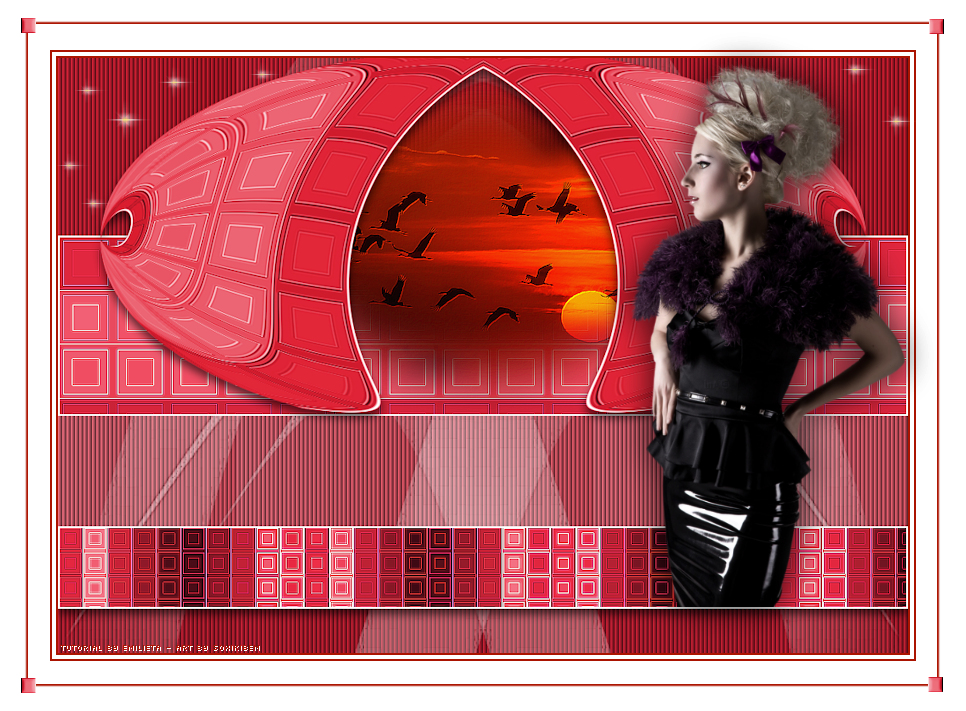
CREDITOS: Version 1 & 2: Main Tube & Landscape by Animabelle - Remainder of material provided by Emilieta
Tutorial by Emilieta
Feel free to submit your versions. I'll be happy to post them on our site.
|