|
Tutorial By Emilieta English Translation by Soxikibem Original Tutorial
MATERIAL 1 Main Tube of your choice Flor de lágrimas Gerbera blanca esquinero Adorno-florecitas Corel_08_095 (Save this pattern to PSP Pattern folder) Sel-Menta.PspSelection (Save selection to PSP Selections folder)
Pluguins FM Tile Tools > Blend Emboss
EXECUTION
-1- Open your material, duplicate and close the originals. Choose two colors . Here I used:Foreground: #96b998 Background: #0a4e51
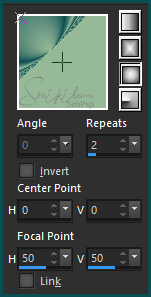
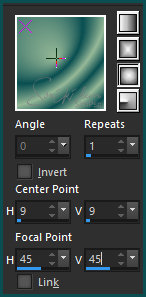
-2- Open a 1000x700px Transparency. Paint with a Sunburst Gradient formed by the colors you choose.
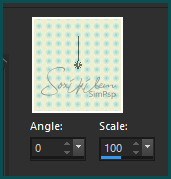
-3- Layers > New Raster Layer. Selections > Load/Save Selection > Load Selection From Disk: Sel-Menta. Confiure your foreground palette with the pattern Corel_08_095.
Paint this selection with this pattern.
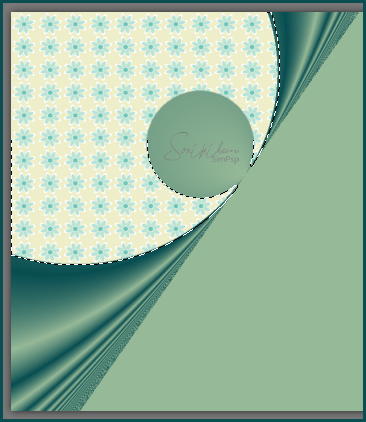
-4- Adjust > Sharpness > Sharpen. Decrease visibility of this layer to 55%. Selections > Select None.
-5- Effects > 3D Effects > Drop Shadow: 10, 0, 80, 25, black color. Effects > 3D Effects > Drop Shadow: -10, 0, 80, 25, black color. Layers > Merge > Merge Visibile.
-6- With the freehand Selection Tool select the lightest part on the right. Hit the delete key on the keyboard. Selections > Select None.
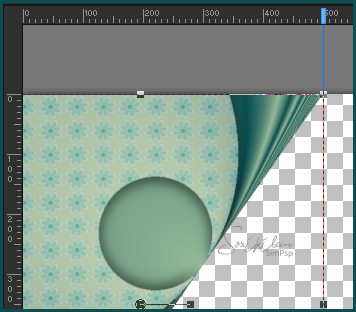
-7- View - Rules - Position the layer at 500. Moving left your work.
-8- Layers > Duplicate. Image > Mirror > Mirror Horizontal. Layers > Merge > Merge Visible. Effects > 3D Effects > Drop Shadow: 7, 7, 80, 25. Effects > 3D Effects > Drop Shadow: -7, -7, 80, 25.
-9- Edit Copy in the Gerbera blanca tube. Edit > Paste a new Layer. Position it in the center of the circle, on the left. Effects > Edge Effects > Enhance. Effects > 3D Effects > Drop Shadow: 0, 0, 80, 25, black color. Layers > Duplicate. Image > Mirror > Mirror Horizontal. Layers > Merge > Merge Visible.
-10- Layers > New Raster Layer. Paint with the gradient changing as in print below.
Layers > Duplicate. Image > Mirror > Mirror Horizontal. Set the opacity to 50%. Layers > Merge > Merge Down. Layers > Arrange > Send to Bottom Effects > Edge Effects > Enhance. Effects > Image Effects > Seamless Tiling: Default.
-11- Enable layer Merged. Effects > Image Effects > Seamless Tiling: Default.
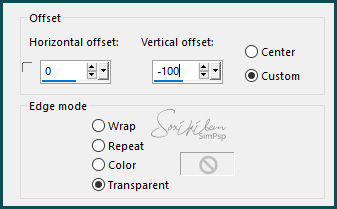
-12- Copy in the Tube Flor de lágrimas. Edit > Paste a New Layer. Image > Resize: 65%. Adjust > Sharpness > Sharpen. Plugin FM Tile Tools > Blend Emboss: Default. Effects > 3D Effects > Drop Shadow: 6, 12, 80, 25, black color. Effects > Image Effects > Offset.
Layers > Merge > Merge All. Image > Resize: 85%.
-13- Image > Add Borders: 2px background color 20px foreground color 2px background color 10px foreground color 2px background color 5px foreground color 2px background color 2px foreground color
-14- Edit > Copy in the Adorno-florecitas. Edit > Paste a New Layer. Position left. Effects > 3D Effects > Drop Shadow: 0, -7, 80, 25, black color. Layers > Duplicate. Image > Mirror > Mirror Horizontal. Erase the drop shadow visible on the frame.
-15- Edit > Copy in the Main Tube. Edit > Paste a New Layer. Resize if necessary. Effects > 3D Effects > Drp Shadow: 6, -12, 80, 25, black color.
-16- Image > Add Borders: 45px, background color. Edit > Copy in the tube esquinero. Edit > Paste a New Layer. Effects > Edge Effects > Enhance More. Effects > 3D Effects > Drop Shadow: 0, 0, 80, 25, black color.
-17- Layers > New Raster Layer. Paint with foreground color. Selections > Select All. Selections > Modify > contract: 2 Delete. Selections > Select None.
-18- Apply your watermark or signature. File > Export > JPEG Optimizer...
CREDITOS: Version 1: Tube by Gabry. - Remainder of material provided by Emilieta Version 2: Tube by Animabelle - Tube Flower by Gini
Tutorial by Emilieta
Feel free to submit your versions. I'll be happy to post them on our site.
|