|
Tutorial By Colybrix Tradução em Português por Soxikibem Tutorial Original
MATERIAL Alpha Perfect Harmony deco 1 fleur86-coly NarahsMasks_1536 Texte titre Transparent_Butterfly_Decorative_Clipart Perfectharmony - coly & PerfectHarmony Glass Coly (Dê um duplo clique nos Presets, eles irão para as pastas)
PLUGINS Filters Unlimited - Bkg Designer SF10I Carolaine and Sensibility Alien Skin Eye Candy 5: Impact Simple
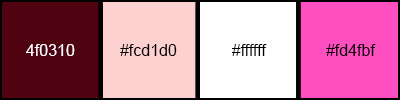
CORES Foreground: #4f0310 Background: #fcd1d0
TUTORIAL
1 - Abria o Alpha Perfect Harmony, duplique.
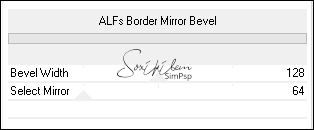
3 - Adjust > Blur > Gaussian Blur: 15 Layers > Duplicate. Filters Unlimited 2.0 > Bkg Designer SF10I > ALFs Border Mirror Bevel: Default.
4 - Effects > Image Effects > Seamless Tiling: Default. Layers > Properties: Opacity 85%. Layers > Merge > Merge Down.
5 - Selections > Load/Save Selection > Load Selection From Alpha Channel: Selection #1. Layers > New Raster Layer. Pintar esta seleção com a cor branca. Selections > Modify > Contract: 3. Aperte a tecla Delete do teclado.
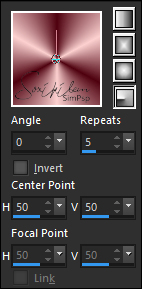
6 - Ferramenta Flood Fill (Baldinho) com a Opacity em 50%. Pintar com o gradiente como abaixo (background cor branca)
Selections > Select None.
7 - Effects > Image Effects > Seamless Tiling: Default. Layers > Properties: Blend Mode Overlay.
8 - Selections > Load/Save Selection > Load Selection From Alpha Channel: Selection #2 Flood Fill (Baldinho) com a Opacity em 100% Layers > New Raster Layer. Pintar a seleção com a cor branca. Selections > Modify > Contract: 3. Aperte a tecla Delete do teclado. Flood Fill com a Opacity em 50% Pintar com o gradiente em uso. Selections > Select None.
9 - Effects > Image Effects > Seamless Tiling: Default. Layers > Arrange > Move Down.
Flood Fill com a Opacity em 100%
10 - Com a Layer Raster 3 ativa. Plugin Carolaine and Sensibility > CS-LDots: Default.
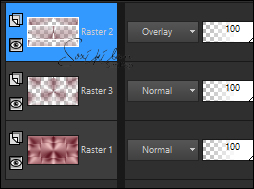
11 - Ativar a Layer Raster 2. Plugin Carolaine and Sensibility > CS-DLines: Default. Layers > Merge > Merge Visible.
12 - Selections > Load/Save Selection > Load Selection From Alpha Channel: Selection #1. Effects > 3D Effects > Drop Shadow: 0, 0, 70, 25, cor preta. Selections > Select None.
13 - Selections > Load/Save Selection > Load Selection From Alpha Channel: Selection #2. Effects > 3D Effects > Drop Shadow: 0, 0, 70, 25, cor preta. Selections > Select None.
14 - Layers > New Raster Layer. Flood Fill 100% Pintar esta layer com a cor branca. Layers > New Mask Layer > From Image: NarahsMasks_1536. Effects > Edge Effects > Enhance. Layers > Merge > Merge Group. Layers > Properties: Blend Mode Luminance (Legacy), Opacity 75%.
15 - Edit > Copy no tube fleur86-coly. Edit > Paste a New Layer. Image > Mirror > Mirror Horizontal. Image > Resize: 70%, resize all layers desmarcado.
16 - Pick Tool: Position X 293, Position Y 33. Effects > 3D Effects > Drop Shadow: 0, 0, 70, 25, cor preta.
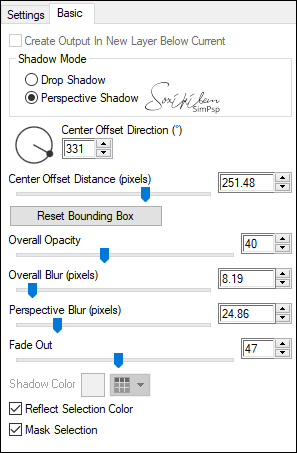
17 - Plugin Alien Skin Eye Candy 5 > Impact: Perspective Shadow. Escolha o preset Perfectharmony-coly ou aplique como abaixo.
18 - Edit > copy no Deco 1. Edit > Paste a New Layer. Pick Tool: Position X 64, Position Y 205. Layers > Properties: Blend Mode Luminance (Legacy) Adjust > Sharpness > Sharpen.
19 - Layers > Duplicate. Image > Mirror > Mirror Horizontal. Image > Mirror > Mirror Vertical. Layers > Arrange > Move Down (2 vezes).
20 - Ativar a layer Merged. Layers > Duplicate. Layers > Arrange > Bring to Top. Effects > Geometric Effects > Circle: Transparent marcado.
21 - Effects > Geometric Effects > Spherize: Strength 100, Ellipse marcado.
22 - Image > Resize: 10%, resize all layers desmarcado. Pick Tool: Position X 191, Position Y 104.
23 - Plugin > Alien Skin Eye Candy 5; Impact: Glass. Escolha o Preset PerfectHarmony Glass Coly.
24 - Plugin Simple > Top Left Mirror. Layers > Properties: Opacity 70%.
25 - Edit > Copy no Texte titre. Edit > Paste a New Layer. Image > Resize: 73%, all layers desmarcado Image > Negative Image.
26 - Pick Tool: Position X 16, Position Y 297. Effects > 3D Effects > Drop Shadow: -3, 6, 100, 6, cor do foreground.
27 - Ativar a layer Merged, Edit > Copy.
28 - Image > Add Borders: 1px cor foreground 3px cor branca 1px cor foreground 3px cor branca 1px cor foreground
30px cor branca 1px cor foreground 3px cor branca 1px cor foreground 3px cor branca 1px cor foreground
40px cor branca 1px cor foreground
29 - Com a Magic Wand selecione a borda branca de 40px. Edit > Paste Into Selection. Adjust > Blur > Gaussian Blur: 15.
30 - Layers > Promote Selection to Layer. Layers > Properties: Blend Mode Multiply. Plugin Carolaine and Sensibility > CS-LDots: Default. Plugin Carolaine and Sensibility > CS-DLines: Default. Layers > Merge > Merge Down. Selections > Select None.
31 - Selections > Select All. Selections > Modify > Contract: 41. Effects > 3D Effects > Drop Shadow: 0, 0, 80, 40, cor preta.
32 - Selections > Modify > Contract: 39 Effects > 3D Effects > Drop Shadow: 0, 0, 30, 40, cor foreground. Selections > Select None.
32 - Abri o Transparent Butterfly Psd e ativar a layer papillon 1. Edit > Copy. Edit > Paste a New Layer. Image > Resize: 55%, all layers desmarcado. Pick Tool Position X 751, Position Y 467.
33 - Volte ao Transparent Butterfly Psd e ative a layer papillon 2. Edit > Copy. Edit > Paste a New Layer. Image > Mirror > Mirror Horizontal. Image > Resize: 40%, all layers desmarcado. Pick Tool Position X 814, Position Y -17.
34 - Effects > 3D Effects > Drop Shadow: -22, 28, 20, 6, com a cor 4.
35 - Assine ou aplique sua Marca D'água. Layers > Merge > Merge All. Image > Resize para 950px, resize all layers checked.
Créditos: Tutorial by Colybrix - Art by Soxikibem
Versão 1: material do tutorial original de Colybrix
Tutorial by Colybrix
Sinta-se à vontade para enviar suas versões.
|