|
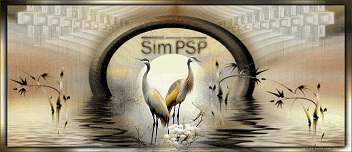
Este Tutorial foi elaborado por Roberta Maver, qualquer semelhança é mera coincidência. Tutorial testado e revisado por Márcinha.
TRADUÇÕES:
Obrigada aos nossos tradutores!
MATERIAL:
Narah_mask_Abstract174
Mehdi > Weaver Mehdi > Kaleidoscope 2.1
Mehdi > Eraser Genuine Carolaine & Sensibility > cs_texture
Mehdi > Vibrations 1.1
Adjust > Blur > Gaussian Blur: 25. Effects > Plugins > Mehdi > Sorting Tiles:
Effects > Edge Effects > Enhance.
Pintar com a cor o Foreground Layers > New Raster Layer. Pintar com a cor o Background.
Layers > New Mask Layer > From Image: Narah_mask_Abstract174 Layers > Merge > Merge Down.
7 - Effects > Plugins > Mehdi > Weaver.
Effects > Edge Effects > Enhance.
8 - Effects > Plugins > Mehdi > Kaleidoscope 2.1
9 - Effects > Plugins > Mehdi > Eraser Genuine
10 - Effects > Plugins > Carolaine & Sensibility > CS-LDots:
11 - Layers > New Raster Layer.
Selections > Select None.
12 - Effects > Plugins > Mehdi > Weaver
13 - Effects > Plugins > Carolaine & Sensibility > cs_texture.
Layer > Properties > General > Blend Mode: Overlay
14 - Edit > Copy no Decor01_CalmAfteron_byRobertaMaver Layer > Properties > General > Blend Mode: Luminance (Legal)
15 - Layers > New Raster Layer. Ativar a Ferramenta Select tool > Custom Selecton:
Pintar com o gradiente Linear formado pelas cores em uso.
16 - Adjust > Add/Remove Noise > Add Noise:
17 - Layers > New Raster Layer. Effects > 3D Effects > Cutout.
Layers > Merge > Merge Down. Selections > Select None.
18 - Layers > New Raster Layer. Selections > Select None.
19 - Effects > Plugins > Mehdi > Vibrations 1.1
20 - Effects > Plugins > Mehdi > Weaver.
Effects > Edge Effects > Enhance.
21 - Edit > Copy no Deco2_CalmAfteron_byRobertaMaver Com a Ferramenta Pick Tool: Position X 37, Position Y 29. Com a ferramenta Magic Wand: Tolerance e Feather: 0,
selecionar dentro de cada quadradinho.
Selections > Modify > Expand > 2
22 - Layers > New Raster Layer. Pintar com as seleções com a cor do Foreground #61482f Effects > Plugins > Alien Skin Eye Candy 5: Impact > Glass > Clear:
Layers > Arrange > Move Down. Ativar a Layer Topo Layers > Merge > Merge Down. Selections > Select None.
23 - Ativar a Layer Raster 1.
Edit > Copy no Misted Paisagem.
Image> Resize se necessário Adjust > Sharpness > Sharpen.
Posicionar ao centro. 1 px - color: Background #f2ead7 10 px - color: Foreground #61482f
1 px - color: Background #f2ead7 Image > Add Broders > Symmetric: 40 px com a cor do Foreground #61482f Selections > Invert.
Adjust > Add/Remove Noise > Add Noise: Selections > Invert.
Effects > 3D Effects > Drop Shadow: 0, 0, 100,50, Color:
#000000
26 - Edit > Copy no Decor03_CalmAfteron_byRobertaMaver Layers > Merge > Merge Down.
Posicionar conforme o modelo da Tag desse tutorial.
Aplique Drop Shadow como preferir. Edit > Copy na layer Raster 3 - Calm. Volte ao trabalho e Edit > Paste as New Layer. Colorize com a cor do Foreground #61482f.
Effects > 3D Effects > Drop Shadow: 1, 2, 100,1, Color:
#f2ead7 (background)
29- Ative o arquivo Titulo_CalmAfternoon_byRobertaMaver. Edit > Copy na layer Raster 4 - Afternoon. Volte ao trabalho e Edit > Paste as New Layer. Colorize com a cor do Background #f2ead7.
Effects > 3D Effects > Drop Shadow: 1, 2, 100,1, Color: #61482f
(Foreground) Layer > Properties > General > Blend Mode: Hard Light - Opacity: 70%
Sinta-se à vontade para enviar suas versões. Terei todo o prazer em publicá-las em nosso site.
|