|


TRADUÇÕES:


Obrigada aos nossos tradutores!
MATERIAL:
1 Tube Principal à sua escolha
1 Misted Paisagem à sua escolha
AlphaChannelLonely_byRobertaMaver
Decor_byRobertaMaver
TituloLonelybyRoberta
PLUGINS:
Toadies > What Are You?
Artistiques > Pastels
Factory Gallery A > Holidays in Egypt.
Obs.: Fique à vontade para mudar os Blends de acordo com as
cores que estiver usando.
Colorizar os decors e títulos quando necessário conforme as
cores escolhidas.
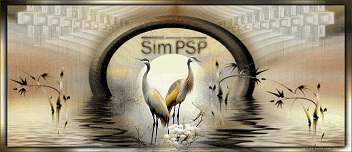
EXECUÇÃO
1 - Abrir o material no PSP, duplique e feche o original.
Escolher duas cores para trabalhar.
Foreground #13193b
Background #b4b5b9
Cor 3 : # ffffff

2 - Abra o arquivo AlphaChannelLonely_byRobertaMaver.
Pintar com o gradiente Linear, Angle 90, Repeats 1,
formado pelas cores em uso.

3 - Selections > Select All.
Edit > Copy no tube principal.
Edit > Paste Into Selection.
Selections > Select None.
Adjust > Sharpness > Sharpen.
4 - Adjust > Blur > Radial Blur:

5 - Effects > Image Effects > Seamless Tiling:

6 - Effects > Plugin > Artistiques > Pastels:

7 - Layers > New Raster Layer.
Selections > Load/Save Selection > Load Selection From Alpha
Channel: Selection #1
Pintar com a cor do Background #b4b5b9
8 - Effects > Texture Effects > Blinds:

Selections > Select None.
9 - Effects > Plugins > Toadies > What Are You?

Layer > Properties > General > Blend Mode: Normal -
Opacity: 70%
10 - Ativar a Layer Raster 1.
Edit > Copy no Decor01_byRobertaMaver
Edit > Paste as New Layer.
Layer > Properties > General > Blend Mode: Soft Light
11 - Layers > New Raster Layer.
Selections > Load/Save Selection > Load Selection From Alpha
Channel: Selection #2
Pintar com o gradiente Linear, Angle 0, Repeats 1,
formado pelas cores em uso.

12 - Effects > Plugins > Factory Gallery A > Holidays in
Egypt.

Layer > Properties > General > Blend Mode: Overlay - Opacity: 100%
Selections > Select None.
Effects > 3D Effects > Drop Shadow: 0 / 0 / 100 /30, Color: #000000
13 - Ativar a Layer Topo.
Layers > New Raster Layer.
Selections > Load/Save Selection > Load Selection From Alpha
Channel: Selection #3
Pintar a seleção com a cor Extra # FFFFFF (Branca)
Selections > Modify > Contract: 10
Pintar a seleção com a cor do Background #b4b5b9
Selections > Modify > Contract: 10
Pintar a seleção com a cor do Foreground #13193b
Selections > Modify > Contract: 10
Pintar a seleção com a Cor Extra # FFFFFF (Branca)
Selections > Modify > Contract: 5
Pintar a seleção com o Gradiente Linear, Angle 0, Repeats 1,
formado pelas cores em uso.
14 - Effects > Texture Effects > Weave.

15 - Edit > Copy no Misted Paisagem
Edit > Paste Into Selection.
Adjust > Sharpness > Sharpen.
Selections > Select None.
Layer > Properties > General > Blend Mode: Soft Light
Layers > Duplicate.
Layer > Properties > General > Blend Mode: Overlay
Effects > 3D Effects > Drop Shadow: 0 / 0 / 100 /30, Color: #00000
16 - Ativar a Layer Raster 2.
Copy no Decor02_byRobertaMaver
Edit > Paste as New Layer.
Com a Ferramenta Pick Tool, posicione: Position X: 0 Position Y: 0
Layer > Properties > General > Blend Mode: Luminace (L)
17 - Ativar a Layer Topo.
Edit > Copy no Decor03_byRobertaMaver
Edit > Paste as New Layer.
Com a Ferramenta Pick Tool, posicione: Position X: 411 Position Y:
-5
Adjust > Sharpness > Sharpen.
Effects > 3D Effects > Drop Shadow: 1, 1, 100, 2,
Color: Foreground #13193b
As Layers devem ficar assim:

18 - Image > Add Borders > Symmetric:
1 px - color: Foreground #13193b
10 px - color: Background #b4b5b9
1 px - color: Foreground #13193b
30 px - Cor Extra 3: #ffffff
1 px - color: Foreground #13193b
10 px - color: Background #b4b5b9
19 - Edit > Copy no Decor04_byRobertaMaver.
Edit > Paste as New Layer.
Com a Ferramenta Pick Tool, posicione: Position X: 70 Position Y: 246
Effects > 3D Effects > Drop Shadow: 1, 1, 100, 2, Color: Foreground
#13193b
20 - Edit > Copy no Tube Principal.
Edit > Paste as New Layer.
Image> Resize se necessário:
no tube do material o resize foi de 90%.
Posicionar à direita.
Aplique Drop Shadow como preferir.
21 - Edit > Copy no TituloLonelybyRoberta
Edit > Paste as New Layer.
Com a Ferramenta Pick Tool, posicione: Position X: 90
Position Y:14
22- Image > Add Borders: 1 px - color: Foreground #13193b
23-
Se você desejar, redimensiona seu trabalho.
Aplicar sua marca d'água ou assinatura.
File > Export > JPEG Optimizer.
VERSÕES


Créditos
Formatação e Tutorial by
Roberta Maver
Tube Principal: Tubed by
Liza
Tubes
Misted Paisagem: by
k@rineDreams
Créditos Versão:
Tube Principal: Tubed by LB TUBES
Misted Paisagem: by anna.br
13/11/2022
Sinta-se à vontade para enviar suas versões.
Terei todo o prazer em publicá-las em nosso site.

|
Tutorial criado por
Roberta Maver em Novembro/2022,
para
SIM-PSP.
Não poderá ser copiado, retirado de seu lugar, traduzido
ou utilizado em listas de aprendizados ou grupos sem o
consentimento prévio da autora. |
|