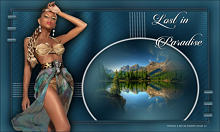
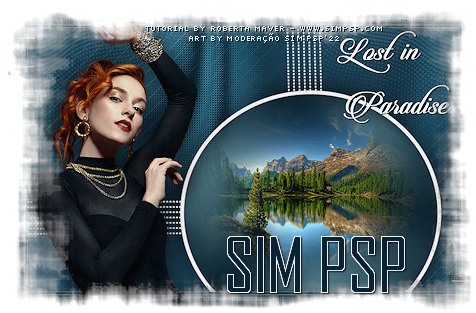
Tutorial by Roberta Maver

English Translation by Moderation SIM-PSP

Original Tutorial


MATERIAL
1 Main Tube of your choice
1 Misted Landscape of your choice 
Deco1_Lost_In_Paradise_byRoberta

Deco2_Lost_In_Paradise_byRoberta

Deco3_Lost_In_Paradise_byRoberta

Titulo_Lost_In_Paradise_byRoberta


PLUGINS
Mehdi > Wavy Lab
L en K's landksiteofwonders > Djin
L en K's landksiteofwonders > Paris
 

TUTORIAL


1 -
Open the material on the PSP, duplicate and close the original. 
Choose two colors to work with:
Foreground #021b2a
Background #53818e


2 - Open a 900 x 550 px transparent image.

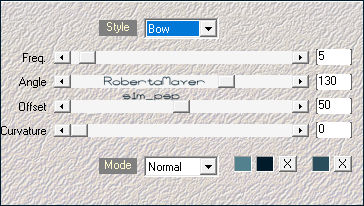
Effects > Plugins > Mehdi > Wavy Lab:


3 - Adjust > Blur > Radial Blur:


4 - Effects > Distortion Effects > Polar Coordinates:


5 - Effects > Distortion Effects > Pinch:


6 - Layers > Duplicate.
Image > Mirror > Mirror Horizontal.
Image > Mirror > Mirror Vertical.

Layers > Properties > General > Opacity: 50%

Layers > Merge > Merge Down.

 Layers > Duplicate.
Layers > Properties > General > Blend Mode: Overlay - Opacity: 100


7 - Effects > Plugins > L en K's landksiteofwonders > Djin:

Effects > Edge Effects > Enhance More.

8 -Effects > Plugins > L en K's landksiteofwonders > Paris:

Edit > Repeat> Effects > L & K > Paris.

Adjust > Sharpness > Sharpen.


9 -  Edit > Copy the Deco1_Lost_In_Paradise_byRoberta. 
Edit > Paste as New Layer.

Layers > Properties > General > Blend Mode: Soft Light

or another Blend Mode that matches your colors.


10 - Edit > Copy the Deco2_Lost_In_Paradise_byRoberta. 
Edit > Paste as New Layer.

Objects > Align > Left.

With Magic Wand: Tolerance and Feather: 0, click inside the circle to select.

Selections > Modify
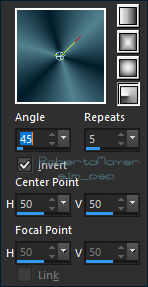
 > Expand: 6.

11 - Layers > New Raster Layer.

Paint with Radial gradient formed with the chosen colors:

Layers > Arrange > Move Down.

Adjust > Blur > Gaussian Blur: 25.


12 - Edit > Copy the Misted Landscape.
Edit > Paste Into Selection.
Adjust > Sharpness > Sharpen.

13 - Layers > New Raster Layer.

Effects > 3D Effects > Cutout:

Layers > Merge > Merge Down.

Selections > Select None.


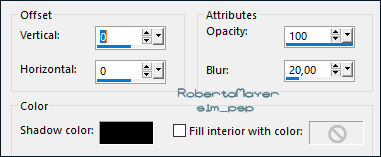
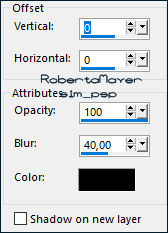
14 - Effects > 3D Effects > Drop Shadow:


Activate the Top Layer


15 - Image > Add Borders > Symmetric: 
1px - color: Background #53818e
4px - color: Foreground #021b2a
1 px - color: Background #53818e

Edit> Copy
Selections > Select All.
Image > Add Broders > Symmetric: 50 px with any color.
Selections > Invert.
Edit > Paste Into Selection.


16 - Adjust > Blur > Gaussian Blur: 25.

Selections > Promote Selection to Layer.
Selections > Select None.


17 -  Effects > Plugins > L en K's landksiteofwonders > Djin:

Layers > Duplicate.
Image > Mirror > Mirror Horizontal.
Image > Mirror > Mirror Vertical.

Layers > Properties > General > Opacity: 50%

Layers > Merge > Merge Down.

Effects > Edge Effects > Enhance

Layers > Merge > Merge Down.


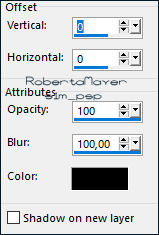
18 - Selections > Select All.

Selections > Modify > Contract: 50

 Effects > 3D Effects > Drop Shadow:

Selections > Select None.
 

19 - Edit > Copy the Deco3_Lost_In_Paradise_byRoberta.
Edit > Paste as New Layer.


20 - Edit > Copy the Main Tube.
Edit > Paste as New Layer.
Image > Resize if necessary.
Position of your choice.

Effects > 3D Effects > Drop Shadow: your choice.

21 - Edit > Copy the Titulo_Lost_In_Paradise_byRoberta.
Edit > Paste a New Layer.
Position of your choice.

Effects > 3D Effects > Drop Shadow: your choice.


22 - Image > Add Borders > Symmetric: 1px - Color: Foreground #021b2a

23 - If you wish, resize your work.
Apply your watermark or signature.
File > Export > JPEG Optimizer.


CREDITS:
Tutorial by
Roberta Maver
English Translation by Moderation
SIM-PSP
Main Tube: Tubed by
Pqna&Alice

Misted Landscape: Tubed by Violet Vixen Mist


Feel free to send your versions.

I will be happy to publish them on our website.


Tutorial created by Roberta Maver, in November/2021, for SIM PSP. Translated into English in January/2022, by the Moderation of SIM-PSP. It cannot be copied, removed from its place, translated or used in learning lists or groups without the author's prior consent.