|
TRADUÇÕES
O Sim PSP valoriza e
reconhece o trabalho das tradutoras que tornam os tutoriais
acessíveis a diferentes idiomas.
Tutorial testado e revisado por Márcinha no PSP 2018
*********
Agradeço às Tubeiras pelos Tubes e Masks, pois sem eles não seria
possível criar este trabalho.
Sinta-se à vontade para adaptar os blends conforme as cores que
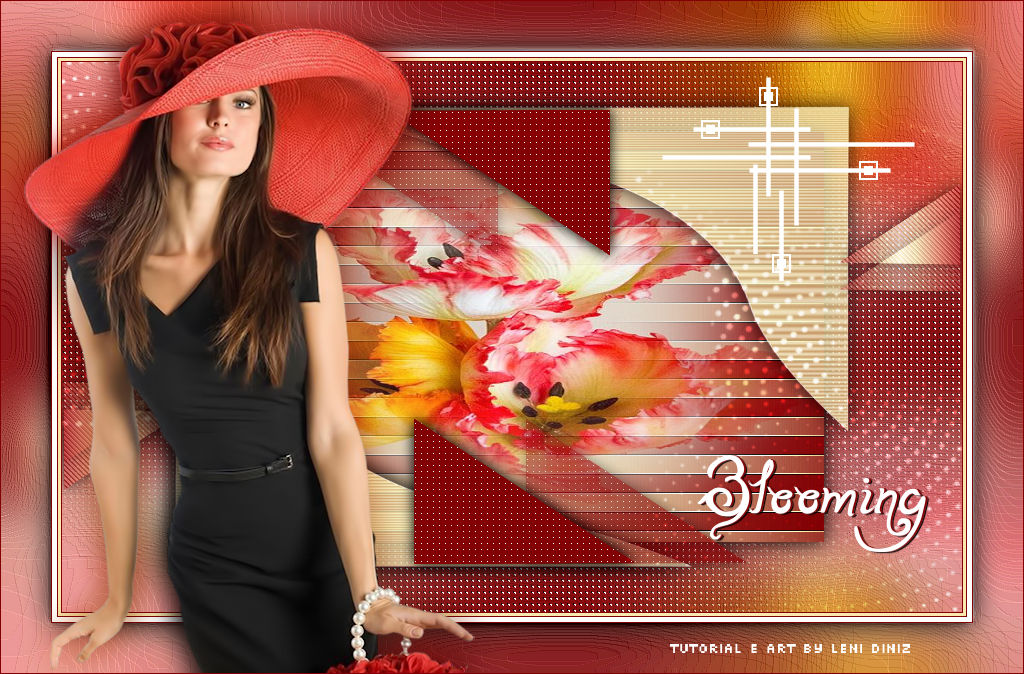
estiver utilizando. MATERIAL 1 Tube principal à sua escolha 1 Misted Floral à sua escolha
PLUGINS dsb flux > Linear Transmission Carolaine and Sensibility > CS_LDots Carolaine and Sensibility > CS-HLines Carolaine and Sensibility > CS-Dlines
CORES #e4a059 (Foreground) #dce9c7 (Background)
TUTORIAL
01- Abrir o material no PSP, copiar e fechar o original.
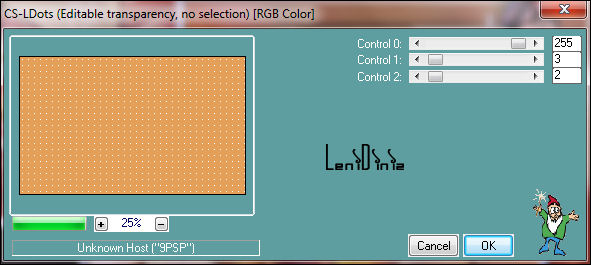
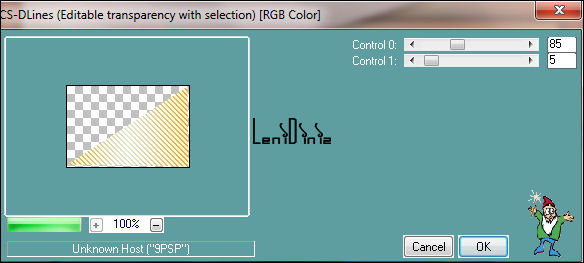
02- Ativar a cópia do arquivo alpha_blooming_LeniDiniz. Pintar com a cor do Foreground. Effects > Plugins > Carolaine and Sensibility > CS_LDots:
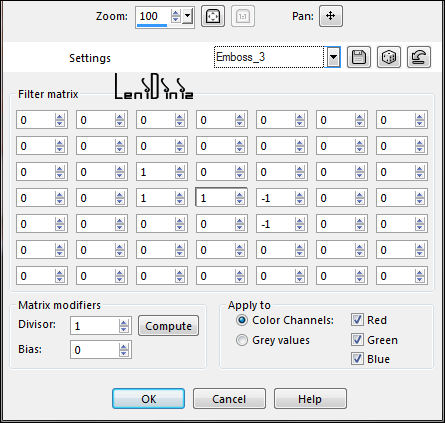
03- Effects > User Defined Filter: Emboss_3
04- Layers > New Raster Layer. Selections > Select All. Edit > Copy no misted floral. Edit > Paste Into Selection. Selections > Select None.
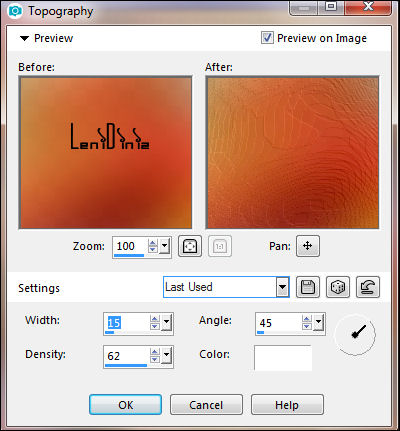
05- Effects > Image Effects > Seamless Tiling: Default. Adjust > Blur > Gaussian Blur: 30 Effects > Artistic Effects > Topography:
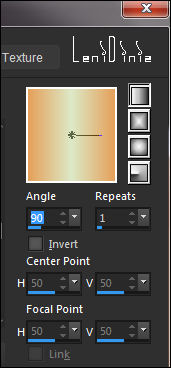
06- Adjust > Sharpness > Sharpen. Layers > New Raster Layer. Selections > Load/Save Selections > Load Selection from Alpha Channel: leni #1 Pintar com um gradiente Linear, formado pelas cores em uso:
07- Effects > Plugins > dsb flux > Linear Transmission:
08- Effects > Edge Effects > Enhance More. Layers > New Raster Layer. Edit > Copy no misted floral Edit > Paste into Selection.
09- Adjust > Sharpness > Sharpen. Layers > Merge > Merge Down. Selections > Select None.
10- Effects > 3D Effects > Drop Shadow: 0, 0, 100, 30, Color #000000
11- Layers > New Raster Layer. Selections > Load/Save Selections > Load Selection from Alpha Channel: leni #2 Pintar com a cor do Background.
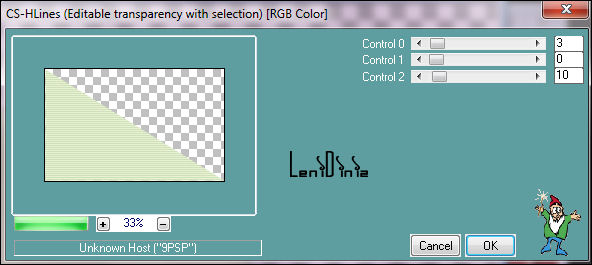
12- Layers > Properties > General > Blend Mode: Normal - Opacity: 80. Effects > Plugin Carolaine and Sensibility > CS-HLines:
13- Effects > Edge effects > Enhance. Selections > Select None.
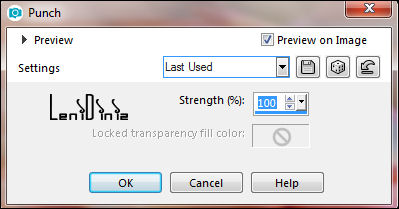
14- Effects > Distortion Effects > Punch:
Image > Resize: 80% - all layers desmarcado.
15- Ferramenta Pick Tool: Position X 112 Position Y 180. Effects > 3D Effects > Drop Shadow: 0, 0, 100, 30, Color #000000
16- Layers > Duplicate. Image > Mirror > Mirror Horizontal. Image > Mirror > Mirror Vertical. Layers > Merge > Merge Down.
17- Layers > New Raster Layer. Selections > Load/Save Selections > Load Selection from Alpha Channel: leni #3 Pintar com o gradiente em uso.
18- Effects > Plugins > Carolaine and Sensibility > CS-Dlines:
Effects > 3D Effects > Drop Shadow: 0, 0, 80, 20, Color #000000 Selections > Select None.
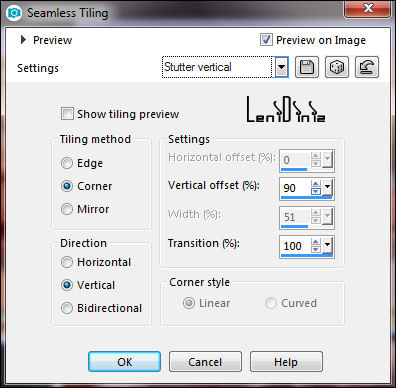
19- Effects > Image Effects > Seamless Tiling: Stutter Vertical:
20- Layers > Duplicate. Image > Mirror > Mirror Horizontal. Image > Mirror > Mirror Vertical. Layers > Merge > Merge Down. 21- Layers > New Raster Layer. Selections > Load/Save Selections > Load Selection from Alpha Channel: leni #4 Pintar com a cor do Foreground.
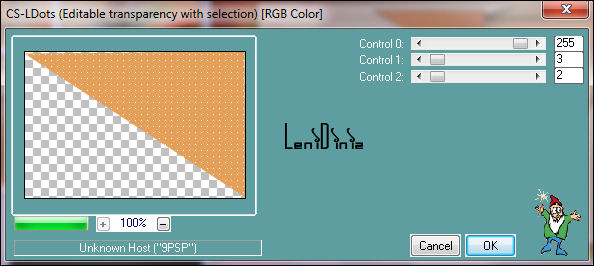
22- Effects > Plugins > Carolaine and Sensibility > CS_LDots
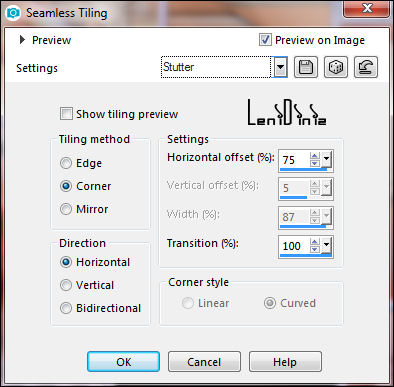
23- Effects > 3D Effects > Drop Shadow: 0, 0, 80, 20, Color: #000000 Selections > Select None. Layers > Duplicate. 24- Effects > Image Effects > Seamless Tiling: Stutter
25- Layers > Arrange > Move Down. Ativar a layer do topo. Layers > Merge > Merge Down.
26- Layers > Duplicate. Image > Mirror > Mirror Horizontal. Image > Mirror > Mirror Vertical. Layers > Merge > Merge Down.
27- Edit > Copy no decor01_blooming_LeniDiniz
Edit > Paste as New Layer.
28- Edit > Copy no decor02_blooming_LeniDiniz Edit > Paste as New Layer. Ferramenta Pick Tool: Position X 600 Position Y 15. 29- Effects > 3D Effects > Drop Shadow: 1, 1, 100, 1, Color: #000000
30- Edit > Copy Special > Copy Merged. 31- Image > Add Borders: 1px - symmetric - color: #e4a059 (cor do foreground). 3px - symmetric - color: #dce9c7 (cor do background). 1px - symmetric - color: #e4a059 (cor do foreground). 5px - symmetric - color: #ffffff (branco) 1px - symmetric - color: #e4a059 (cor do foreground).
32- Selections > Select All.
Image > Add Borders >
50px - symmetric - qualquer
cor Edit > Paste into Selection.
33- Adjust > Blur > Gaussian Blur: 15 Effects > Artistic Effects > Topography:
34- Adjust > Sharpness >
Sharpen. Effects > 3D Effects > Drop Shadow: 0, 0, 100, 40, Color #000000 Selections > Select None.
35- Edit > Copy no tube principal. Edit > Paste as New Layer. Image > Resize se necessário. Adjust > Sharpness > Sharpen. Posicionar à sua escolha. Effects > 3D Effects > Drop Shadow à sua escolha.
36- Edit > Copy no titulo_blooming_LeniDiniz. Edit > Paste as New Layer. Posicionar à sua escolha. Effects > 3D Effects > Drop Shadow à sua escolha. 37- Para terminar: Image > Add Bordes > 1px - symmetric - Color: #e4a059 (cor do foreground).
38- Aplicar sua marca d'água
ou assinatura. Leni, Maio 2022
Créditos: Tutorial by LeniDiniz Tubes Principais: Tubed by CibiBijoux Misteds Florais: by LeniDiniz Maio, 2022
Sinta-se à vontade para
enviar suas versões.
Envie sua versão para o e-mail:
SimPSP Redes Sociais
|