|
Tutorial By
LeniDiniz
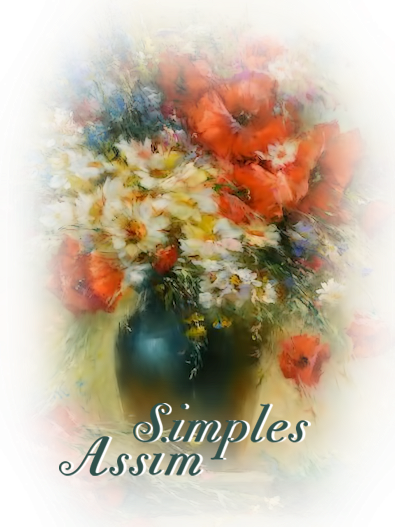
MATERIAL 1 Main Tube of your choice 1 Misted Floral or Landscape of your choice alpha_simples_assim decor_leni - decor_leni_2 - decor_leni_3 Título_simples_assim_leni  PLUGINS:
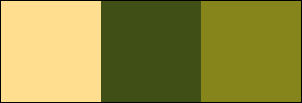
Mehdi > Wavy Lab COLORS: Color 1: #ffde8f (Foreground) Color 2: #404f16 (Background) Color 3: #86851b (extra color)
TUTORIAL
01- Open the material on the psp, copy and close the original.
Change the Blend Mode according to the colors you are working with.
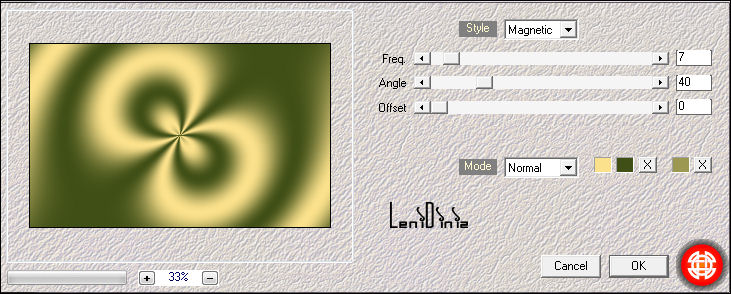
02- Choose 3 colors to work with. Activate the copying the file alpha_simples_assim. Effects > Plugins > Mehdi > Wavy Lab: Following the color sequence: 1 - 2 - 3
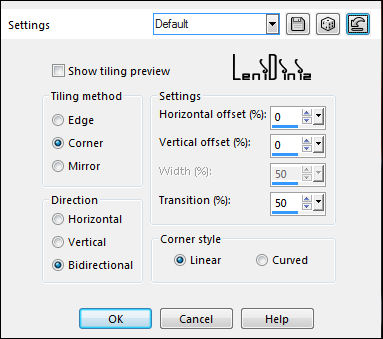
03- Effects > Image Effects > Seamless Tiling: Default.
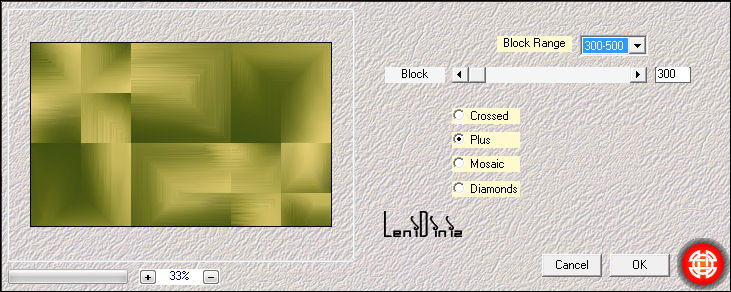
04- Adjust > Blur > Gaussian Blur: 35 05- Layers > Duplicate. Close the visibility of the Copy of Raster layer 1. Activate the layer Raster 1. Effects > Plugins > Mehdi > Sorting Tile:
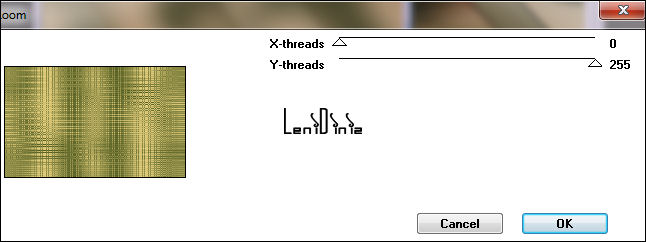
06- Effects > Edge effects > Enhance More 07- Activate and Open the visibility of the Copy of Raster 1 layer. Effects > Plugins > Filter Factory Gallery M > Loom: Default
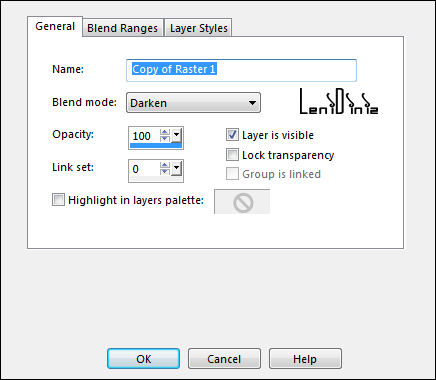
08- Layers > Properties > General > Blend Mode: Darken - Opacity: 100
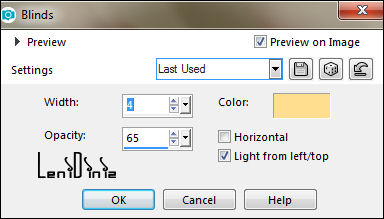
09- Adjust > Sharpness > Sharpen. 10- Layers > New Raster Layer. Selections > Load/Save Selections > Load Selection from Alpha Channel: leni #1 Paint selection with Background color: #404f16 (dark color) 11- Effects > Texture Effects > Blinds: Color: Foreground: #ffde8f (light color)
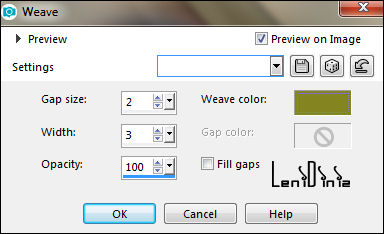
12- Effects > 3D Effects > Drop Shadow: 0, 0, 100, 30, Color #000000 Selections > Select None. 13- Activate the layer Copy of Raster 1. Selections > Load/Save Selections > Load Selection from Alpha Channel: leni #2. Layers > Arrange > Bring to Top. 14- Effects > 3D Effects > Drop Shadow: 0, 0, 100, 30, Color #000000 Selections > Select None. 15- Layers > New Raster Layer. Selections > Load/Save Selections > Load Selection from Alpha Channel: leni #3 Paint selection with Background color: #404f16 (dark color) 16- Effects > Texture Effects > Weave: Weave color: Color 3: #86851b (extra color)
Effects > 3D Effects > Drop Shadow: 0, 0, 100, 30, Color #000000 Selections > Select None.
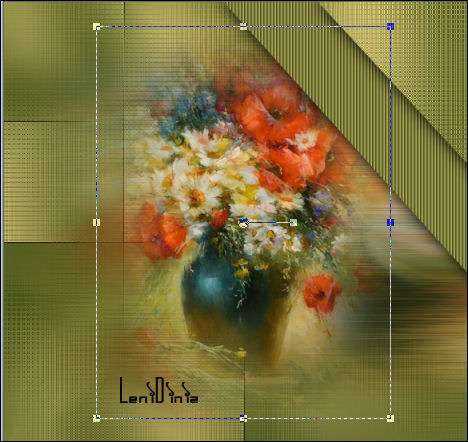
18- Activate the layer Copy of Raster 1. Layers > New Raster Layer. Selections > Select All. 19- Edit > Copy on Misted Floral or Landscape. Edit > Paste into Selection. Selections > Select None.
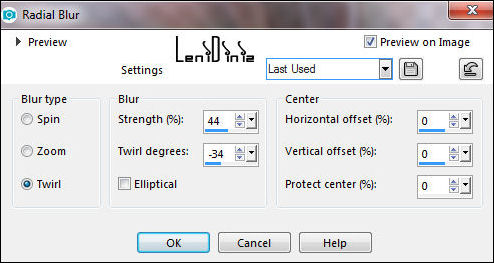
20- Adjust > Blur > Radial Blur:
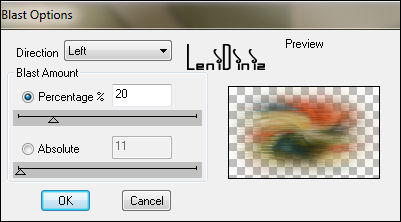
21- Effects > Plugin > dsb flux > Blast:
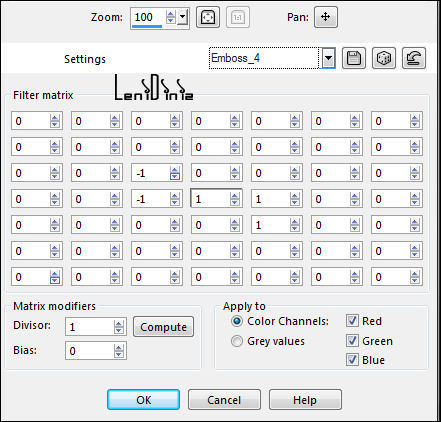
22- Effects > User Defined Filter: Emboss 4
23- Adjust > Sharpness > Sharpen.
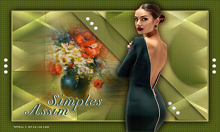
24- Edit > Copy on Misted Floral or Landscape. Edit > Paste as new layer. Image > Resize if necessary. Position as in the example:
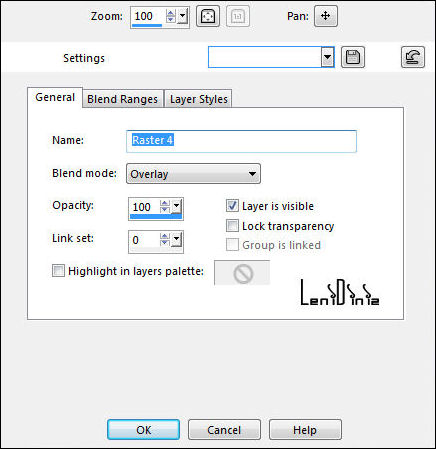
25- Adjust > Sharpness > Sharpen. 26- Activate the layer Raster 3 (top layer). Edit > Copy the decor_leni. Edit > Paste as New Layer. Layers > Properties > General > Blend Mode: Overlay Opacity: 100
27- Image > Add Bordes: 1px - symmetric - color #404f16 (Background) 3px - symmetric - color #ffde8f (Foreground) 1px - symmetric - color #404f16 (Background) Selections > Select All.
28- Image > Add Bordes > 50px - symmetric - color #404f16 (Background) Selections > Invert. Effects > Texture Effects > Weave: Weave color: Cor 3: #86851b (extra color)
29- Selections > Invert. Effects > 3D Effects > Drop Shadow: 0, 0, 100, 45, Color: #000000 Selections > Select None.
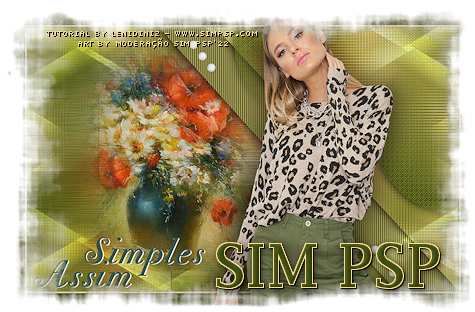
30- Edit > Copy the decor_leni_2 Edit > Paste as New Layer. Pick Tool: Position X: 15 - Position Y: 291
31- Edit > Copy the decor_leni_3 Edit > Paste as New Layer. Pick Tool: Position X: 392 - Position Y: 81 32- Edit > Copy the Main Tube. Edit > Paste as New Layer. Image > Resize if necessary. Adjust > Sharpness > Sharpen. Position at your choice. Effects > 3D Effects > Drop Shadow: your choice.
33- Edit > Copy no título_simples_assim_leni Edit > Paste as New Layer. Position at your choice. Effects > 3D Effects > Drop Shadow: your choice. 34- Image > Add Bordes > 1px - Symmetric - color #404f16 (Background)
35- Apply your watermark or signature.
CREDITS: Tutorial by LeniDiniz English Translation by Moderation SIM-PSP Main Tube: Tubed by Pqna&Alice Misted Floral: by LeniDiniz
Feel free to send your versions.
|