|
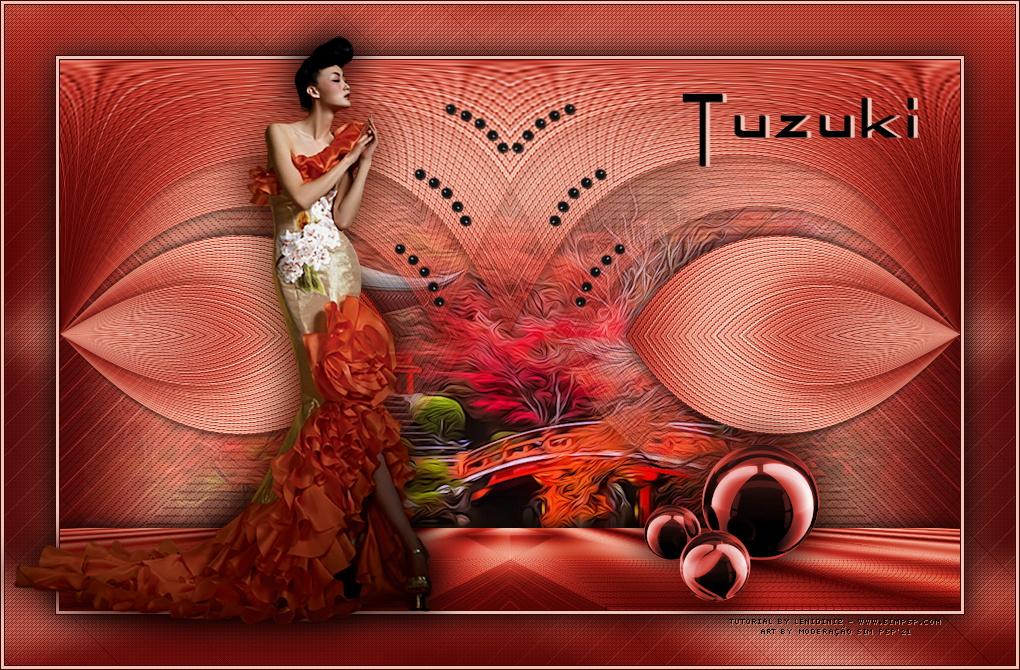
 Tutorial By
LeniDiniz
Material 1 Main Tube of your choice. 1 Decorative Tube of your choice. 1 Misted landscape of your choice Decor_lenituzuli Título_leni_tuzuli  Plugins Simple L en K's landksiteofwonders Mura's Misteister. Flaming Pear Mura's Seamless
Colors
#440404 Foreground #ecc7b7 Background
TUTORIAL 01- Open the material in PSP, duplicate and close the original.
Form a Linear gradient with the two chosen
colors:
02- Activate the file alphachanel_classic_leni. Paint with Linear Gradient. Adjust > Blur > Gaussian Blur: 50
03- Effects > Texture Effects > Weave: Weave Color: #440404 (Foreground)
04- Effects > Plugins > L en K's landksiteofwonders > Paris: Default
Edit > Repeat > L en K' Paris 05- Effects > Plugins > Mura's Seamless > Emboss at Alpha: Default
06- Effects > Plugins > Simple > Pizza Slice Mirror. Layers > Duplicate. 07- Image > Mirror > Mirror Horizontal Layers > Properties > General > Blend Mode: Hard Light Layers > Merge > Merge Down. 08- Selections > Load/Save Selections > Load Selection from Alpha Channel: leni_tuzuki. Selections > Promote Selection to Layer. Selections > None.
09- Layers > Duplicate. Repeat Layers > Duplicate. Repeat Layers > Duplicate.
Close the visibility of
layers Copy of Promoted
Selection and Copy (2)
of Promoted Selection
10- Activate the layer Promoted Selection Effects > 3D Effects > Drop Shadow: 0 > 0 > 100 > 30, color: #000000
11- Effects > Image > Effects > Seamless Tiling: Stutter - (Horizontal offset 75)
12- With the
Selection Tool,
select the part of
the shadow that was
on the right:
Press the keyboard's Delete key.
13- Layers > Duplicate. Image > Mirror > Mirror Horizontal. Layers > Merge > Merge Down. 14- Activate and open the visibility of the Copy Promoter Selection layer. Effects > 3D Effects > Drop Shadow: 0 > 0 > 100 > 30, color: #000000
15- Effects > Image > Effects > Seamless Tiling: Stutter (Horizontal offset (-75))
16- Layers > Duplicate. Image > Mirror > Mirror Horizontal. Layers > Merge > Merge Down.
17- Activate and open the visibility of the Copy layer (2) Promoter Selection. Image > Free Rotate > Right:
18- Objects > Align > Center in Canvas. With the Pick Tool tool, position: Position X: 175 Position Y: -1. Effects > 3D Effects > Drop Shadow: 0 > 0 > 100 > 30, color: #000000
19- Effects > Image > Effects > Seamless Tiling: Stutter (Horizontal offset 75)
20- Effects > Image > Effects > Seamless Tiling: Stutter (Horizontal offset (-75))
Layers > Merge > Merge Down. Repeat > Layers > Merge > Merge Down. Repeat > Layers > Merge > Merge Down.
21- Effects > Plugins > Flamig Pear > Flexify:
22- THIS STEP IS OPTIONAL: I USED AN EFFECT TO HIGHLIGHT THIS LAYER. Adjust > Hue and Saturation > Hue Map Saturation shift > 31 Ligtness shift 5 Or you can modify the setting according to the chosen color.
23- Activate the layer Raster 1. Layers > Duplicate. Layers > Arrange > Bring to Top. Effects > Plugin Muras Meister > Perspective Tiling:
24- THIS STEP IS OPTIONAL: I USED AN EFFECT TO HIGHLIGHT THIS LAYER. Adjust > Hue and Saturation > Hue Map Saturation shift > 31 Ligtness shift 5 Or you can modify the setting according to the chosen color.
25- Effects > 3D Effects > Drop Shadow: 0 > 0 > 100 > 30, color: #000000
Activate the layer Raster 1.
26- Edit > Copy the Misted landscape. Position to the center. Edit > Copy Special > Copy Merged.
27- Image > Add Borders > Symmetric: 1 px color #440404 Foreground 3 px color #ecc7b7 Background 1 px color #440404 Foreground 28- Selections > select All. Image > Add Borders > Symmetric: 50 px with any color. Selections > Invert. 29- Edit > Paste into Selection. Adjust > Blur > Gaussian Blur:15 30- Effects > Texture Effects > Weave: Weave color #440404 (Foreground)
31- Effects > Plugin > L en K's landksiteofwonders > Paris: Default
32- Effects > Plugin Mura's Seamless > Emboss at Alpha: Default
33- Selections > Invert. Effects > 3D Effects > Drop Shadow: 0 > 0 > 100 > 40, color: #000000 Selections > Select None. 34- Edit > Copy the decor_leni_tuzuki. Edit > Paste as New Layer. With the Pick Tool tool, position: Position X: 388 - Position Y: 102 Effects > 3D Effects > Drop Shadow: 1 > 1 > 100 > 1, color: #000000
35- Edit > Copy the Main Tube. Edit > Paste as New Layer. Image > Resize: if necessary. Position of your choice. Adjust > Shapness > Sharpen. Effects > 3D Effects > Drop Shadow: your choice.
36- Edit > Copy no título_leni_tuzuki Edit > paste as New Layer Position of your choice. Effects > 3D Effects > Drop Shadow: 0 > 4 > 100 > 1, color: #ecc7b7 Background
37- Edit > Copy the Decorative Tube. Edit > Paste as New Layer. Image > Resize: if necessary. Position of your choice. Adjust > Sharpness > Sharpen Effects > 3D Effects > Drop Shadow: your choice.
38- Image > Add Borders > Symmetric: 1 px color #440404 Foreground 3 px color #ecc7b7 Background 1 px color #440404 Foreground 39- Apply your watermark or signature.
CREDITS: Main Tube: tubed by SuizaBella Decorative Tube: by angeledesig Misted Landscape: Angel Star
Feel free to send your versions.
Send your version to the email address: familia.olgador@gmail.com
SimPSP Social Networks:
|