  Tutorial By
LeniDiniz 
Material
1 Main Tube of your choice
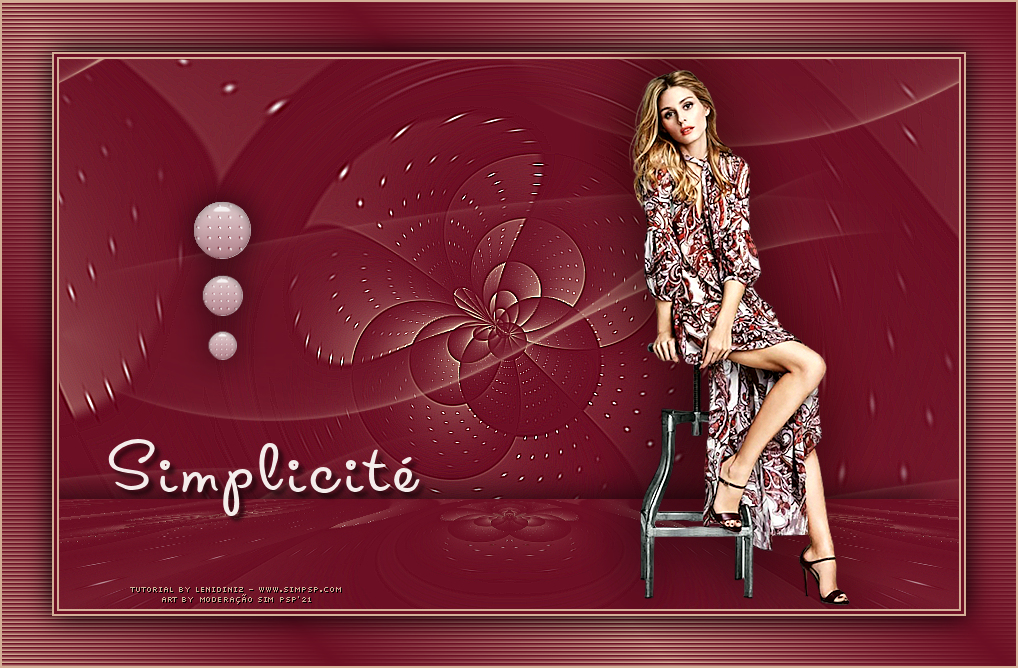
Decor_leni_simplicite.
Mask Narah_Mask_1158
Plugins
AP Lines
Flaming Pear
Mura's Meister
Colors:
#6d0f24 foreground
#d4ae97 background

TUTORIAL
01- Open the
material in PSP, duplicate and close the original.
Open a transparent image the 900x550.
Fill this image with the Linear gradient: Angle: 45 - Repeats: 4 - Invert: Marked, formed with the chosen colors: 
02- Adjust > Blur >
Gaussian Blur: 30.
Effects > Plugins > AP Lines > Line Silver
Lining: Dotty Grid

03- Effects > Texture
Effects > Blinds:
Color: #6d0f24 (foreground)

04- Effects > Texture
Effects > Blinds:
Color: #6d0f24 (foreground)
- Horizontal: Marcado

05- Effects > Plugins >
Flaming Pear > Flexity 2:

06- Effects > Edge Effects >
Enhance More.
Layers > Duplicate.
Close the visibility of the Copy of Raster 1 layer.
Activate the Raster 1 layer.
07- Layers > New Raster Layer.
Paint with color #d4ae97 (background).
Layers > New Mask Layer > From image:
Narah_Mask_1158
Layers > Merge > Merge Group.
Effects > Image >
Seamless Tiling: Default.
Activate the layer Copy of
Raster 1.
08- Effects > Plugins >
Mura's
Meister > Perspectiva Tiling:

09- Effects > Reflection
Effects > Rotating Mirror:

Effects > 3D Effects >
Drop Shadow: 0 > -30 > 80 > 50, color: #000000
10- Edit > Copy no decor_leni_simplicité.
Edit > Paste As New Layer.
Pick Tool tool, position: Position X: 134 Position Y: 142
11- Effects > 3D Effects >
drop Shadow: 0 > 0 > 80 > 50, color: #000000
12- Image > Add Border
> Symmetric:
2 px - color: #d4ae97 (background)
3 px - color: #6d0f24 (foreground)
2 px - color: #d4ae97 (background)
13- Edit > Copy
the Main Tube.
Edit > Paste as New
Layer
Image > Resize: if necessary.
Adjust > Shapness >
Sharpen.
Position to the right.
Effects > 3D Effects >
drop Shadow: your choice.
14- Selections > Select
All.
Image > Add Border >
Symmetrica: 50 px with any color.
Selections > Invert.
15- Paint the selection with the Linear gradient:
Angle: 45 - Repeats: 4 - Invert: Checked,
formed with the chosen colors:
Effects > Effect
Texture > Blinds:
Color: #6d0f24 (foreground)

16- Selections > Invert.
Effects > 3D Effects >
Drop Shadow: 0 > 0 > 100 > 40, color: #000000
Selections > Select
None
17- Edit > Copy
the titulo_leni_simplicité.
Edit > paste as new Layer.
Position of your choice.
Effects > 3D Effects > Drop
Shadow: 5 > 5 > 60 > 5, color: #000000
18- Image > Add Border
> Symmetric: 2 px #d4ae97 (background)
19- Apply your watermark or signature.
File > Export > JPEG Optimizer. 
CREDITS: Main Tube: tubed by Luz Cristina
Feel free to send your versions.
Send your version to the email address: familia.olgador@gmail.com
|