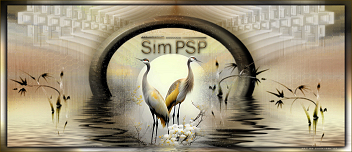
|


Tutorial By
LeniDiniz
English Translation by SIM-PSP moderation
Original Tutorial

Material
1 Main Tube of your choice
Misted Landscape of your choice.
decor_the_world_of_glamour_leni_1
decor_the_worldof_glamour_leni_2
titulo_the_world_of_glamour_leni
Mask creation.tine_masque032
Mask 1217491050_masques_nikita
Plugins
Factory Galery M
Mehdi
Len K landksiteofwonders
FM Tile Tools
Graphics Plus
AAA Filter
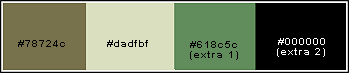
Cores
#78724c (Foreground)
#dadfbf (Background)
#618c5c (extra color 1)
#000000 (extra color 2)
TUTORIAL
01- Open the
material in PSP, duplicate and close the original.
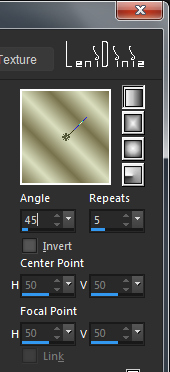
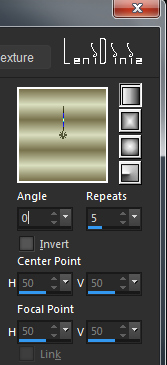
02- Form a Linear gradient: Angle: 45 - Repeats: 5 - Invert:
unchecked:
03- Open a new transparent image of 900x500.
Paint the transparent
image with the gradient.
Adjust > Blur > Gaussian Blur: 35

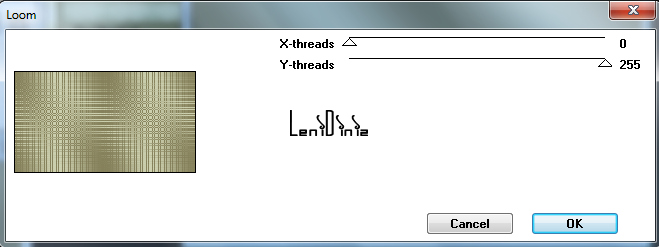
04- Effects > Plugins > Factory Gallery M > Loom:
Default
05- Form a Linear
gradient: Angle: 0 - Repeats: 5 - Invert: unchecked:
06- Layers > New Raster Layer
Paint this layer with the
gradient.
Effects > Image Effects > Seamless Tiling: default
Adjust > Blur > Gaussian Blur: 35
07- Effects > Plugins > Len K landksiteofwonders > Paris:
Default
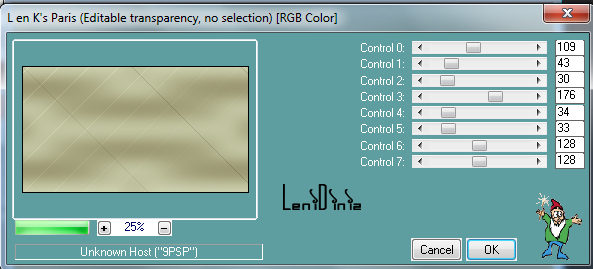
Repeat > Plugins > Len K landksiteofwonders
> Paris: Default...
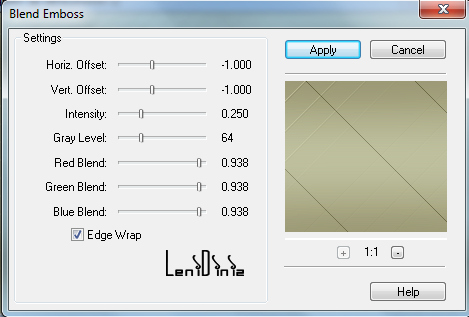
08- Effects > Plugins > FM Tile Tools > Blend Emboss:
Default
09- Layers > New Mask Layer > From: 1217491050_masques_nikita
Layers > Merge > Merge Group.
10- Layers > Properties> General > Blend Mode > Multiply:
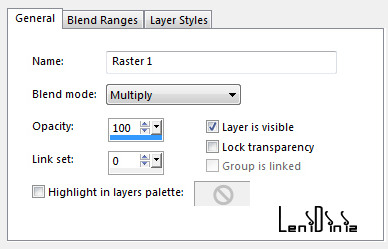
Note: Feel free to change the Blend Mode according to the colors you
are using.
11- Layers > New Raster Layer.
Paint with color #dadfbf (background)
Layers > New Mask Layer > From: creation.tine_masque032.
Layers > Merge > Merge Group.
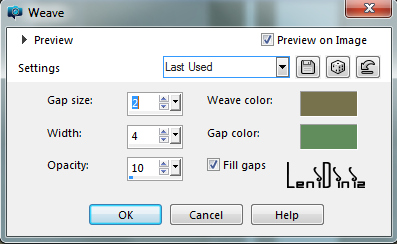
12- Effects > Texture Effects > Weave:
Weave color:
#78724c (Foreground)
Gap color:
#618c5c (extra color 1)
13- Effects > Plugins > Mehdi > Weaver:

14- Activate mask creation.tine_masque032.
Image > Rotate Right.
15- Back to work:
Layers > New Raster Layer.
Paint with color #dadfbf (background)
Layers > New Mask Layer > From: creation.tine_masque032.
Layers > Merge > Merge Group.
16- Effects > Texture Effects > Weave, print
Weave color:
#78724c (Foreground)
Gap color:
#618c5c (extra color 1)
17- Effects > Plugins > Mehdi > Weaver:
18- Edit > Copy the Misted Landscape.
Edit > Paste as New Layer.
Image > Resize: if necessary.
Adjust > Sharpness > Sharpen.
Position left at the top.
19- Edit > Copy Special > Copy Merged.
20- Image > Add Borders > Symmetric:
2 px - color: #000000 (cor extra 2)
2 px - color: #dadfbf (Background)
2 px - color: #000000 (cor extra 2)
21- Selections > Select All
Imagem > Add Border > Symmetric:
45 px with any color.
Selections > Invert.
22- Edit > Paste Into Selection.
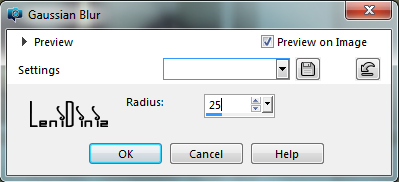
Adjust > Blur > Gaussian Blur > Radius: 25
Effects >
Plugins > Len K landksiteofwonders > Paris: Default
Repeat > Plugins > Len K landksiteofwonders
> Paris: Default...
23- Effects > Plugins > FM Tile Tools > Blend Emboss:
Default
24- Image > Mirror > Mirror Horizontal.
Effects >
Plugins > Graphics Plus > Cross Shadow: Default

25-
Selections > Invert.
Effects > 3D Effects > Drop Shadow:
0 > 0 > 100 > 40, color: #000000
Selections > Select None.
26- Effect > Plugins > AAA Filters > Custom > Landscapes:

27- Edit > Copy the decor_world_leni_1
With the Pick Tool tool, position: Position X 791 Position Y 61
28- Edit > Copy the titulo_the_world_of_glamour_leni
Position of your choice.
Effects > 3D Effects > Drop Shadow: 1 > 1 > 100 > 1, color:
#000000
29- Edit > Copy the Main Tube.
Image > Resize: if necessary.
Adjust > Sharpness > Sharpen.
Position of your choice.
Effects > 3D Effects > Drop Shadow: your choice.
30- Edit > Copy the decor_leni_2.
Edit > Paste as New Layer.
31- Image > Add Borders > Symmetric:
2 px - color: #000000.
32-
Apply your watermark or signature.
File > Export > JPEG Optimizer.

Feel free to send your versions.
I will be happy to publish them on our website.


|
Tutorial created by LeniDiniz, in May /
2021. Translated into English in August /
21, by the Moderation of SIM-PSP. It cannot
be copied, removed from its place,
translated or used in learning lists or
groups without the author's prior consent. |
|