|
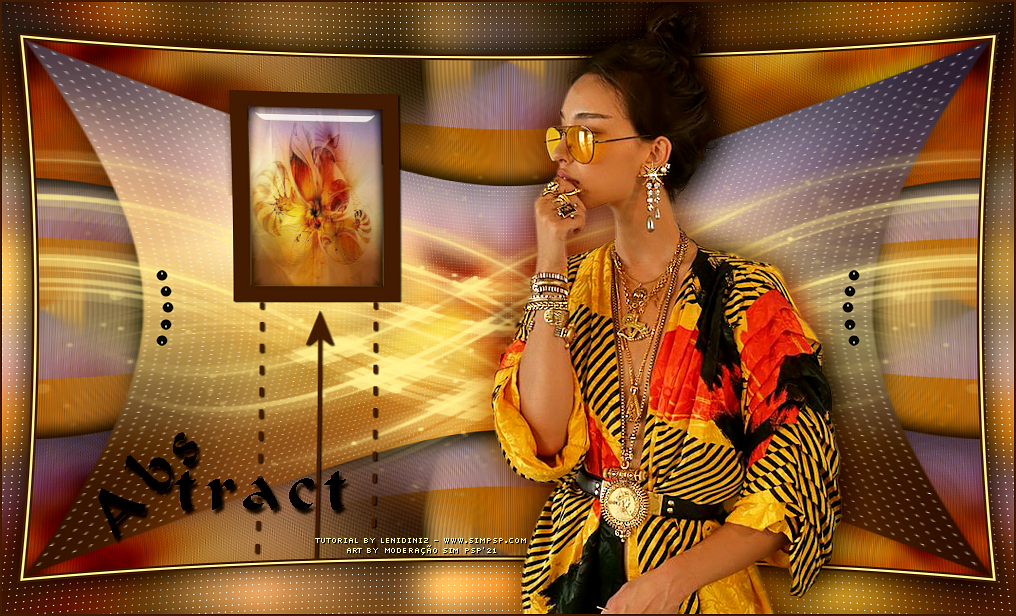

Tutorial By
LeniDiniz
English Translation by SIM-PSP moderation
Original Tutorial

|
IMPORTANT:
SIM PSP and its tutorial authors kindly ask that:
- Please keep the tutorial as it was originally written
and refrain from adding or including effects that are
not requested;
- The use of different images is allowed and even
encouraged; however, please do not alter the content of
the original tutorial;
- Please acknowledge and give proper credit to the
authors who write the tutorials, the translators, and
the creators of the materials used
Note:
This tutorial was written by Leni
Diniz.
Any resemblance to other tutorials is purely
coincidental.
Kind regards,
SIM PSP and Leni Diniz |
MATERIAL
1 Main Tube of your choice
1 graphic in jpg
Preset leni_abtract*
*Double click to
import to Eye Candy 5 - Impact plugin
PLUGINS
Carolaine and Sensibility
Graphic Plus
Eyes Candy 5
AAA Filter.
COLORS
#47250b (Foreground)
#faed9e (Background)

Open the material in PSP, duplicate and close the original.
Choose two colors to work with.
Choose a graphic or abstract jpg image that you like.
Feel free to change the Blend Mode according to the colors you are
using.
Double click on the leni_abstract preset to import this effect into
the plugin.
TUTORIAL
1- Activate the chosen graphic image.
Edit > Copy.
2- Open a transparent image of 900x500.
Selections > Select All.
Edit > Paste Into Selection.
Adjust > Blur > Gaussian Blur:15

3- Selections > Select None.
Layers > Duplicate.
Edit > Repeat Duplicate
layer.
Close the visibility of the Copy Raster 1 and Copy (2) Raster 1
layers.
Activate the Raster 1 layer.
4- Effects > Texture Effects > Blinds:
Color: Foreground #47250b

5- Effects > Distortion Effects > Lens Distortion:
Edge Mode: Wrap

Edit > Repeat Lens Distortion.
6- Effects > Image Effects > Seamless Tiling: default

7- Activate and open the visibility of the Copy Raster 1
layer.
Effects > Plugins > Carolaine and Sensibility > CS-DLine:

8- Effects > Distortion Effects > Lens Distortion:
Edge Mode: transparent

Edit > Repeat Lens
Distortion.
9- Effects > 3D Effects > Drop Shadow: 0 > 0 > 100 > 30,
color #000000
Layers > Properties >
General > Blend Mode: Multiply

10- Effects > Image Effects > Seamless Tiling: Default
11- Activate and open the visibility of the layer Copy (2) Raster 1.
Effects > Plugins > Carolaine and Sensibility > CS-LDots:

12- Effects > Distortion Effects > Lens Distortion:
Edge Mode: transparent
Edit > Repeat Lens Distortion.
13- Effects > 3D Effects > Drop Shadow: 0 > 0 > 40 > 30,
color #000000
14- Layers > New Raster Layer,
Paint with the background color #faed9e.
15- Layers > New Mask Layer > From Image: Narah_mask_0651
Layers > Merge > Merge Group.
16- Layers > Duplicate.
Image > Mirror > Mirror Horizontal.
Layers > Merge > Merge Down.
17- Edit > Copy no decor_leni_astract
Edit > Paste as New Layer.
Configure the *Foreground
with the color #47250b and the Backgorund with the color #FFFFFF

*Replace the
foreground color with the color chosen by you.
Activate the Color
Replacer Tool
 and configure as indicated:

and click Replace all pixels to colorize the decor_leni_astract
layer:

18- With the Pick Tool Tool, position: Position
X 168 - Position Y 29.
19- Com a ferramenta Magic Wand Tool > Mode: Add (Shift) - tolerance
> 0 feather > 0,

select the inner part:

Layers > New Raster Layer.
Edit > Copy on the jpg graphic being used.
Edit > Paste Into
Selection.
20- Effects > Plugins > Eyes Candy 5 > Glass: leni_abstract

or do by the settings:

21- Selections > Selection None.
Layers > Merge > Merge Down.
Effects > 3D Effects > Drop Shadow: 1 > 1 > 100 > 2, color #000000
22- Image > Add Borders > Symmetric:
2 px - color: foreground
2 px - color: background
2 px - color: foreground
Edit > Copy.
23- Selections > Select All.
Image > Add Borders > Symmetric: 50 px with any color.
Selections > Invert.
Edit > Paste Into Selection.
24- Adjust > Blur > Gaussian Blur:15
25- Effects >
Plugins > Carolaine and Sensibility > CS-LDots:
26- Selections > Invert.
Effects > 3D Effects > Drop Shadow: 0 > 0 > 100 > 40, color #000000
Selections > Invert.
27- Effects > Plugins > Graphic Plus > Cross Shadow:

28- Selections > Selection None.
Adjust > Barrel
Distortion Correction:

29- Edit > Copy leni_decor_08
Edit > Paste as New Layer.
30- Edit > Copy Main Tube.
Edit > Paste as New Layer.
Image > Resize: if necessary.
Adjust > Sharpness > Sharpen.
Position to the right.
Effects > 3D Effects > Drop Shadow: your choice.
31- Edit > Copy no titulo_Abstract_byLeni
Position your choice.
Effects > 3D Effects > Drop Shadow: 4 > 3 > 80 > 4, color #000000
32- Image > Add Borders > Symmetric: 2 px - color: foreground.
33- Effects > Plugins > AAA Filter > Custom > Landscape:

34-
Apply your watermark or signature.
File > Export > JPEG Optimizer.

Images Graphics taken from the
Pinterest site
Mask by Narah
Feel free to send your versions.
I will be happy to publish them on our website.
Send your version to the email address:
familia.olgador@gmail.com

|
Tutorial created by LeniDiniz, in June /
2021.
Translated into English in August /
21, by the Moderation of SIM-PSP.
It cannot
be copied, removed from its place,
translated or used in learning lists or
groups without the author's prior consent. |
|
|