 Tutorial by Inácia Neves English Translation by Moderation SIM-PSP Original Tutorial
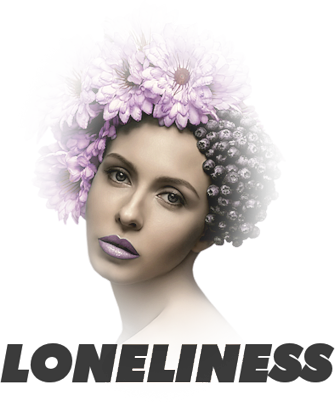
MATERIAIS 1 Main Tube of your choice 1 Misted Landscape of your choice TexitureGabry (Save in PSP Textures folder) WordArt loneliness_titulo_inacia
Plugins: FM Tile Tools > Blend Emboss AAA Frames > Foto Frame Corel2020 PSP Effects
TUTORIAL
1- Open the material on the PSP,
duplicate and close the original. Foreground: #fff796 (light color) Background: #682f6b (dark color)
2- Open a new transparent image of 1000 x 600 px. Form a Gradient Style: Linear > Angle: 0 > Repeats: 0 > Invert: unchecked. Paint the transparency with the gradient. Layers > New Raster Layer. Selections > Select All.
3- Activate landscape misted. Edit > Copy. Activate the work. Edit > Paste Into Selection. Selections > Select None. Effects > Image Effects > Seamless Tiling: Default
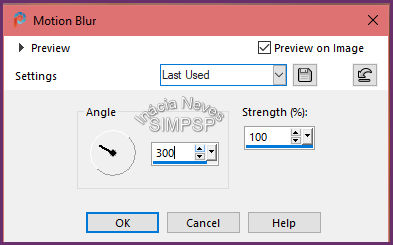
4- Adjust > Blur > Motion Blur:
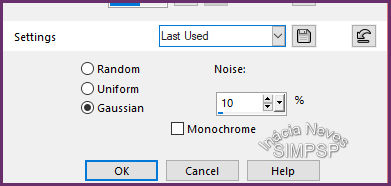
Edit > Repeat Montion Blur. Adjust > Add/Remove Noise > Add Noise
Effects > Plugins > FM Tile Tools > Blend Emboss in the configuration you open.
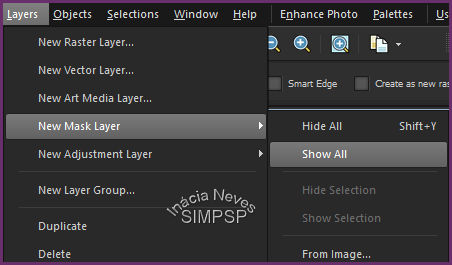
5- Layers > Duplicate. Layers > New Mask Layer > Show All
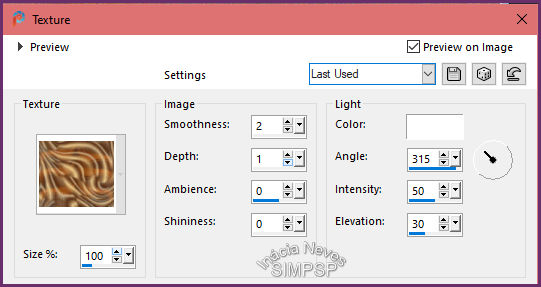
Effects > Texture Effects > Texture: Texture: TexitureGabry
Image > Negative Image. Layers > Merge > Merge Group. Effects > Edge Effects > Enhance. Effects > Plugin > FM Tile Tools > Blend Emboss.
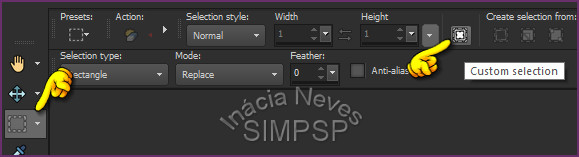
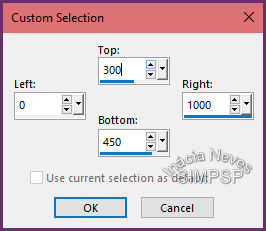
6- Layers > New Raster Layer. Selection tool > Custon Selection.
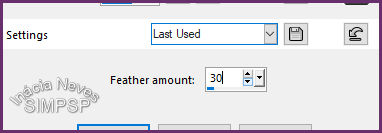
Selections > Modify > Feather:
Activate landscape misted. Edit > Copy. Activate the work. Edit > Paste Into Selection. Selections > Select None. Layers > Duplicate. Layers > Merge > Merge Down.
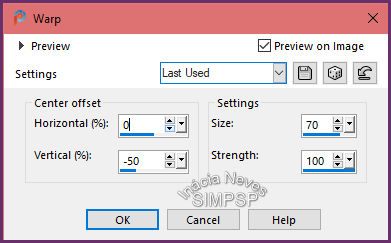
7- Effects > Distortion Effects > Warp:
Layers > Duplicate. Image > Mirror > Mirror Vertical. Layers > Merge > Merge Down.
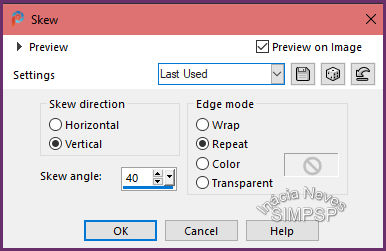
8- Effects > Geometric Effects > Skew:
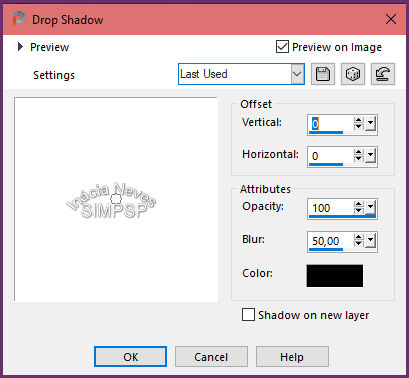
Layers > Duplicate. Image > Mirror > Mirror Vertical. Layers > Merge > Merge Down. Effects > 3D Effects > Drop Shadow:
Adjust > Sharpness > Sharpen More.
9- Activate Landscape Misted. Edit > Copy. Activate the work. Edit > Paste As New Layer. With the Pick Tool, position the Misted Landscape of your choice. Adjust > Sharpness > Sharpen More. Layers > Arrange > Move Down.
10- Activate Main Tube. Edit > Copy. Activate the work. Edit > Paste as New Layer. Image > Resize: if necessary. Adjust > Sharpness > Sharpen.
11- This step is optional, it's up to you to apply it or not: Duplicate the Main Tube layer. With Layer Copy of Raster 5 active: Layers > Properties > General > Blend Mode: Multiply > Opacity: 50% Layers > Merge > Merge Down
12- Effects > 3D Effects > Drop Shadow of your choice.
13- Activate WordArt loneliness_titulo_inacia Edit > Copy. Activate the work. Edit > Paste As New Layer. Image > Resize: of your choice. Position and apply effects of your choice. I changed the Blend Mode to Luminance (L) Layers > Merge > Merge All. 14- Create the Borders: - Image > Add Borders > 2 px > Symmetric > Color: #682f6b (dark color) - Image > Add Borders > 2 px > Symmetric > Color:#fff796 (light color) - Image > Add Borders > 2 px > Symmetric > Color: #682f6b (dark color) Edit > Copy. Selections > Select All 15- Image > Add Borders > 50 px > Symmetric: any color. Selections > Invert. Edit > Paste Into Selection. 16- Adjust > Blur > Motion Blur:
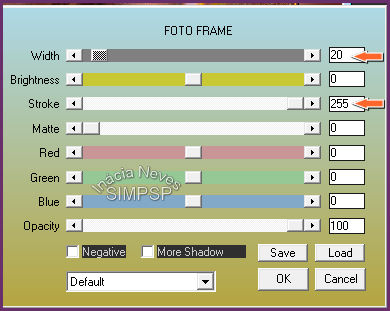
Edit > Repeat Montion Blur. Effects > Plugin > AAA Frames > Foto Frame
Selections > Invert. Effects > 3D Effects > Drop Shadow > 0/0/100/50 > Color: #000000 (Balck) Selections > Select None. Image > Add Borders > 1 px > Symmetric > Cor: #000000 (Black)
17- If you wish, resize your work.
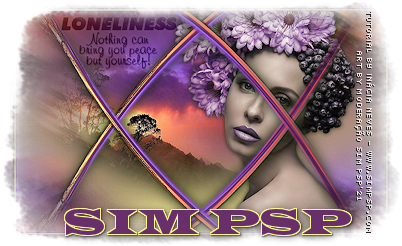
CREDITS: WordArt: loneliness_titulo_inacia Feel free to send your versions. I will be happy to publish them on our website.   
|