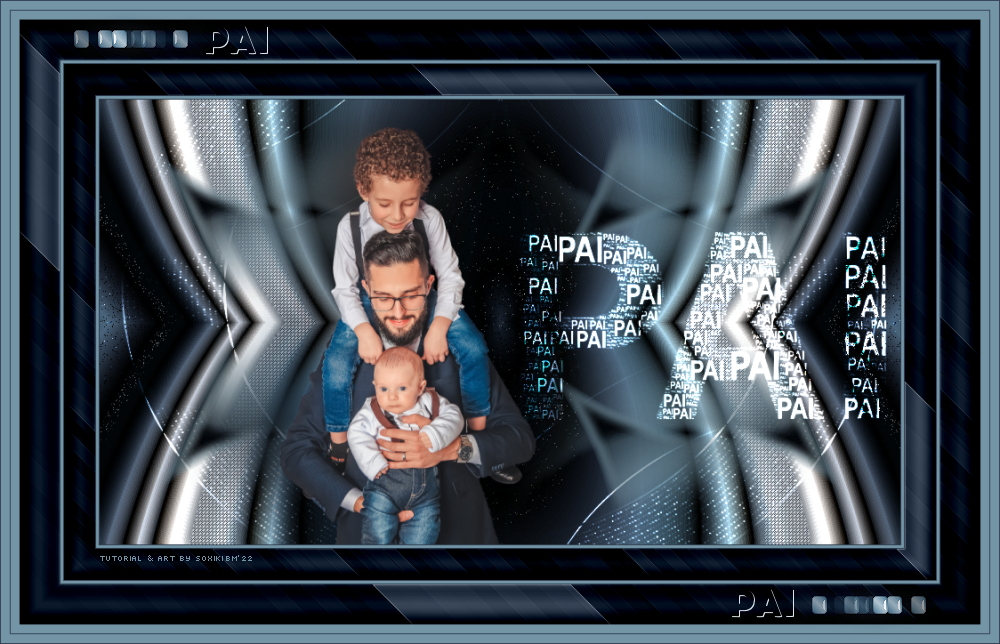
|
TRADUÇÕES:
Obrigada aos nossos tradutores!
MATERIAL 1 Tube ou Misted Pai à sua escolha AlphaChannel_PaiBySoxikibem TituloPaiBySoxikibem DecorPaiBySoxikibem NarahsMasks_1711
PLUGINS Andrew's Filters 43 > Crayon U Like Flaming Pear > Flexify 2 Unlimited 2.0 > Bkg Kaleidoscope Mehdi > Wavy Lav 1.1
NOTA: Fique à vontade para alterar os Blends e
Opacidade de acordo com o material Lembre-se de retirar a Marca d'agua do material usado para colocar em seu trabalho.
Execução
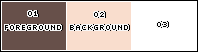
1 - Abrir o material no PSP, duplique e feche o original. Escolher 3 cores para trabalhar. Foreground: #67504a Background: #f9ddcd Cor 3: #ffffff
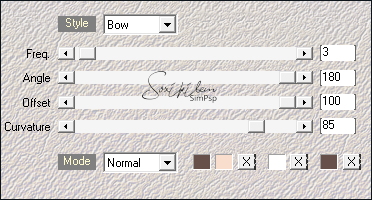
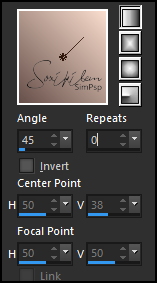
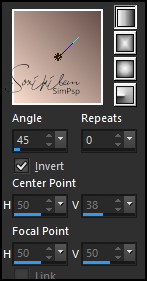
2 - Abra o AlphaChannel_PaiBySoxikibem. Effects > Plugins > Mehdi > Wavy Lav 1.1: Seqüência das cores: 1, 2, 3, 1.
3 - Effects > Texture Effects > Sandstone: Color: cor do Foreground.
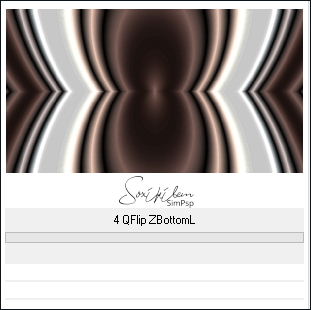
4 - Effects > Plugins > Filter Unlimited 2.0 > Bkg Kaleidoscope > 4Q Flip ZBBottomL:
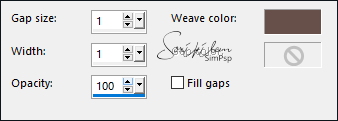
5 - Selections > Load/Save Selections > Load Selection from Alpha Channel: Selection #1. Effects > Texture Effects > Weave: Color: cor do Foreground.
6 - Effects > 3D Effects > Drop Shadow: 0, 0, 100, 15, Color: cor do Foreground. Selections > Select None.
7 - Selections > Load/Save Selections > Load Selection from Alpha Cannel: Selection #2. Adjust > Add/Remove Noise > Add Noise: Random - Noise: 15 - Monochrome marcado.
8 - Selections > Promote Selection to Layer. Selections > Select None.
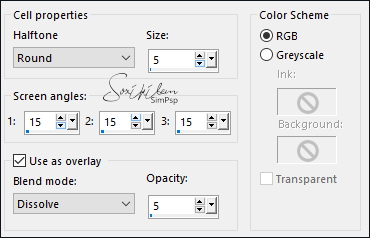
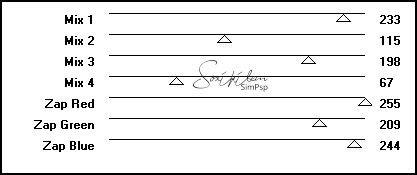
9 - Ativar a Layer Raster 1. Selections > Load/Save Selections > Load Selection from Alpha Cannel: Selection #4. Effects > Artistic Effects > Halftone:
Seletions > Select None.
10 - Ainda com Layer Raster 1 ativada... Selections > Load/Save Selections > Load Selection from Alpha Cannel: Selection #3. Effects > Artistic Effects > Halftone:
* Se estiver usando uma cor muito escura no Foreground este efeito não vai fazer diferença. Então eu sugiro usar Adjust > Add/Remove Noise > Add Noise: Random, Noise 3, Monochrome marcado. Apliquei este feito na segunda versão.
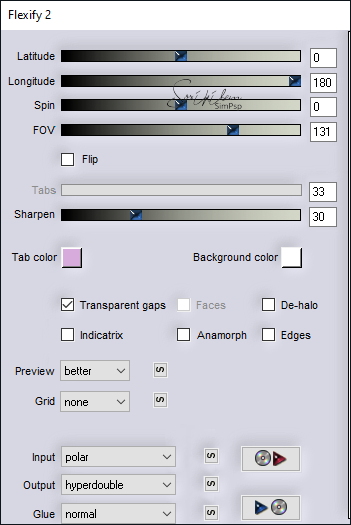
11 - Selections > Promote Selection to Layer. Selections > Select None. Effects > Plugins > Flaming Pear > Flexify 2:
12 - Selections > Load/Save Selections > Load Selection from Alpha Cannel: Selection #5. Pressionar a tecla Delete do teclado por 5 vezes. Selections > Select None.
13 - Effects > Image Effects > Seamless Tiling: Default. Effects > 3D Effects > Drop Shadow: 0, 0, 100, 0, Color: cor do Background. Layers > Duplicate. Layers > Properties > General > Blend Mode: Screen.
14 - Ativar a layer Raster 1. Layers > New Raster Layer. Pintar com a cor #ffffff (Branco). Layers > New Mask Layer > From Image: NarahsMasks_1711. Layers > Merge > Merge Group. Layers > Properties > General > Blend Mode: Dodge.
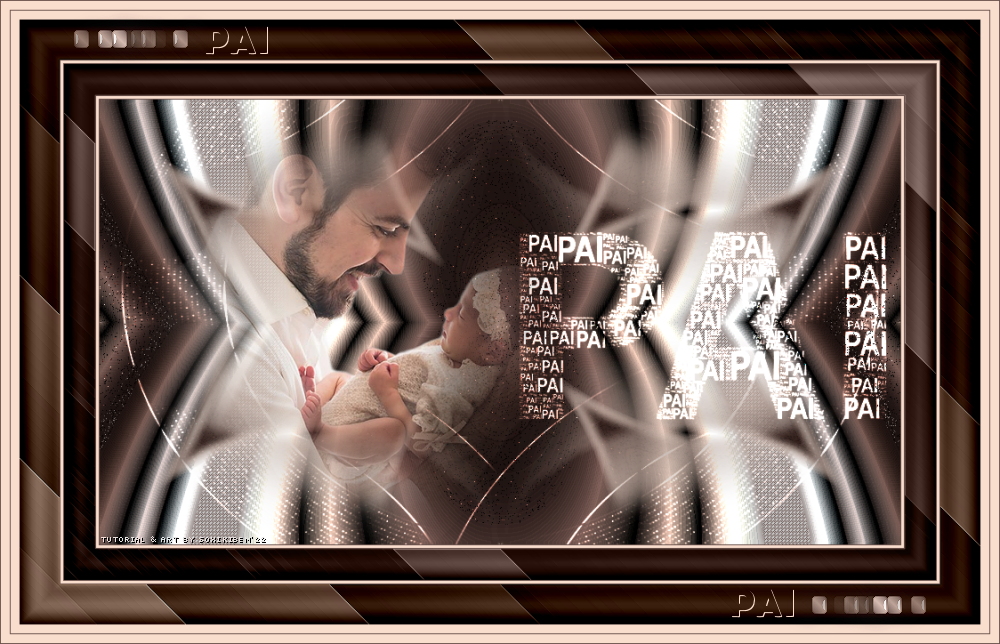
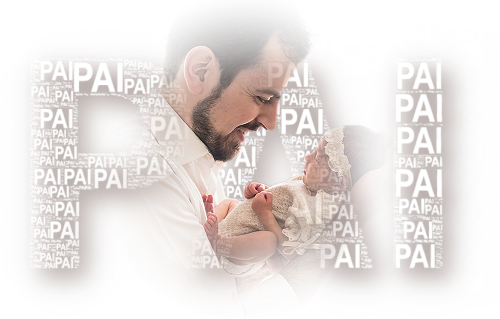
15 - Ativar a Layer do Topo. Edit > Copy no TituloPaiBySoxikibem. Edit > Paste as New Layer. Pick Tool: Position X 446, POsition Y 116. Layers > Properties > General > Blend Mode: Dodge.
16 - Edit > Copy no Tube Misted Pai. Edit > Paste as New Layer. Posicionar à esquerda do trabalho. * Se estiver usando um Tube, aplique Drop Shadow como preferir.
17 - Image > Add Borders > Symmetric: 1px - Color: cor do Foreground 3px - Color: cor do Background 1px - Color: cor do Foreground
18 - Selections > Select All. Image > Add Borders > Symmetric: 35 px - Color: cor do Foreground. Selections > Invert. Layers > New Raster Layer. Pintar esta seleção com um gradiente Linear, formado pelas cores do Foreground e Background:
19 - Effects > Plugins > Andrew's Filters 43 > Crayon U Like:
Layers > Properties > General > Blend Mode: Luminance (L). Effects > Edge Effects > Enhance.
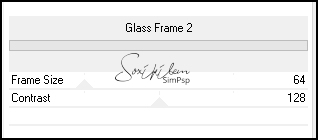
20 - Layers > Merge > Merge Down. Effects > Plugins > Filters Unlimited 2.0 > Buttons & Frames > Glass Frame 2:
Selections > Select None.
21 - Image > Add Borders > Symmetric: 1px - Color: cor do Foreground 3px - Color: cor do Background 1px - Color: cor do Foreground
22 - Selections > Select All. Image > Add Borders > Symmetric: 45 px - Color: cor do Background. Selections > Invert. Layers > New Raster Layer. Pintar esta seleção com um gradiente Linear, formado pelas cores do Foreground e Background > Invert marcado:
23 - Effects > Plugins > Andrew's Filters 43 > Crayon U Like:
Layers > Properties > General > Blend Mode: Luminance (L). Effects > Edge Effects > Enhance.
24 - Layers > Merge > Merge Down. Effects > Plugins > Filters Unlimited 2.0 > Buttons & Frames > Glass Frame 2:
Selections > Select None.
25 - Image > Add Borders > Symmetric: 10px - Color: cor do Background 1px - Color: cor do Foreground 10px - Color: cor do Background 1px - Color: cor do Foreground
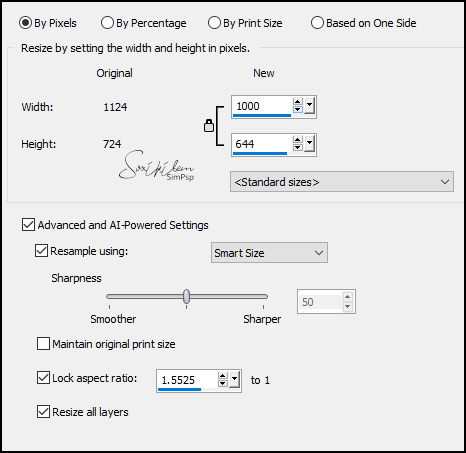
26 - Image > Resize > By Pixels > Width 1000 - Resize all layers marcado:
27 - Edit > Copy no DecorPaiBySoxikibem. Edit > Paste as New Layer.
28 - Aplicar sua marca d'água ou assinatura. File > Export > JPEG Optimizer.
CRÉDITOS: Versão 1 & 2: Tutorial & Art by Soxikibem Misted Pai by Pqna&Alice - Mask by Narah
Sinta-se à vontade para enviar suas versões. Terei todo o prazer em publicá-las em nosso site.
|